As you know, I took my team to the new luxury estate property in Oregon Wine Country for our last retreat in May, and as the first guests, we were blown away. Now, what you might not know is that it’s owned by one of my best friends (of 25 years), so I write today’s post with an extreme amount of pride, despite having nothing to do with the design. It’s something we’ve talked about since they closed on the property four years ago, and I’ve gone out to visit it many times to see the progress. So I’m extremely emotionally invested in The Carly (just not actually invested). The design of it is so incredible, and I just want to shout it from the rooftops – group retreats, corporate retreats, bachelorette trips, family reunions, weddings – it’s an incredibly luxurious place to stay with the most beautiful setting. Max Humphrey designed it alongside my friend (and the architect Beebe Skidmore), and the result is stunning. So today we are going to talk more design elements, point out what we love, how they broke rules, layered in ways that surprised us, and created a truly unpredictably homey and totally stylish vibe. If you like Soho House designs (not a member myself, but who doesn’t love the design?), then you’ll love The Carly.
It’s out in Carlton, Oregon, which is only an hour away from Portland (and the drive is generally gorgeous, not on a freeway). It has a large pond (for dipping and swimming) and a few outbuildings for fun, with a massive field for weddings or larger events.
The Fern Lodge
There are two main buildings for sleeping – the Fern Lodge and the Hummingbird Cottage. Pistils Landscape Design did the landscaping, and it’s pretty amazing. The Fern Lodge has five suites (sleeping 10), all with king beds with en suite bathrooms. It has a commercial-style kitchen that is still so cozy for pizza nights and a media room for movies/presentations.
I was blown away by all the hard finishes. Not a spec of drywall in sight. Every surface has paneling, tile, and/or trimwork, making the details so fun to soak in (we nerded out for hours looking at how and why they did everything).
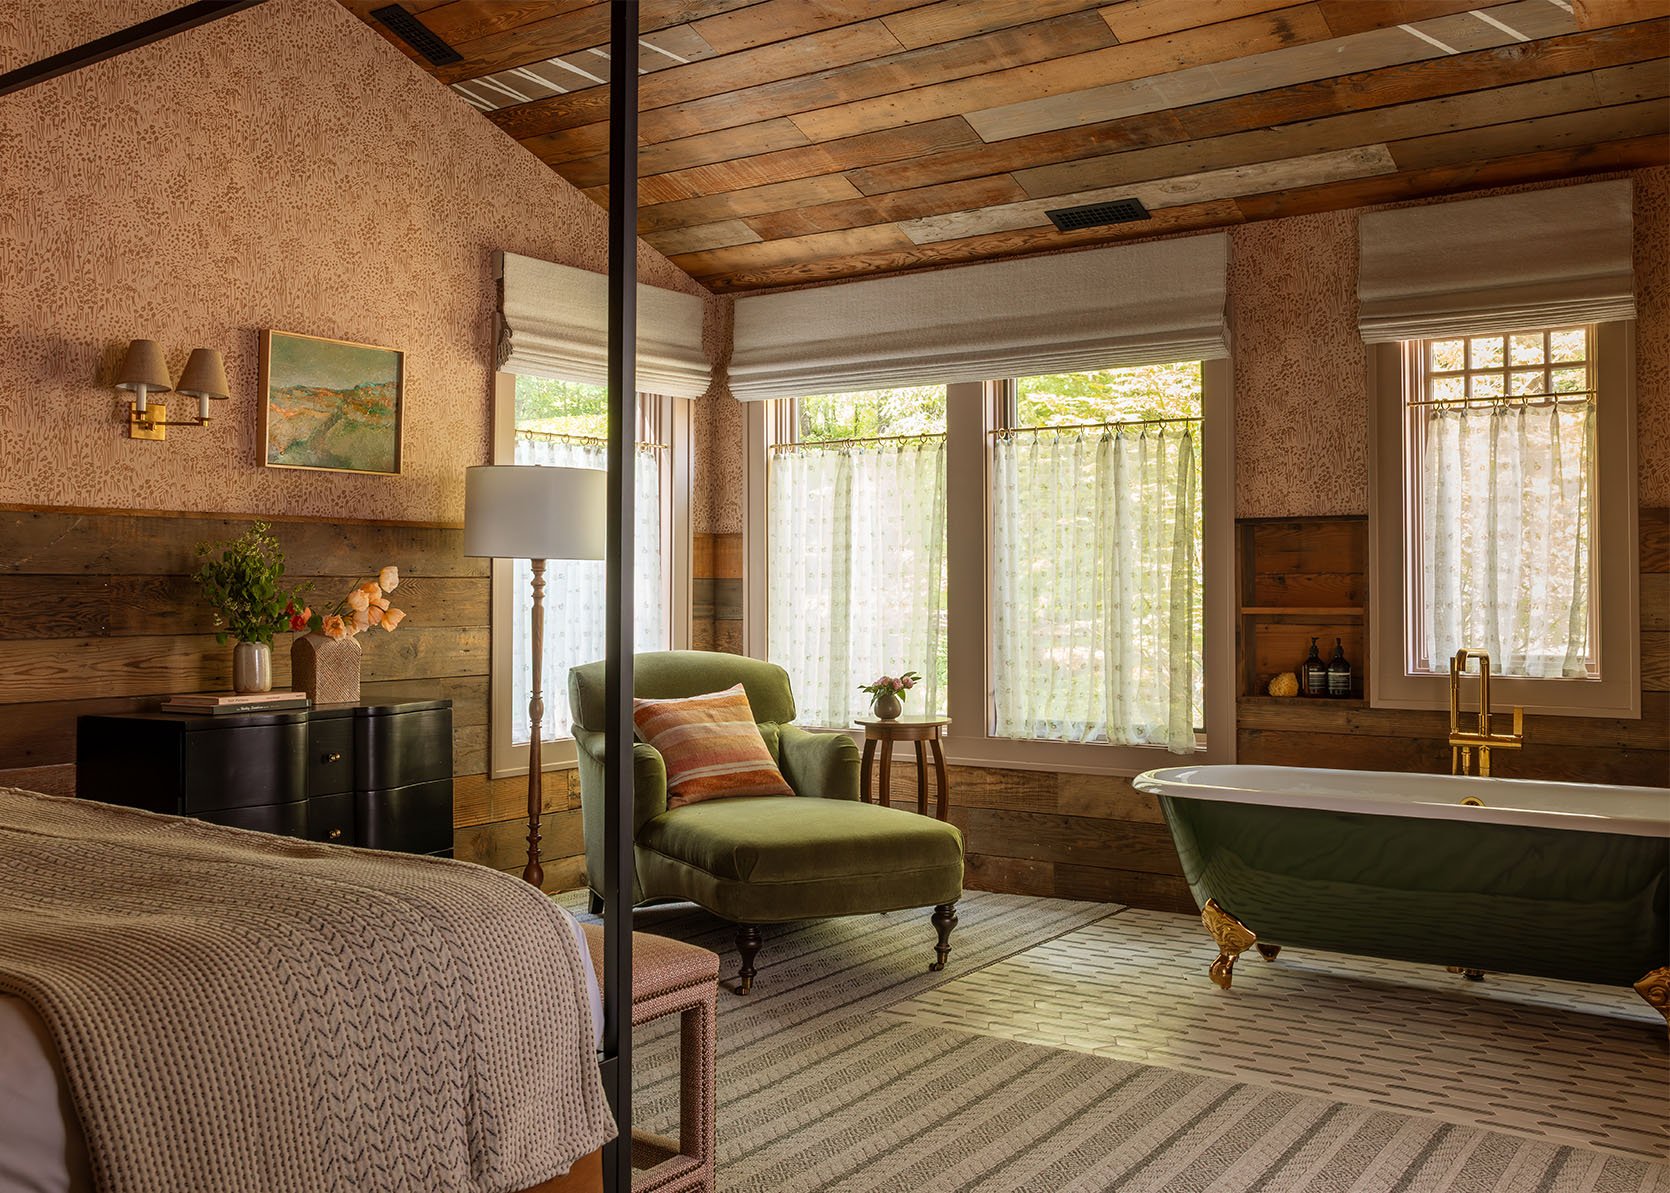
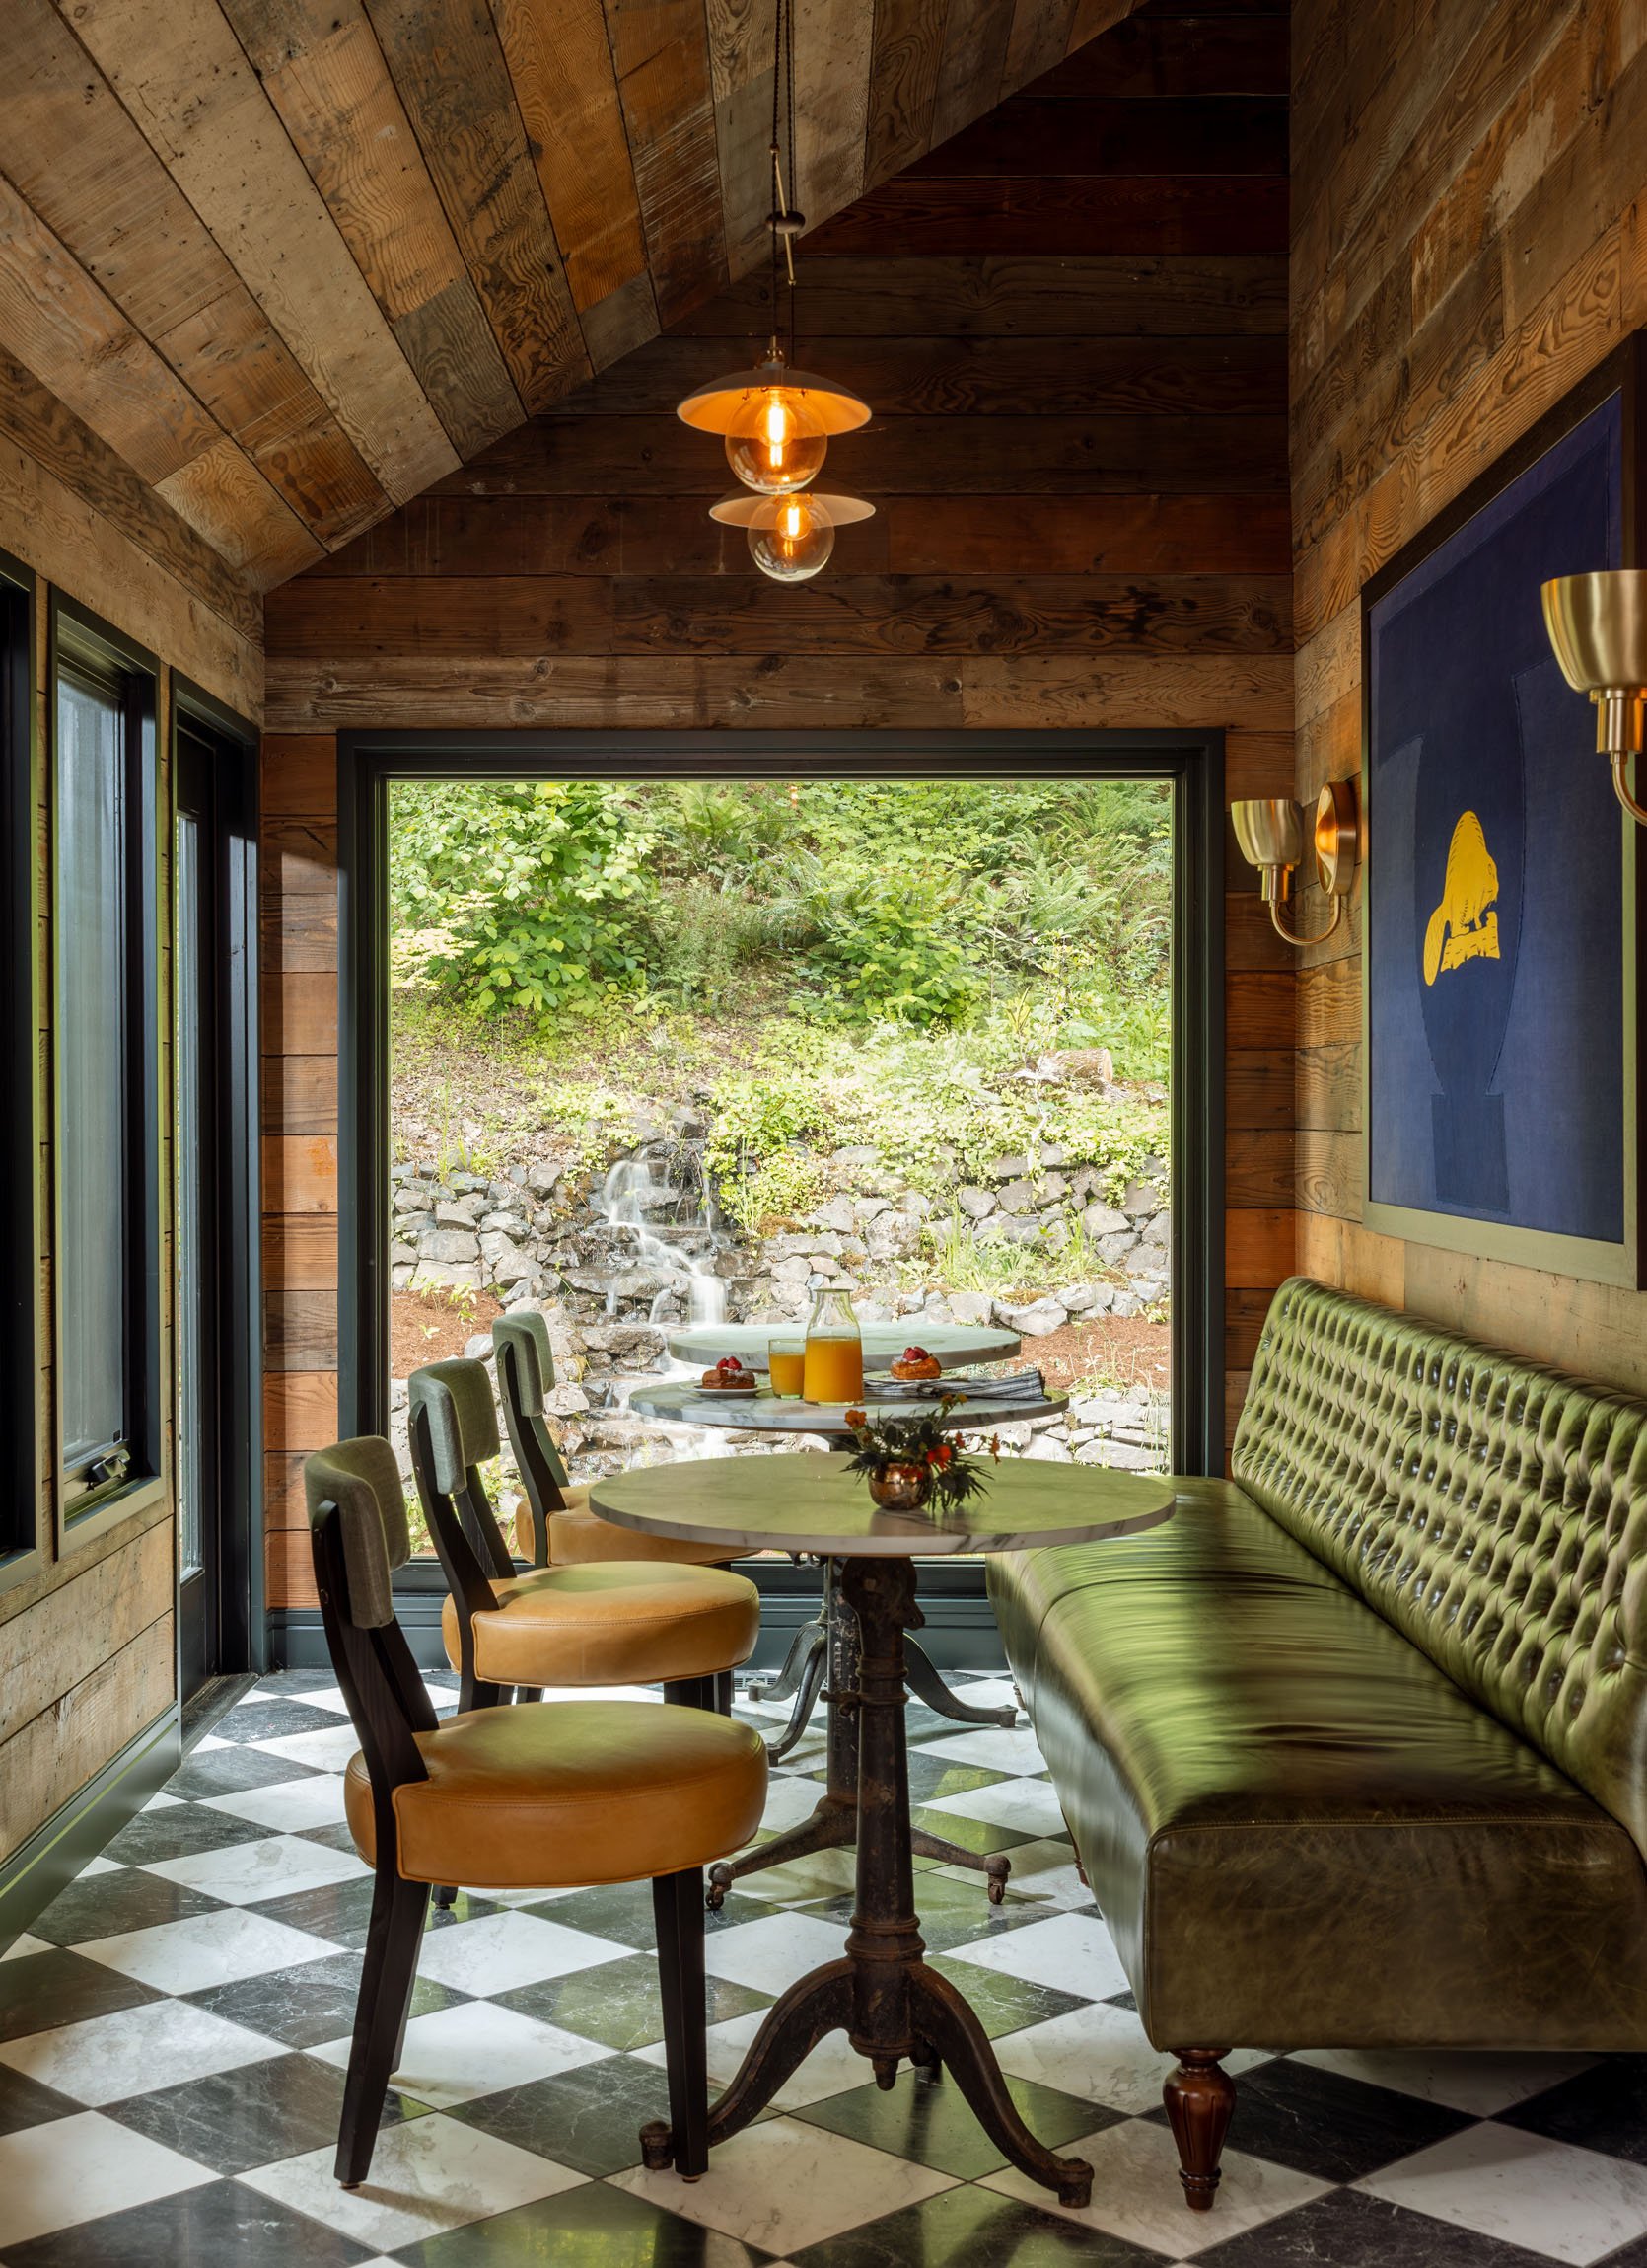
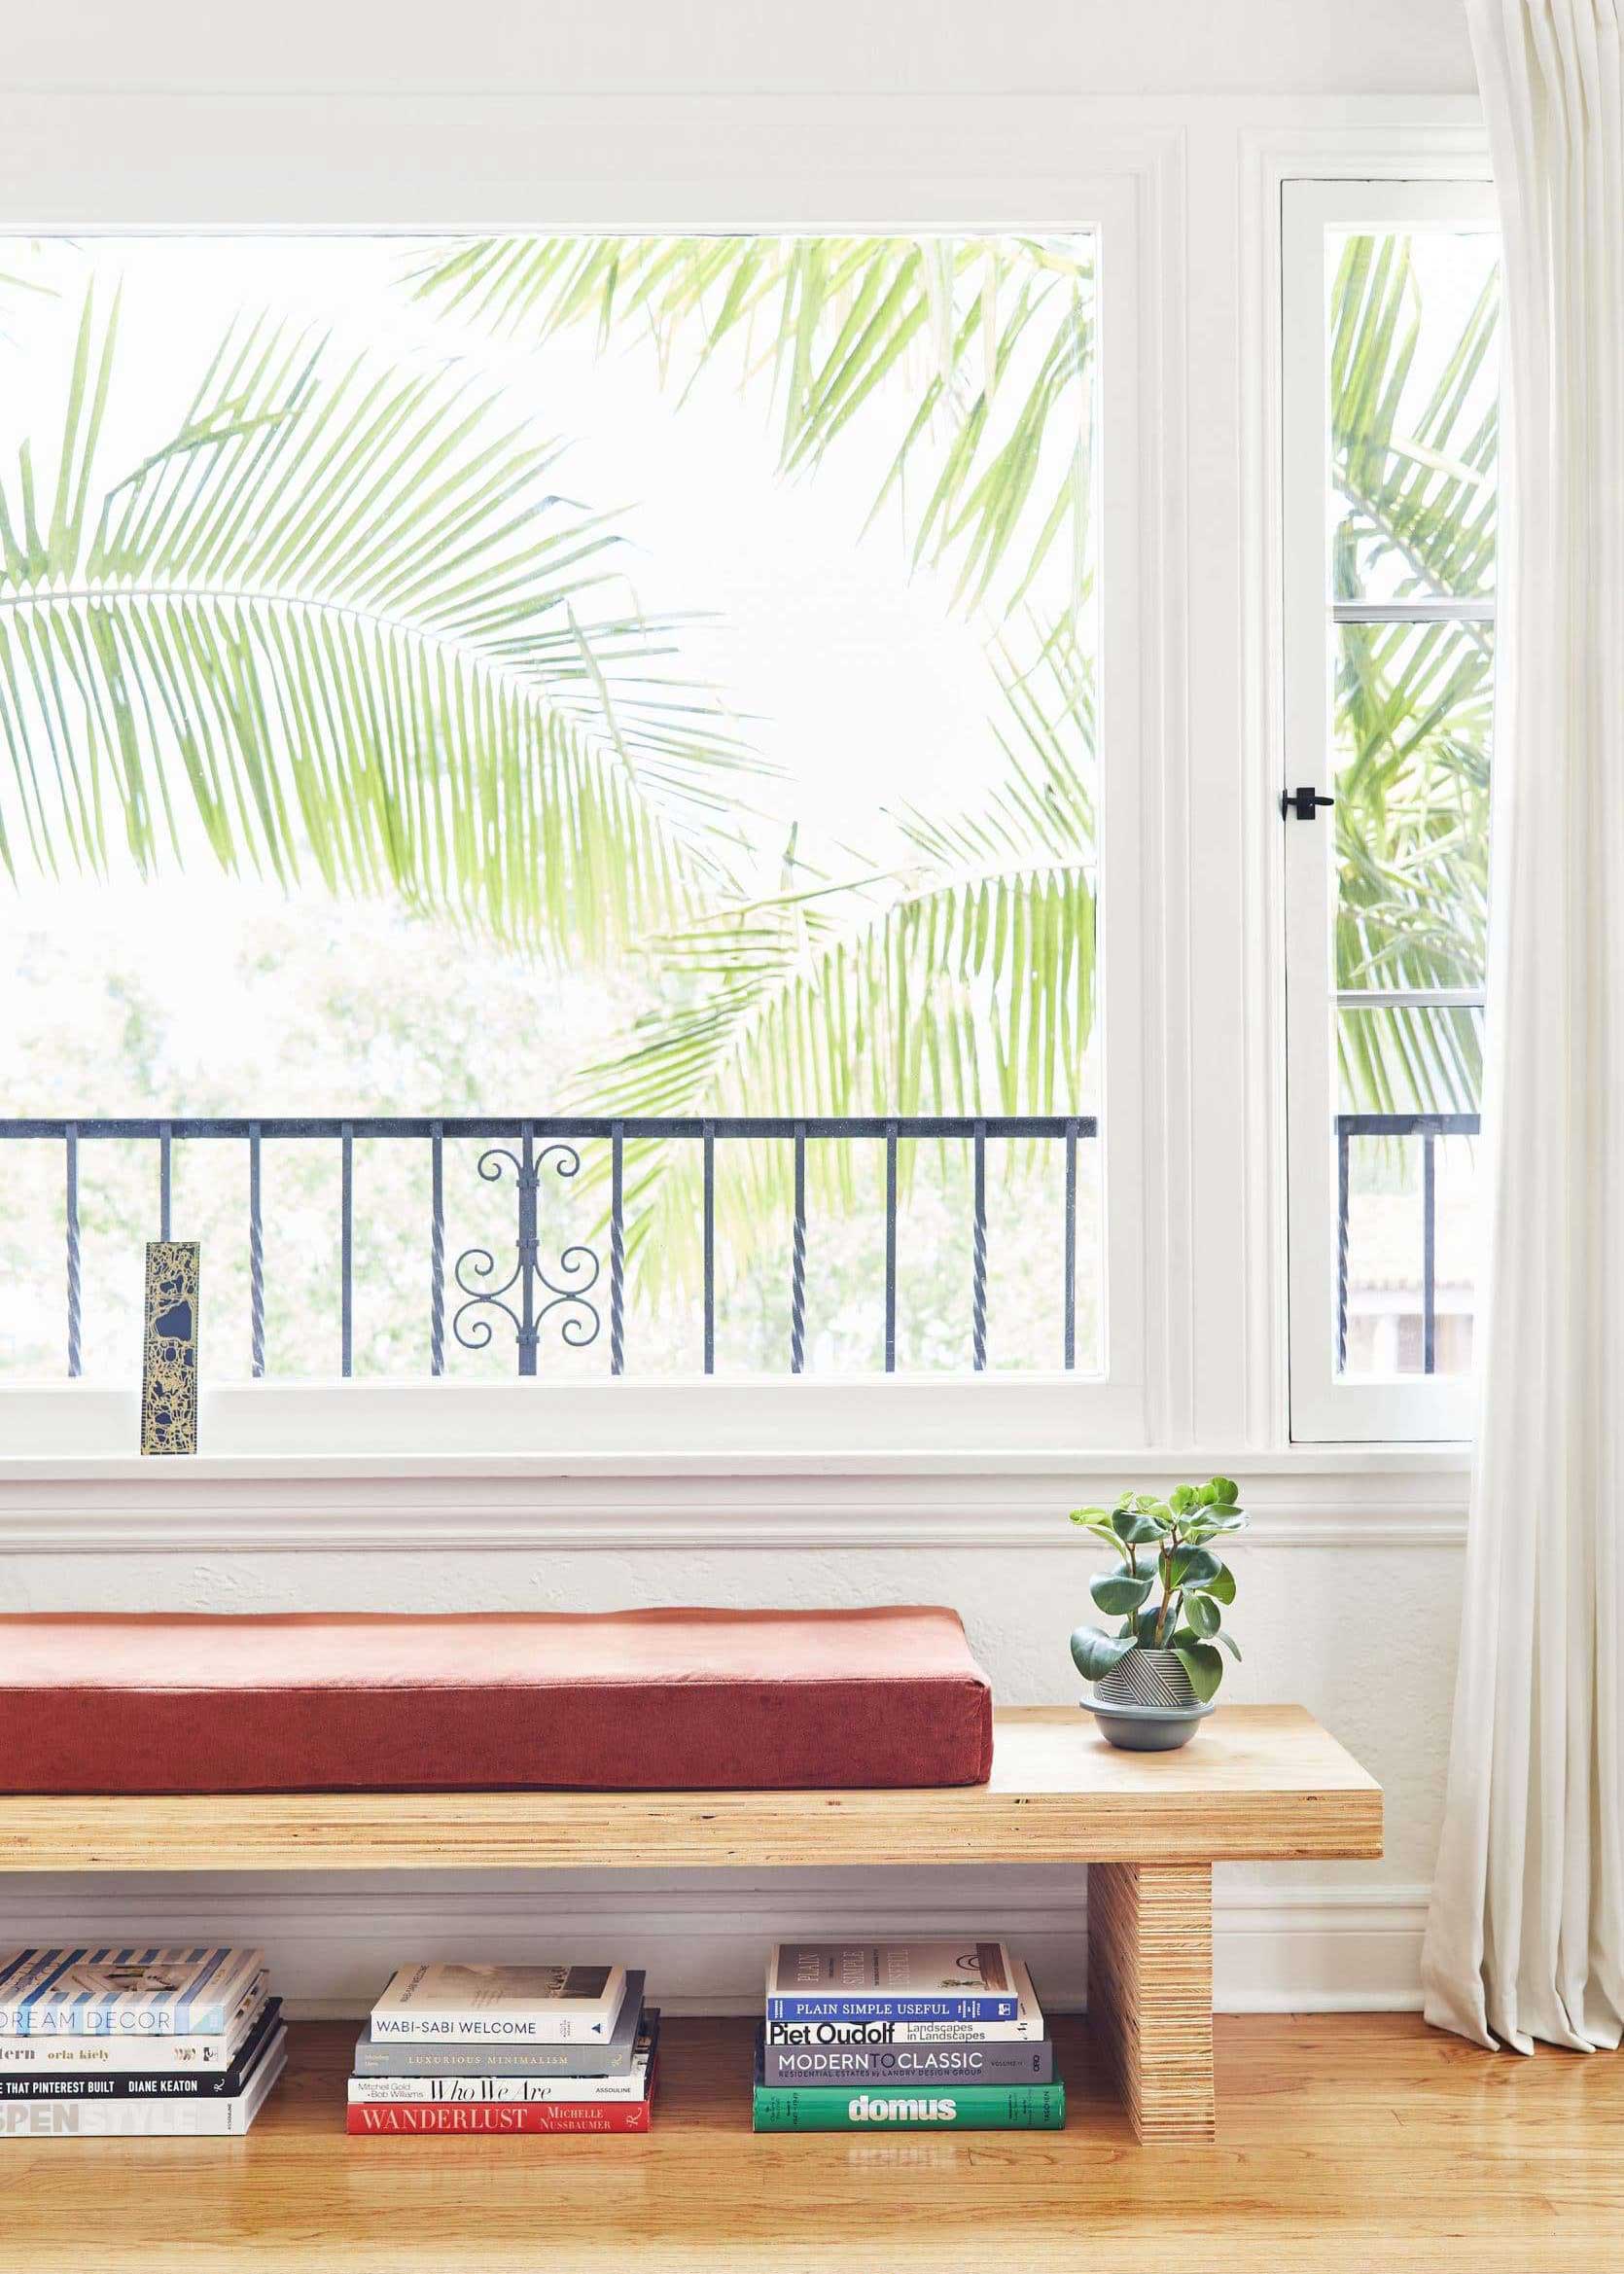
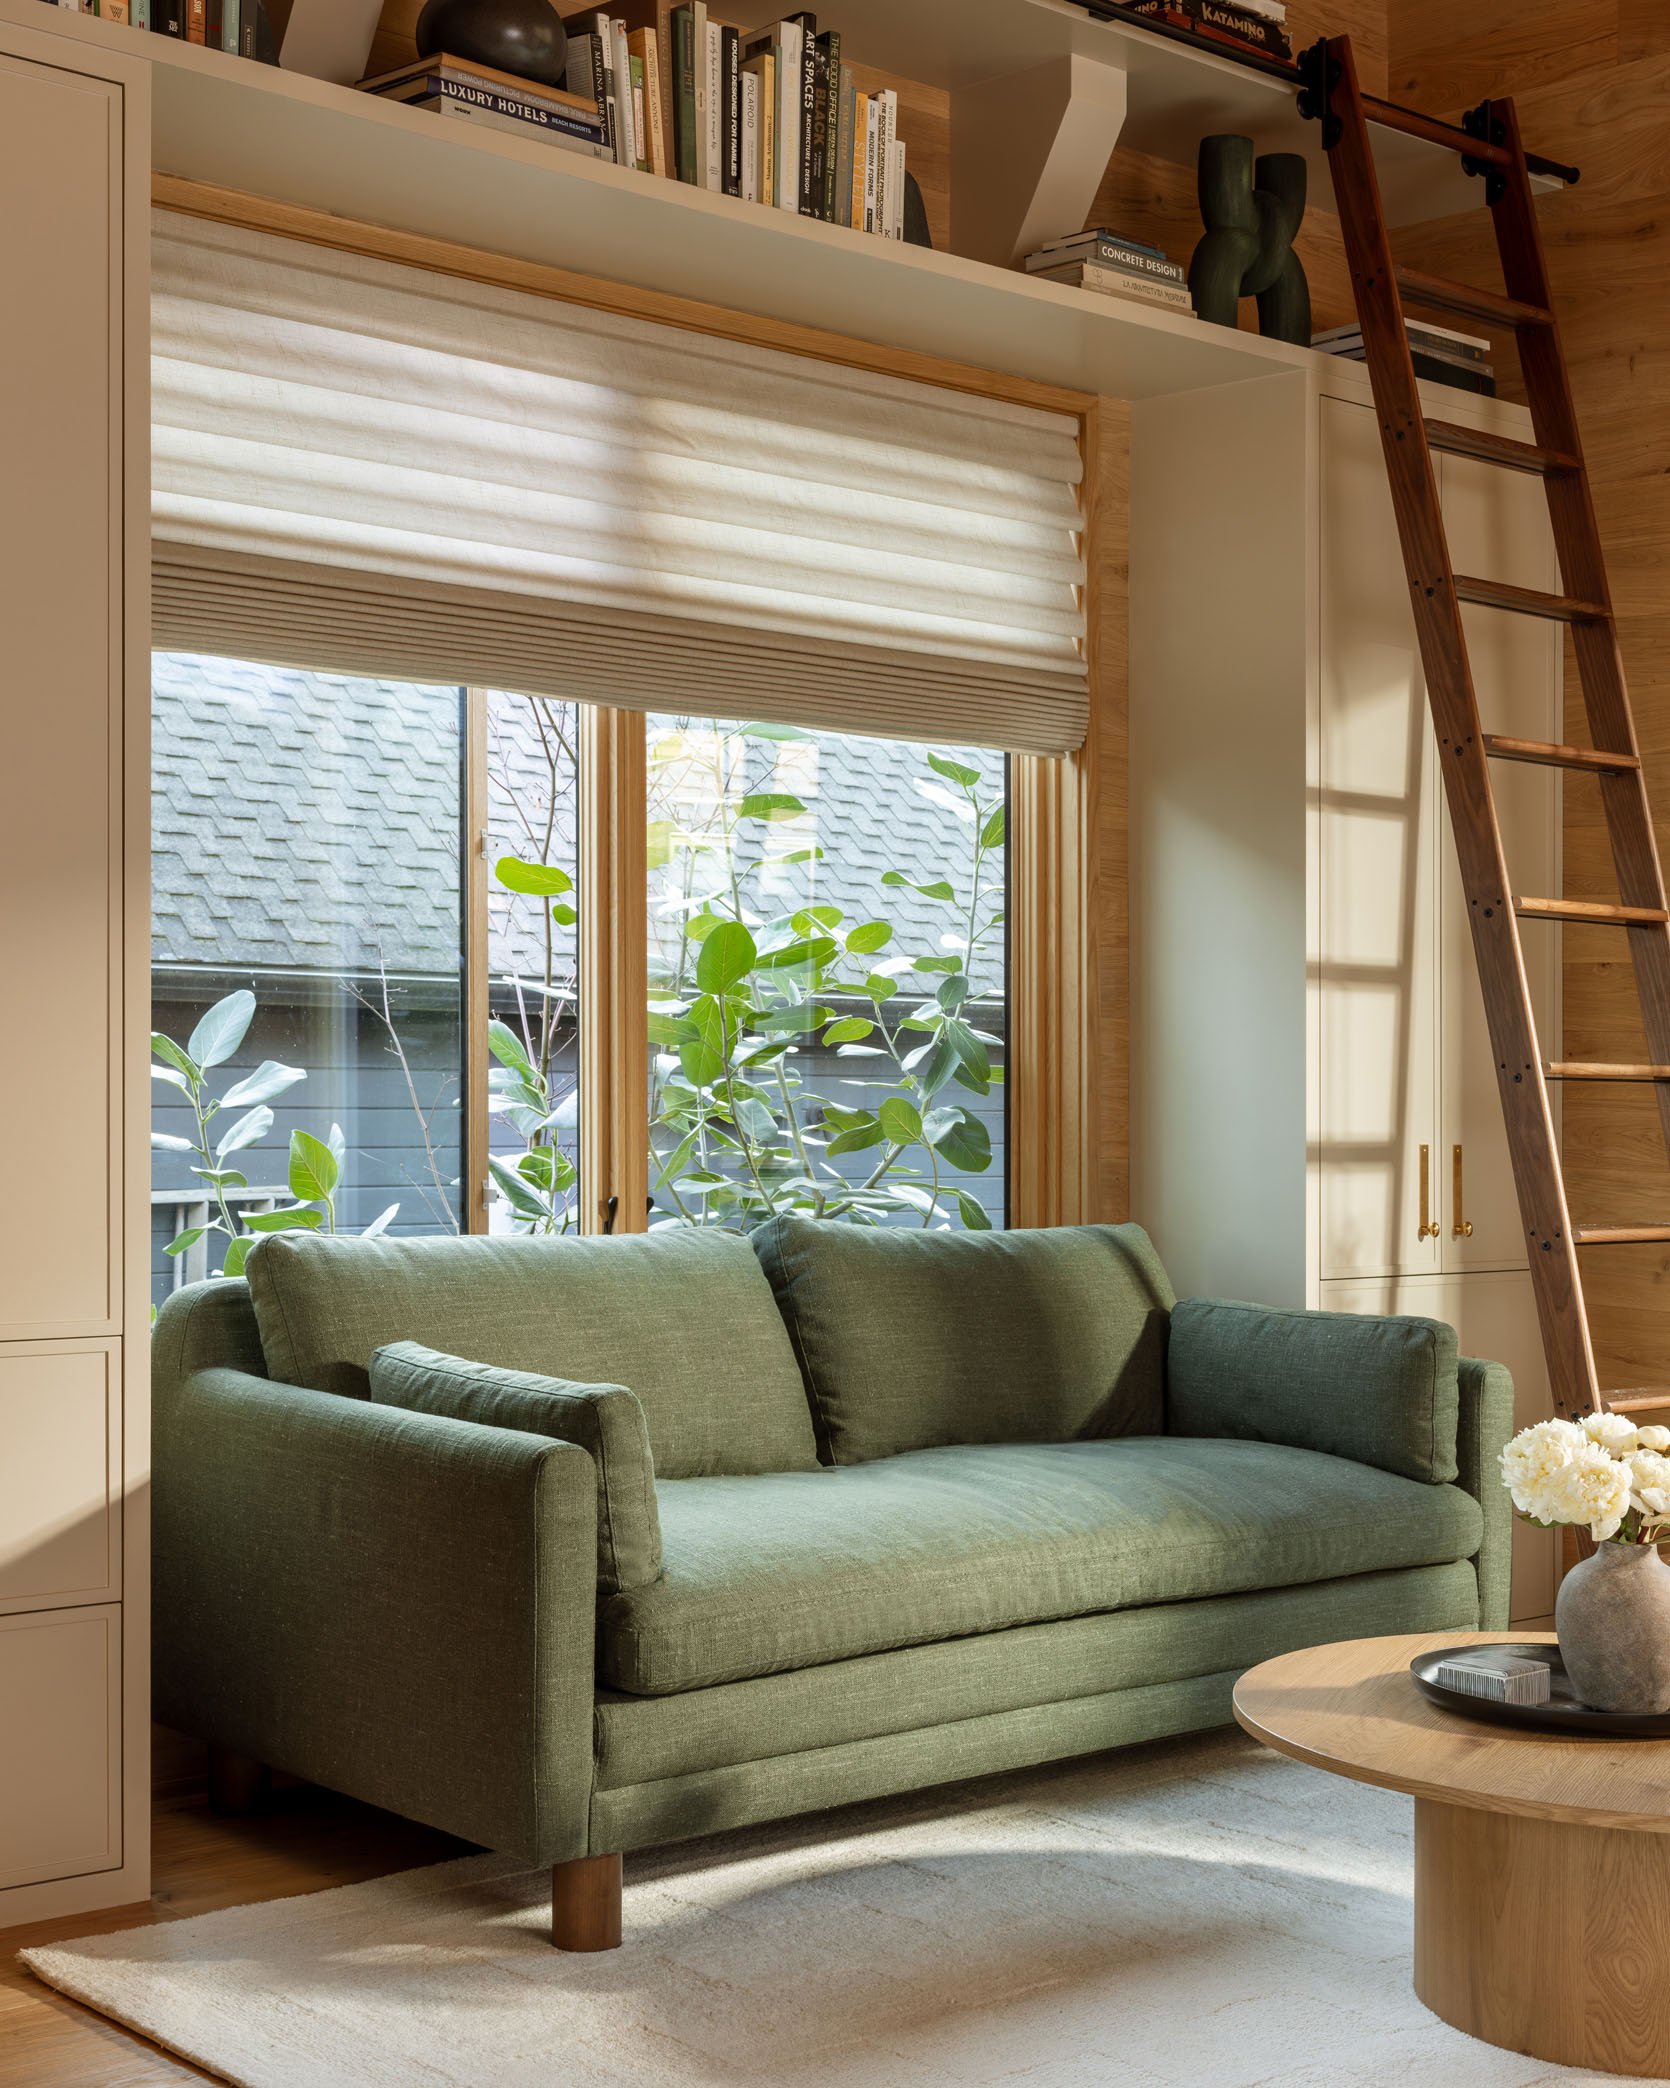
That is the entry – a massive window with smaller cozy vignettes, styled out like a home (but a home that a butler set up perfectly for you).
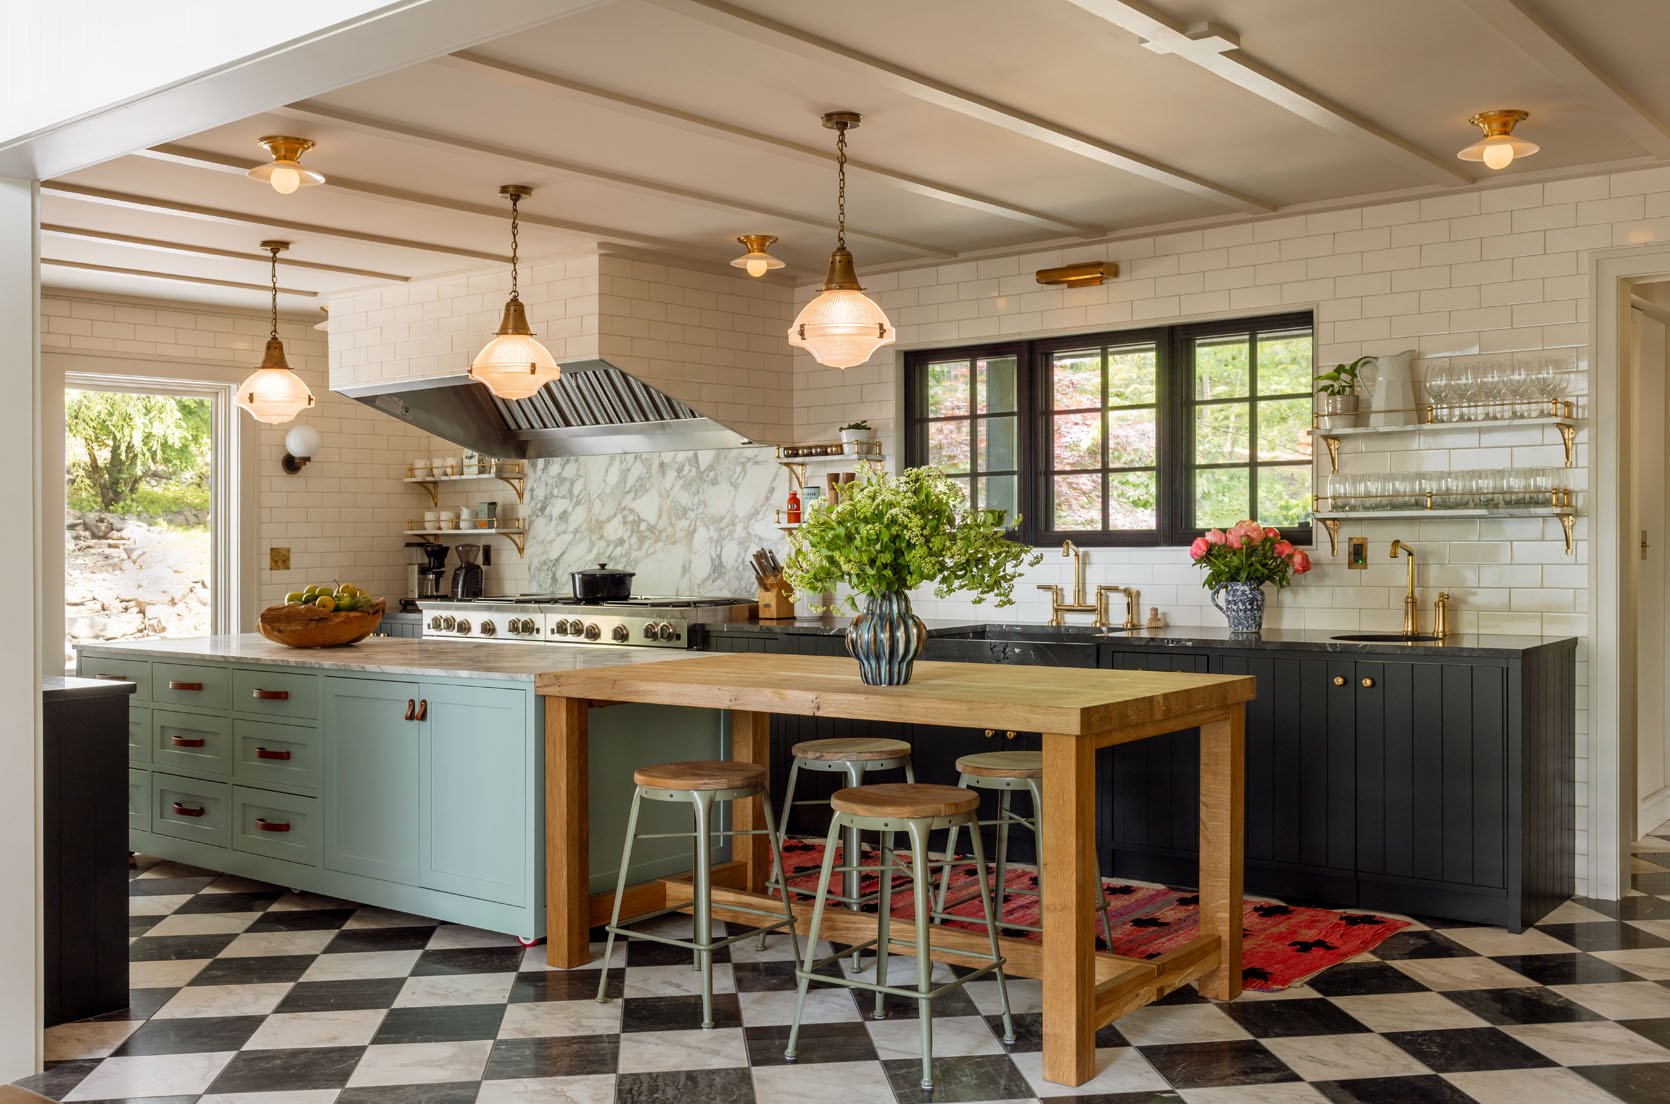
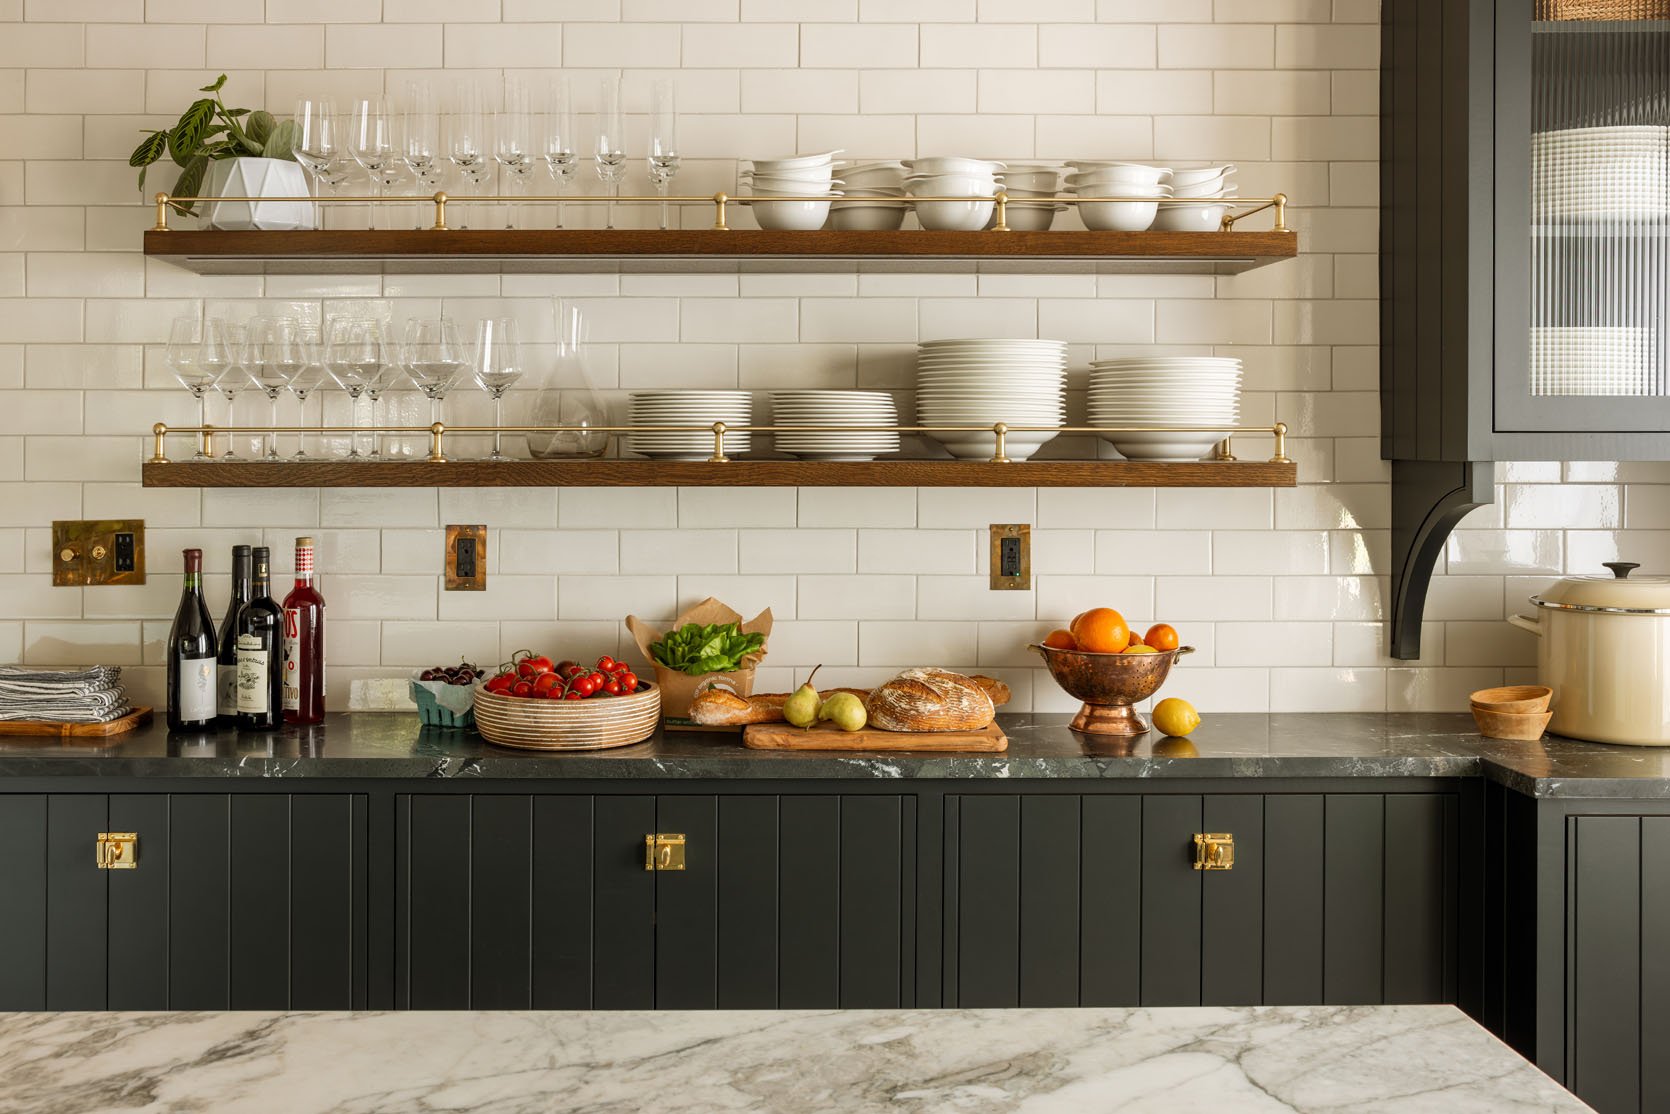
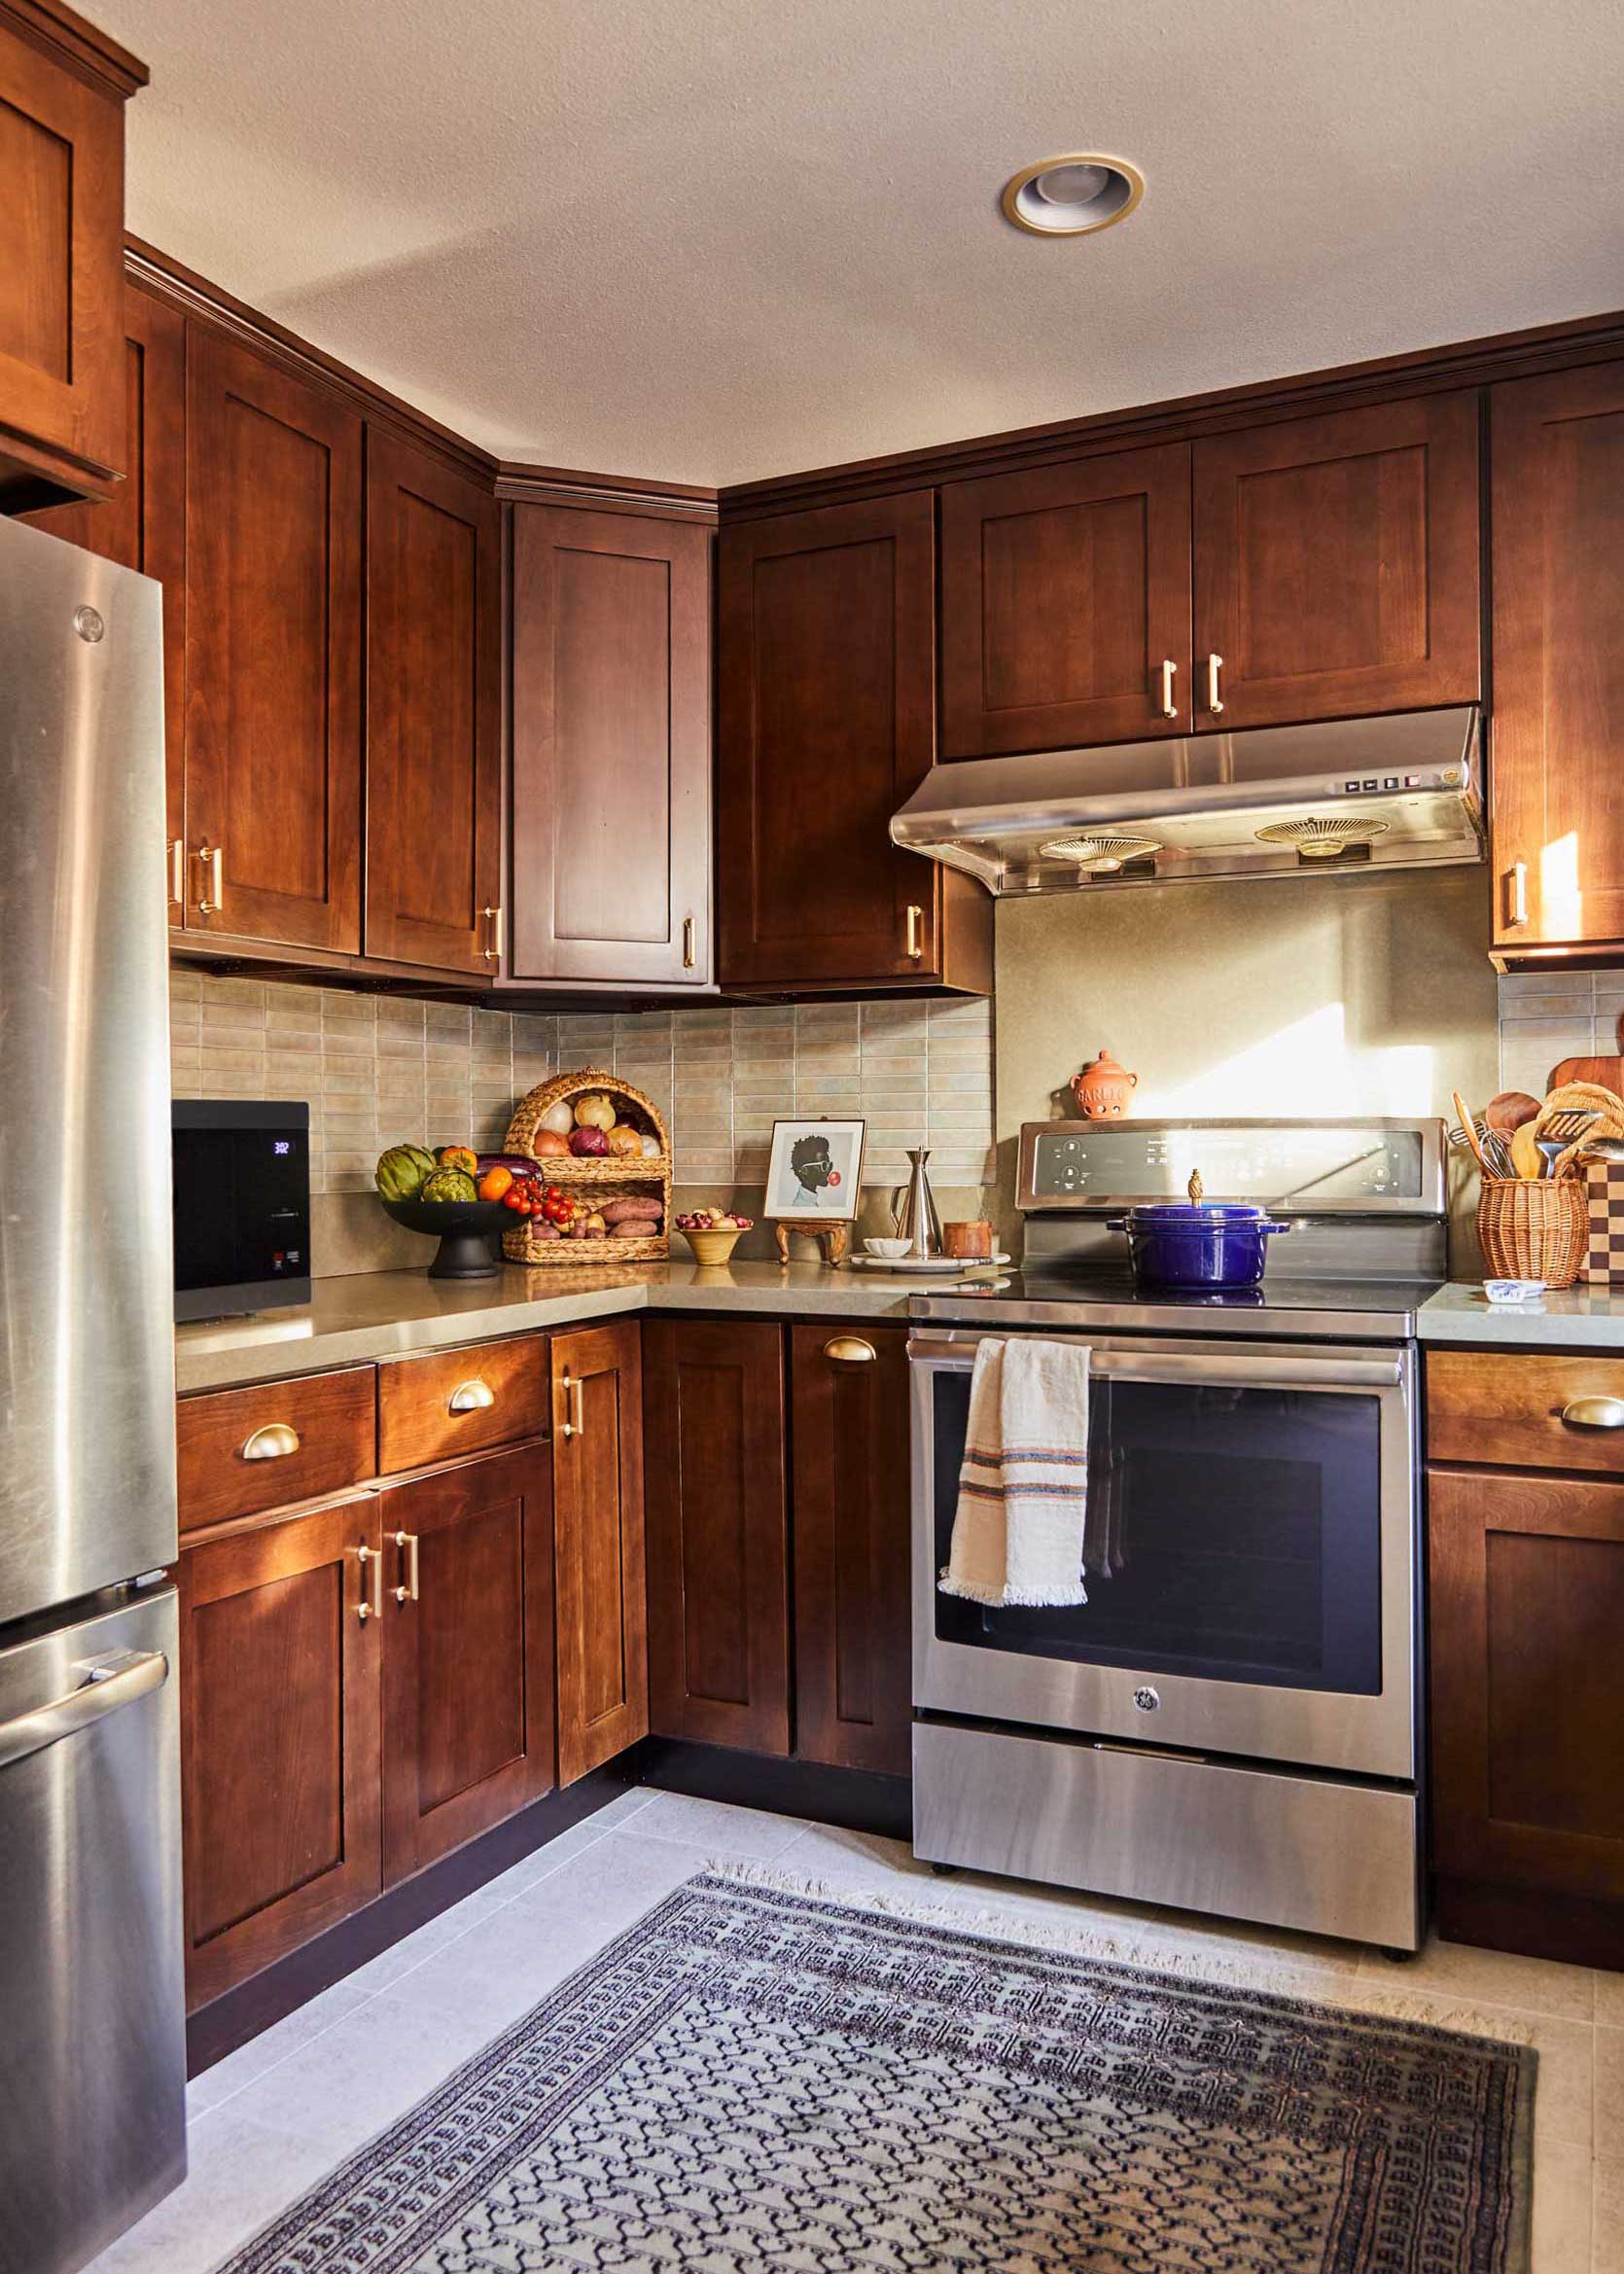
The Kitchen
The kitchen is stunning – mixing a lot of patterns (floor) and colors (the black with the robin’s egg blue is so surprising). It can be shut off with a huge barn door should the guests want to bring in a private chef, like we did. It’s well stocked and feels so homey. What you can’t see is the scullery (the dishwashing room is hidden and closed off). Curtis (the owner and my friend) really thought of everything for every style of guest/stay.
I love how they mixed those pendants over the island with the tiny flush mounts on the ceiling and picture lights – it looks so special and custom. The ceiling paneling is a nice detail that is a great design hack – low work with high impact, as it’s in semi-gloss, so it catches the light so nicely.
Totally classic and timeless, but still interesting and warm. Max really nailed it (I also love the reeded glass and the decorative shelf bracket).
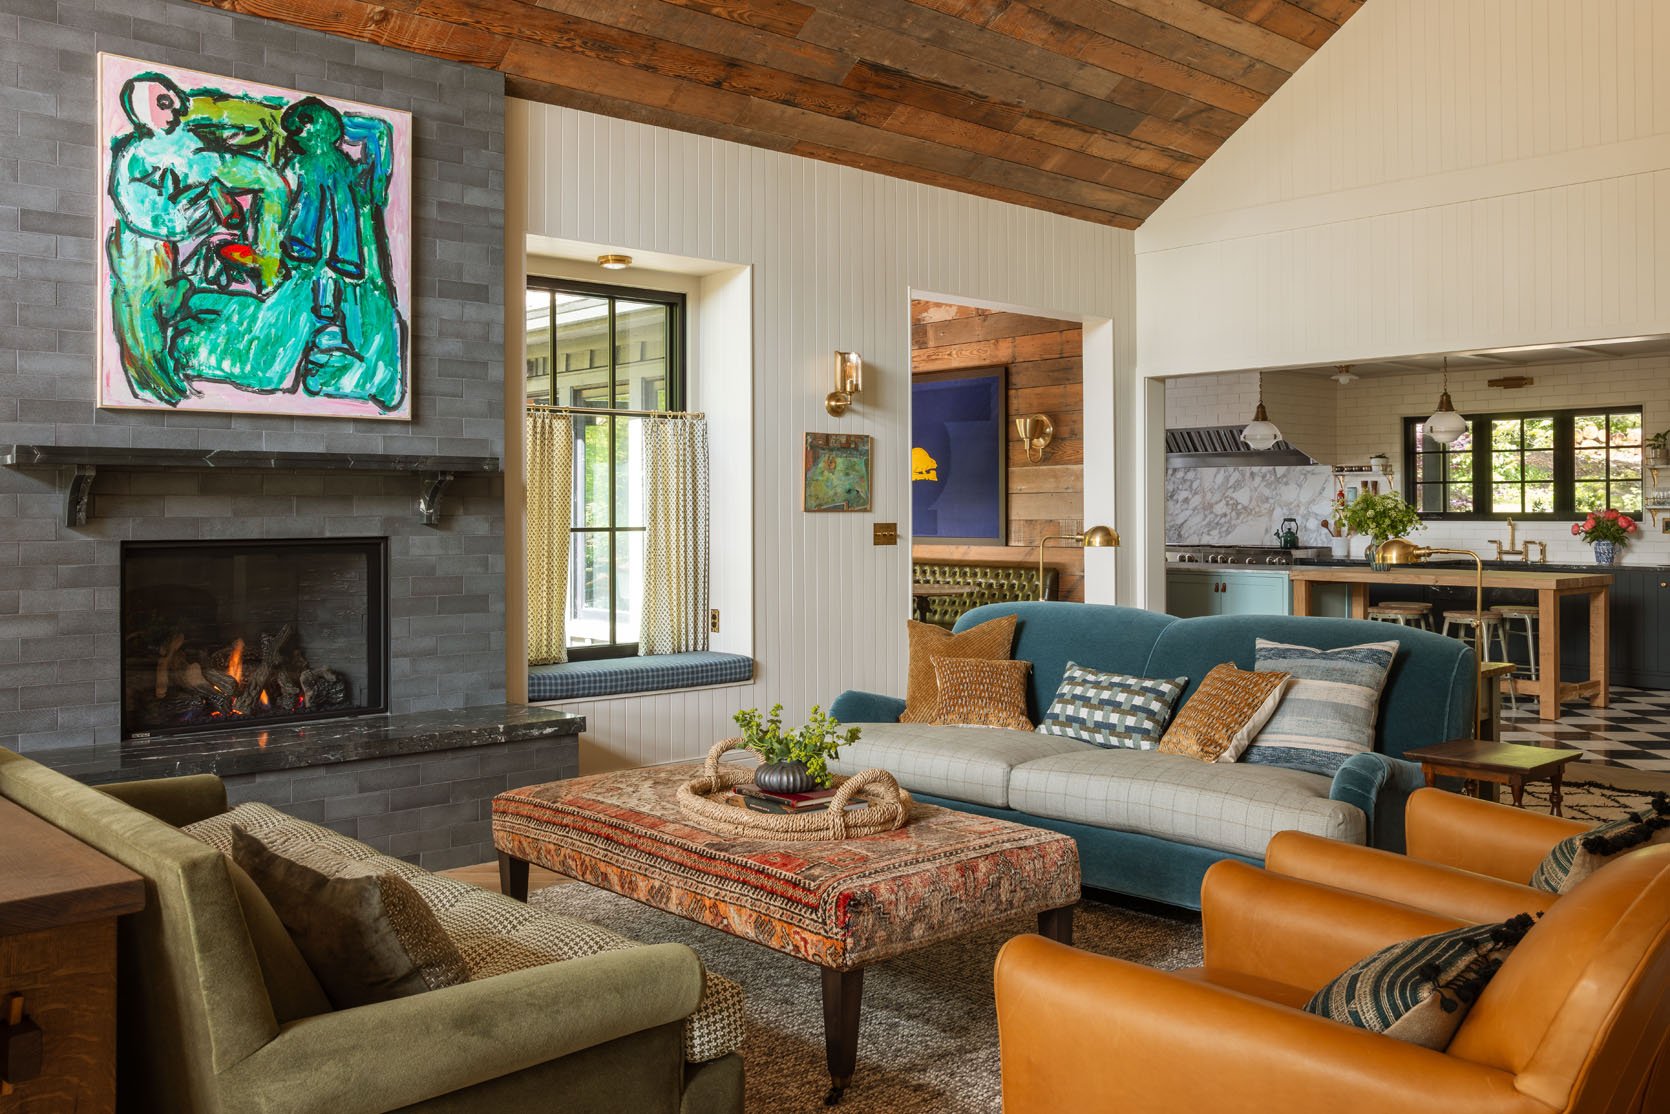
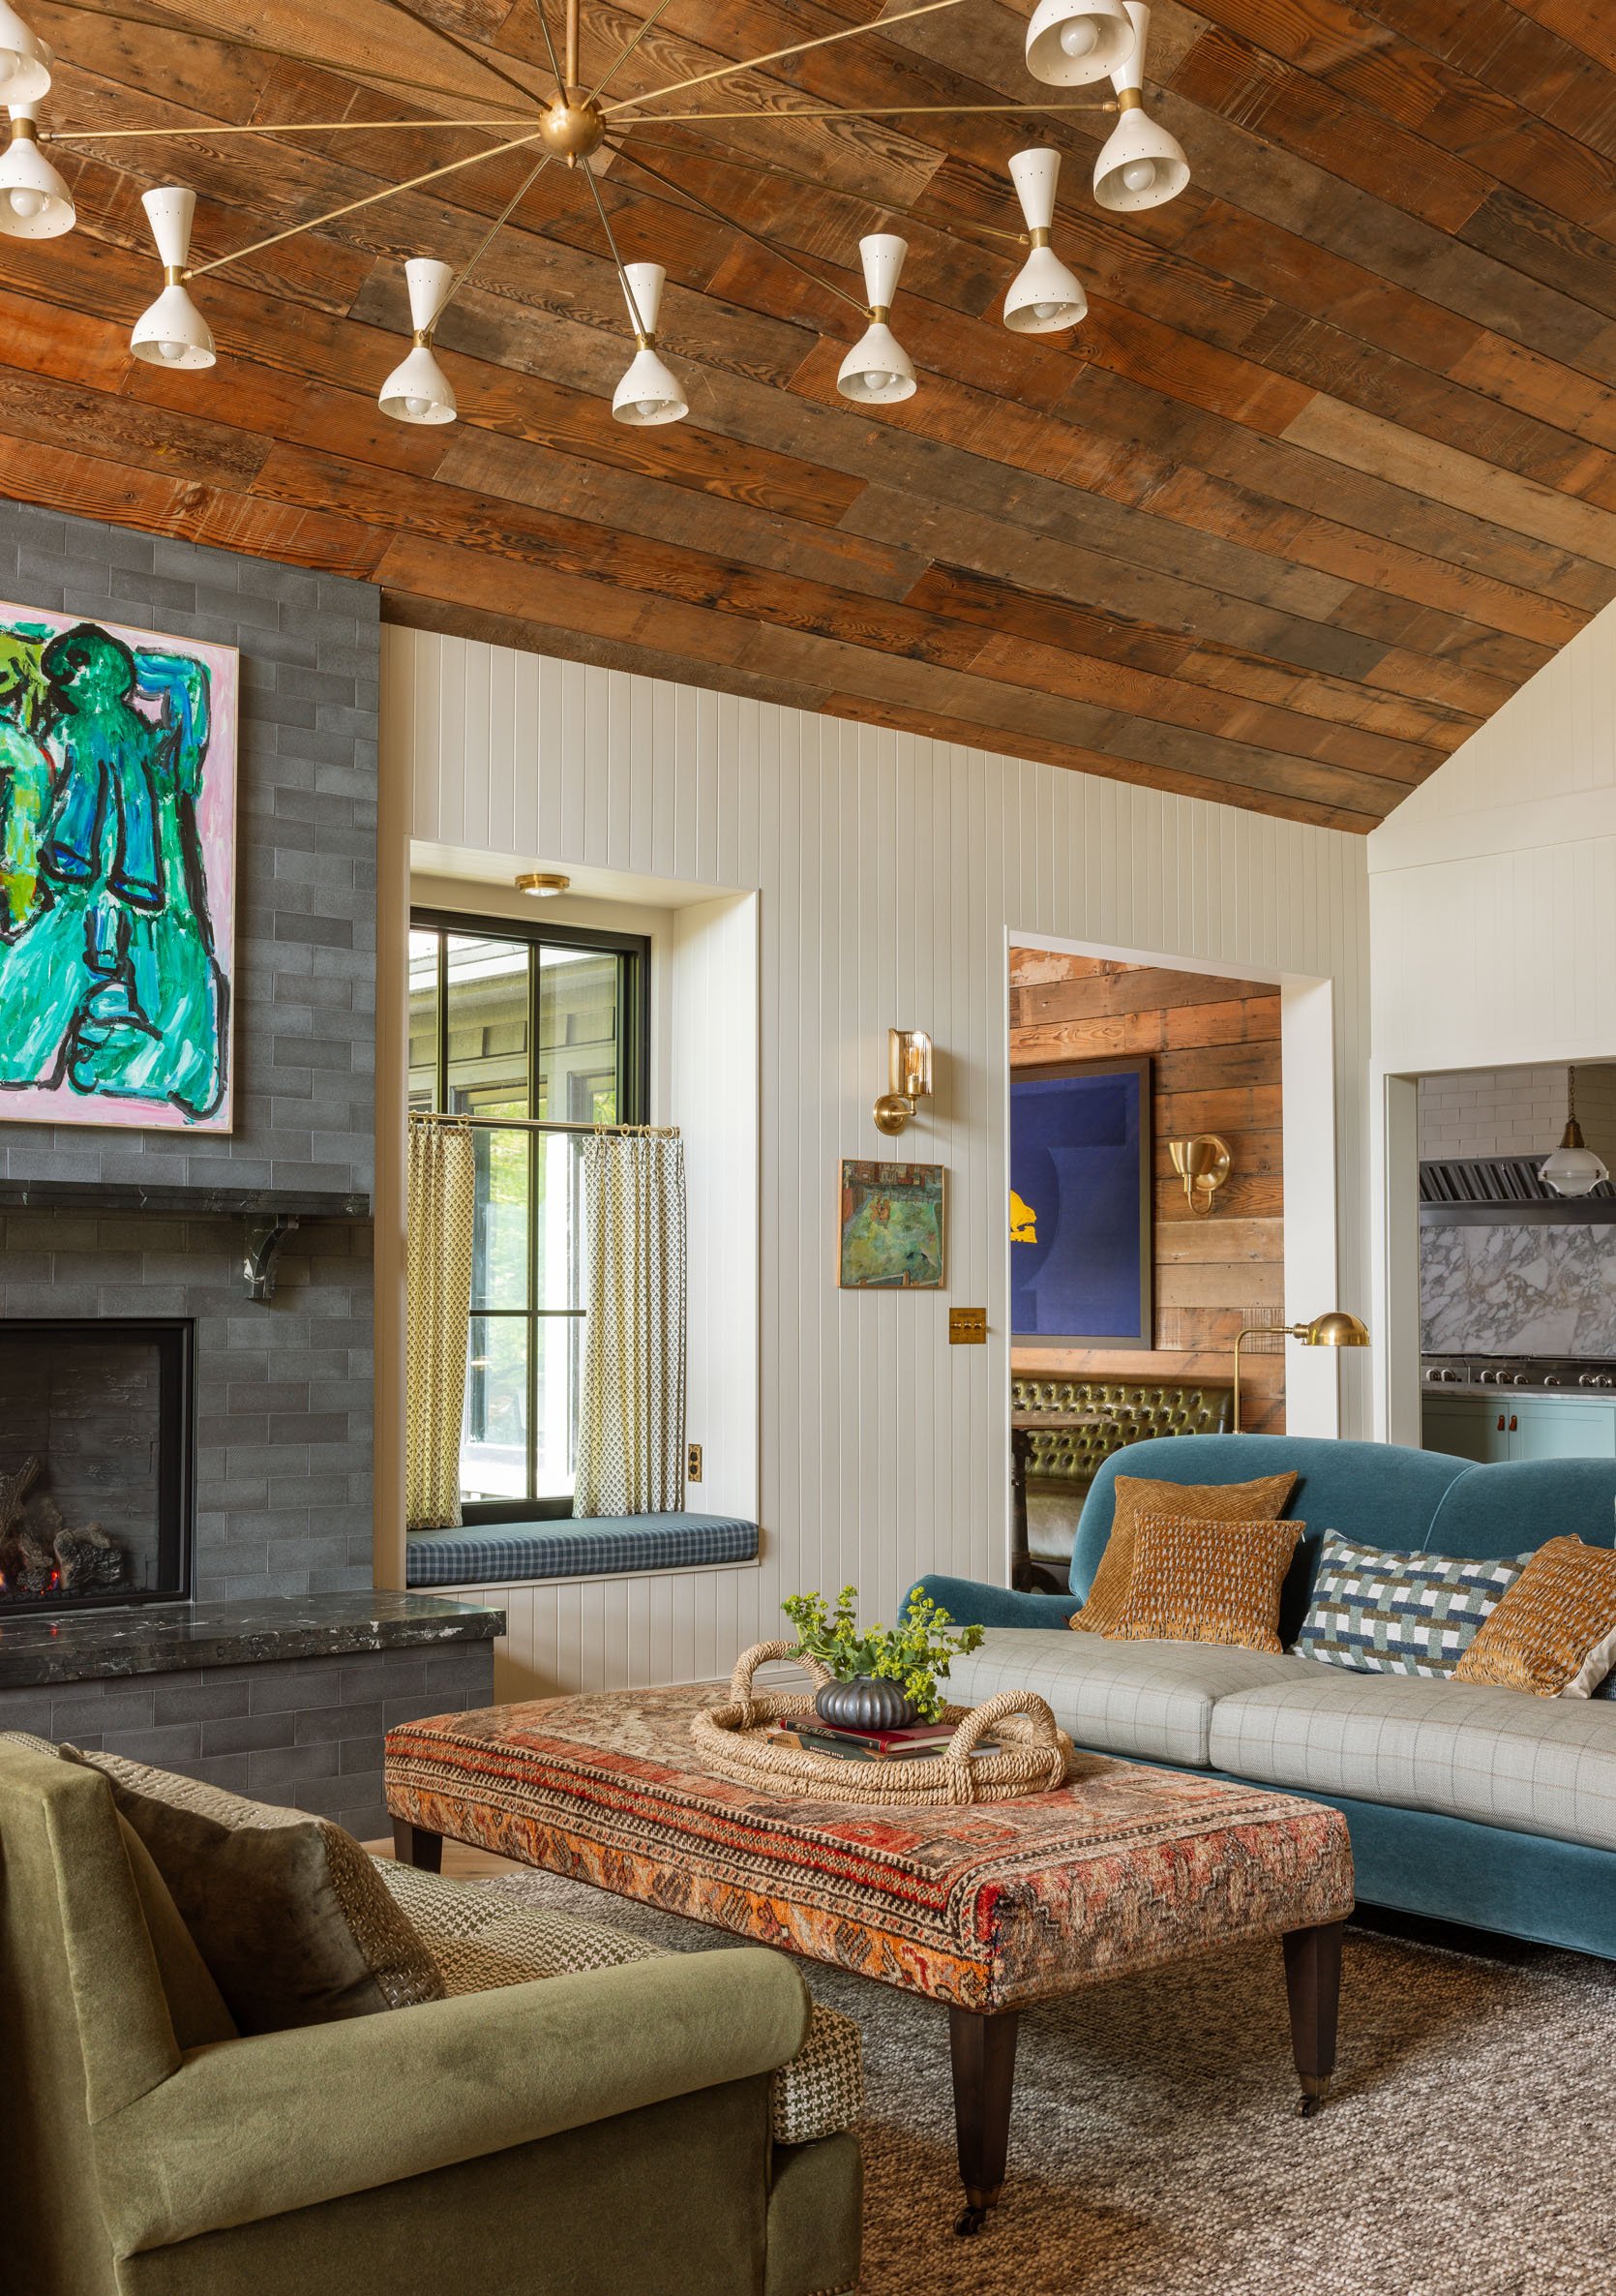
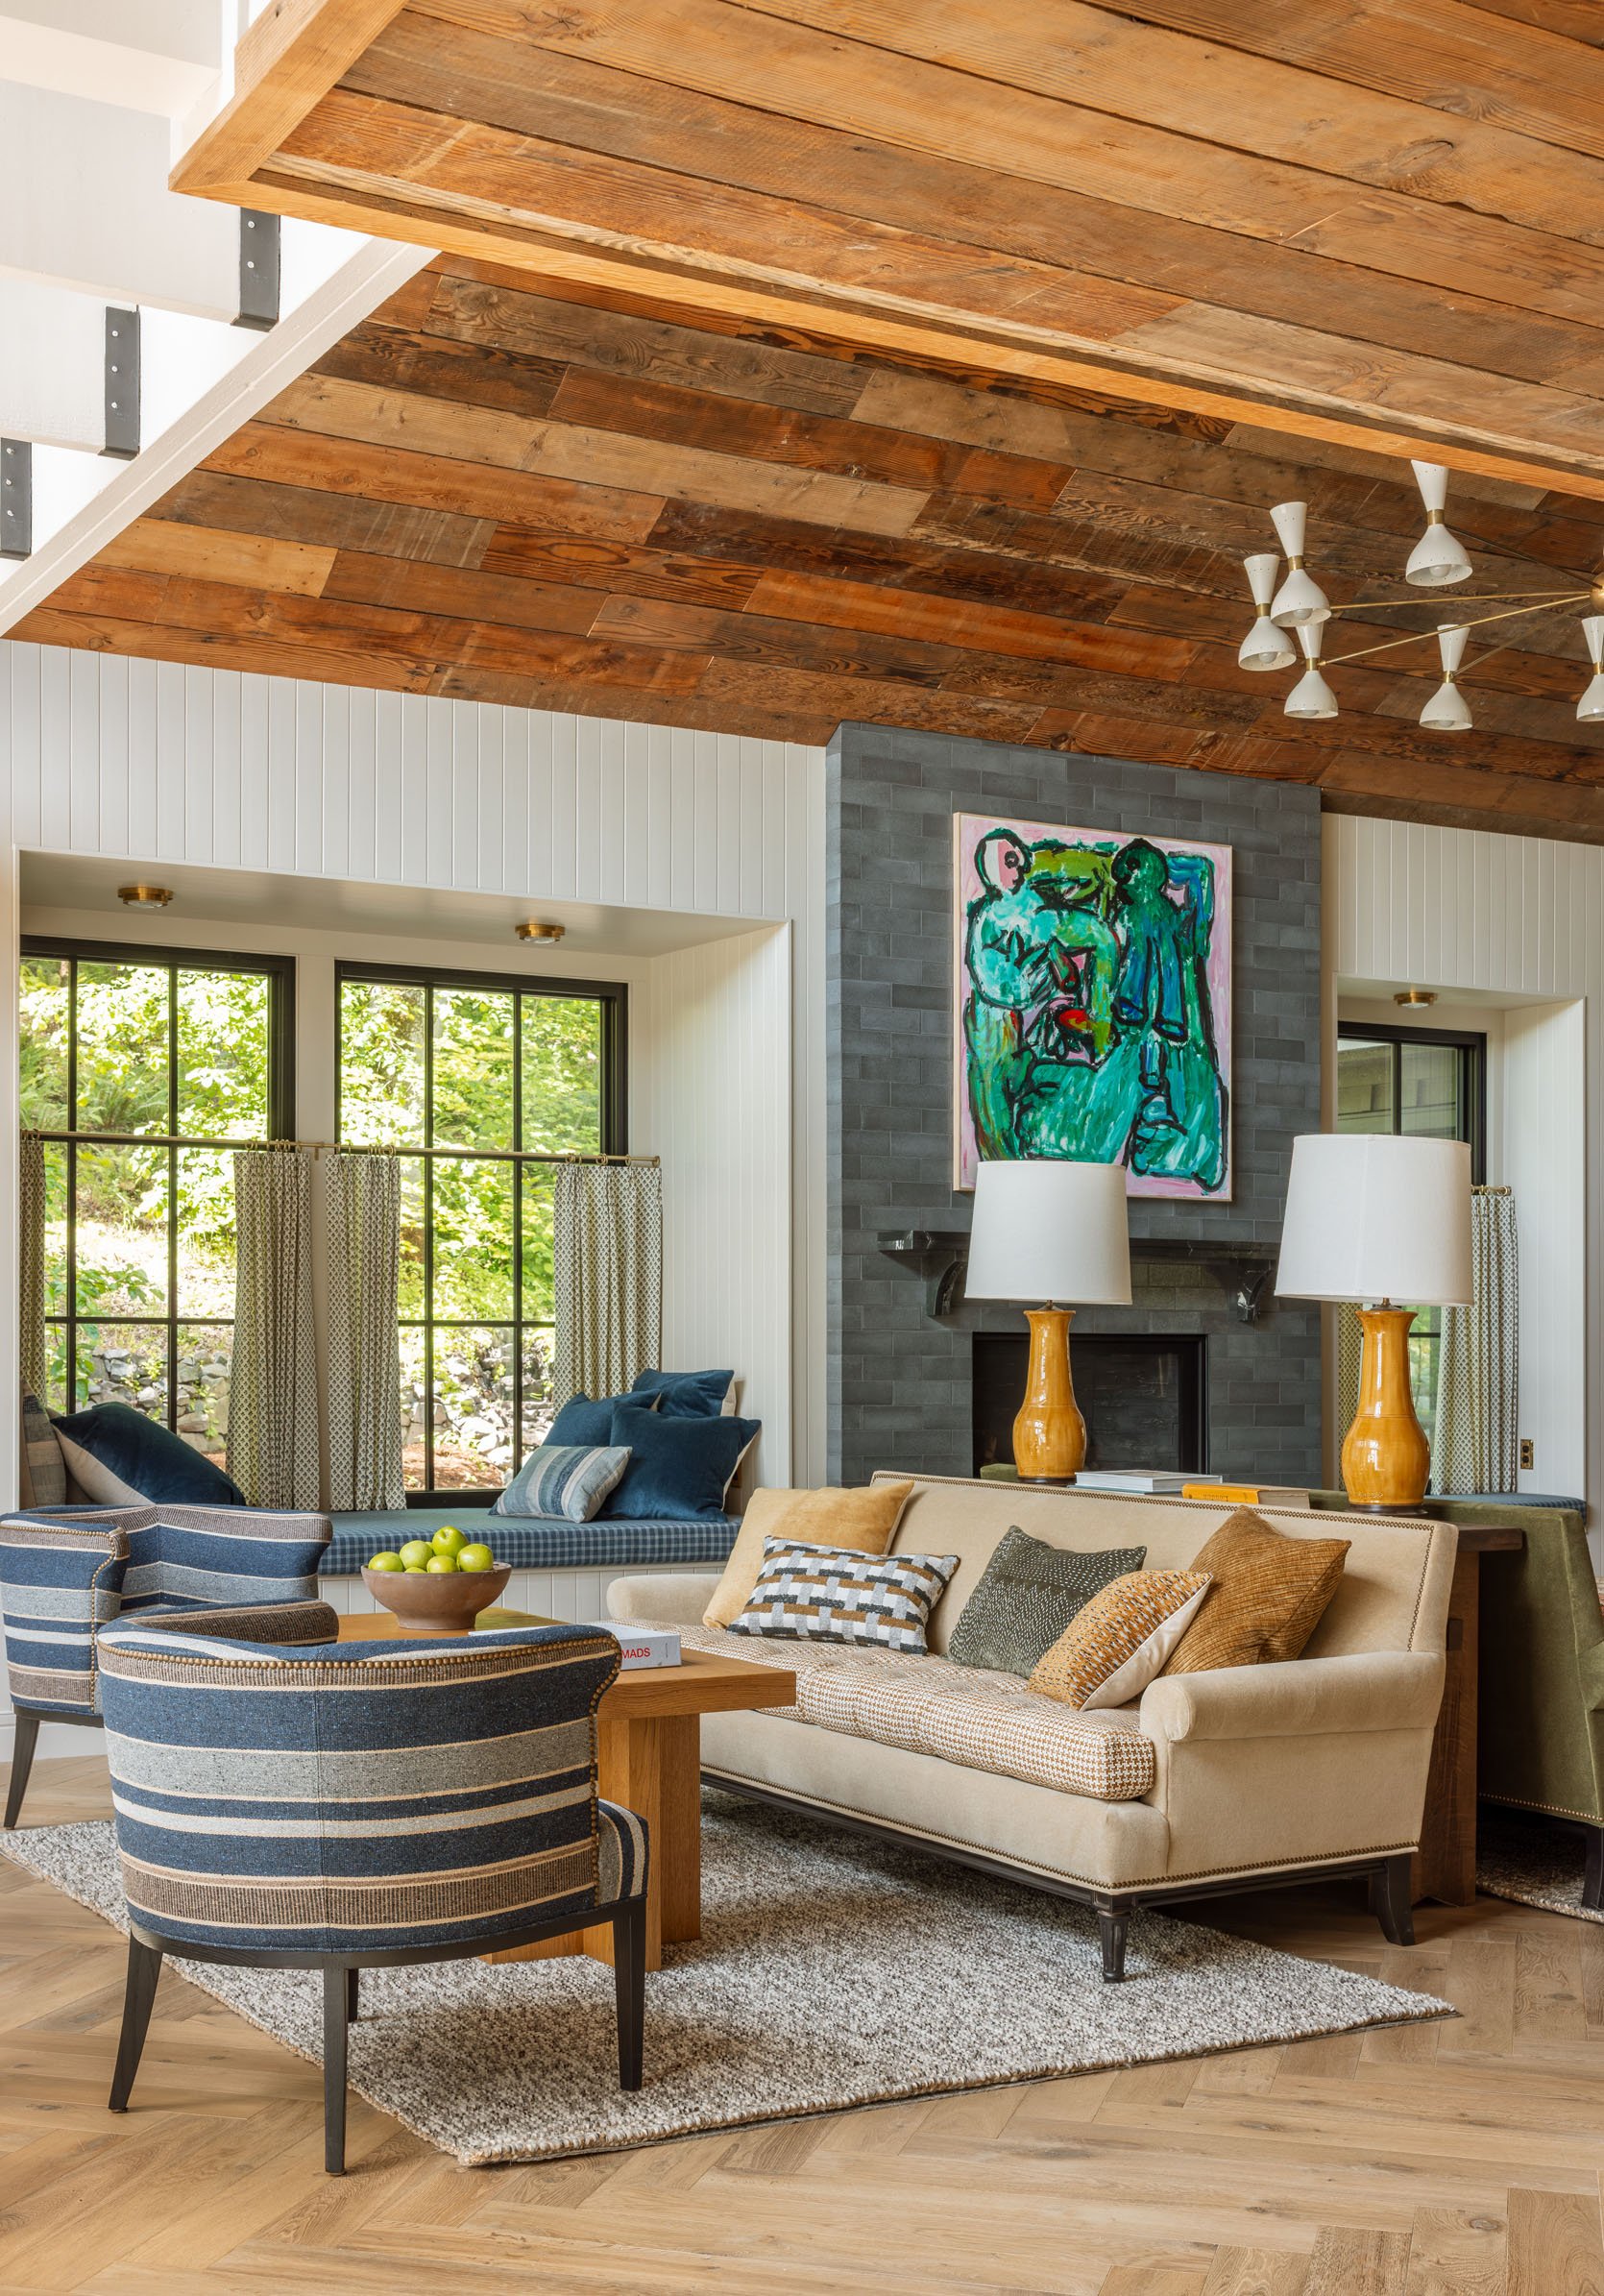
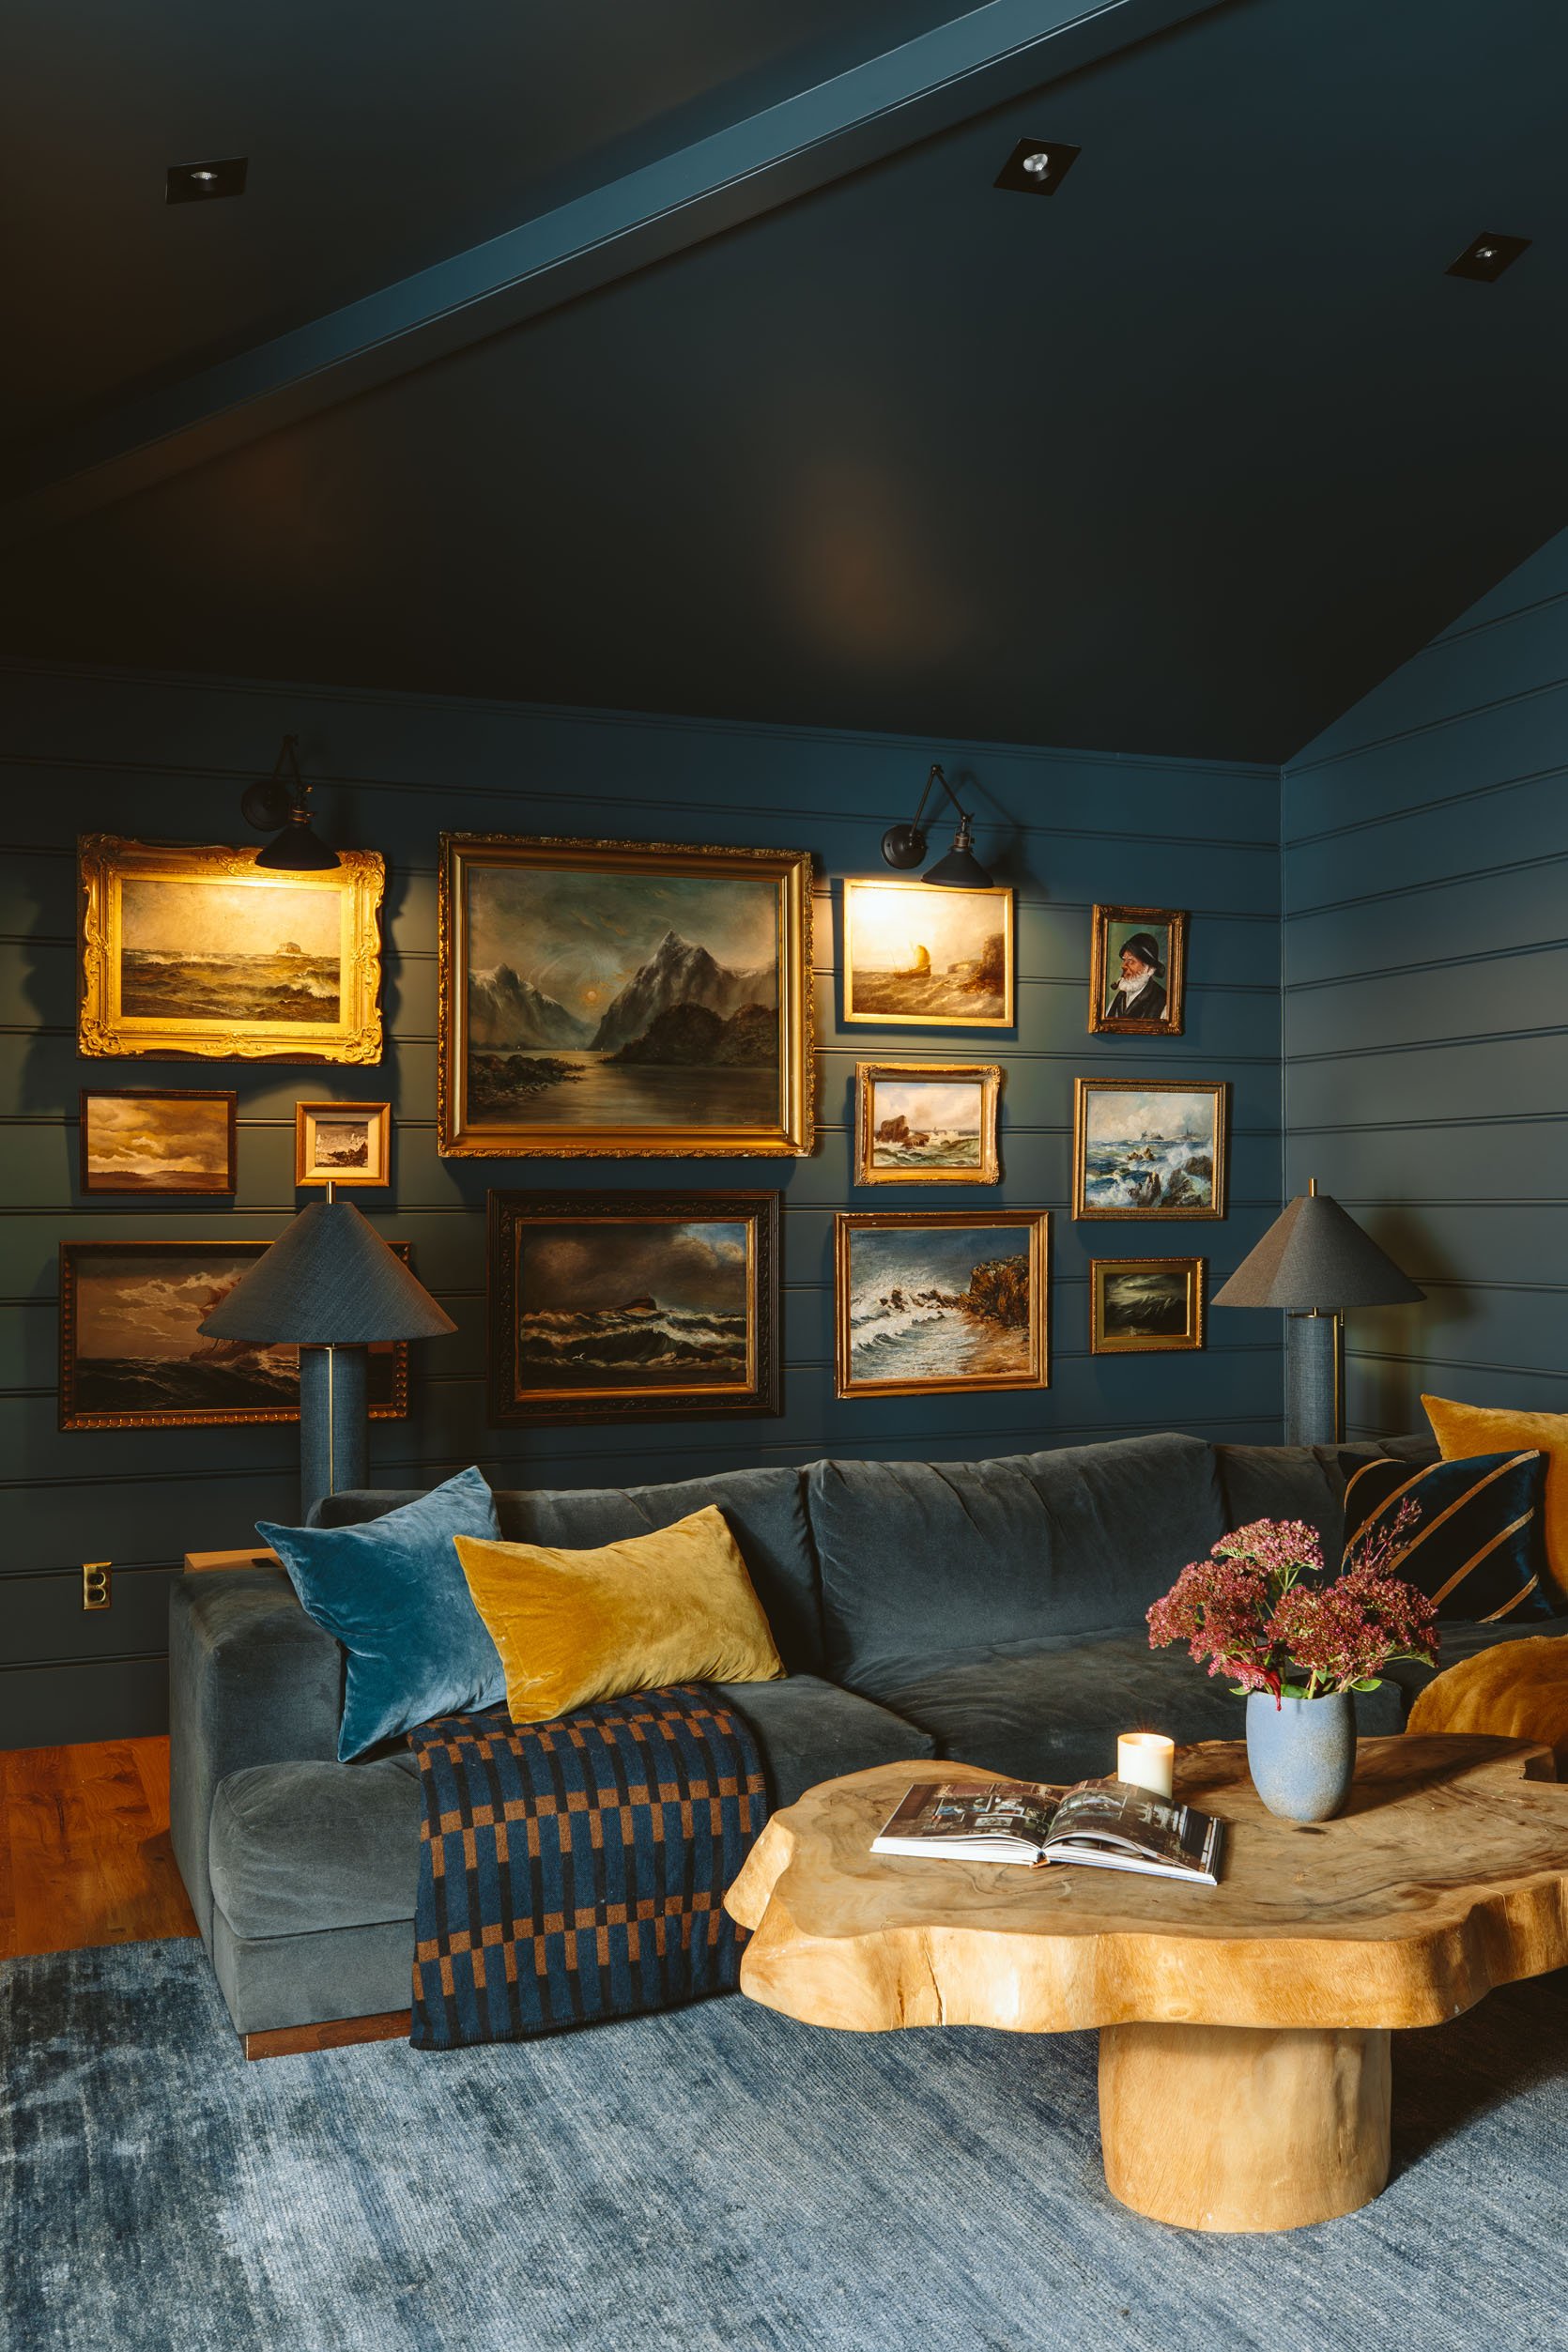
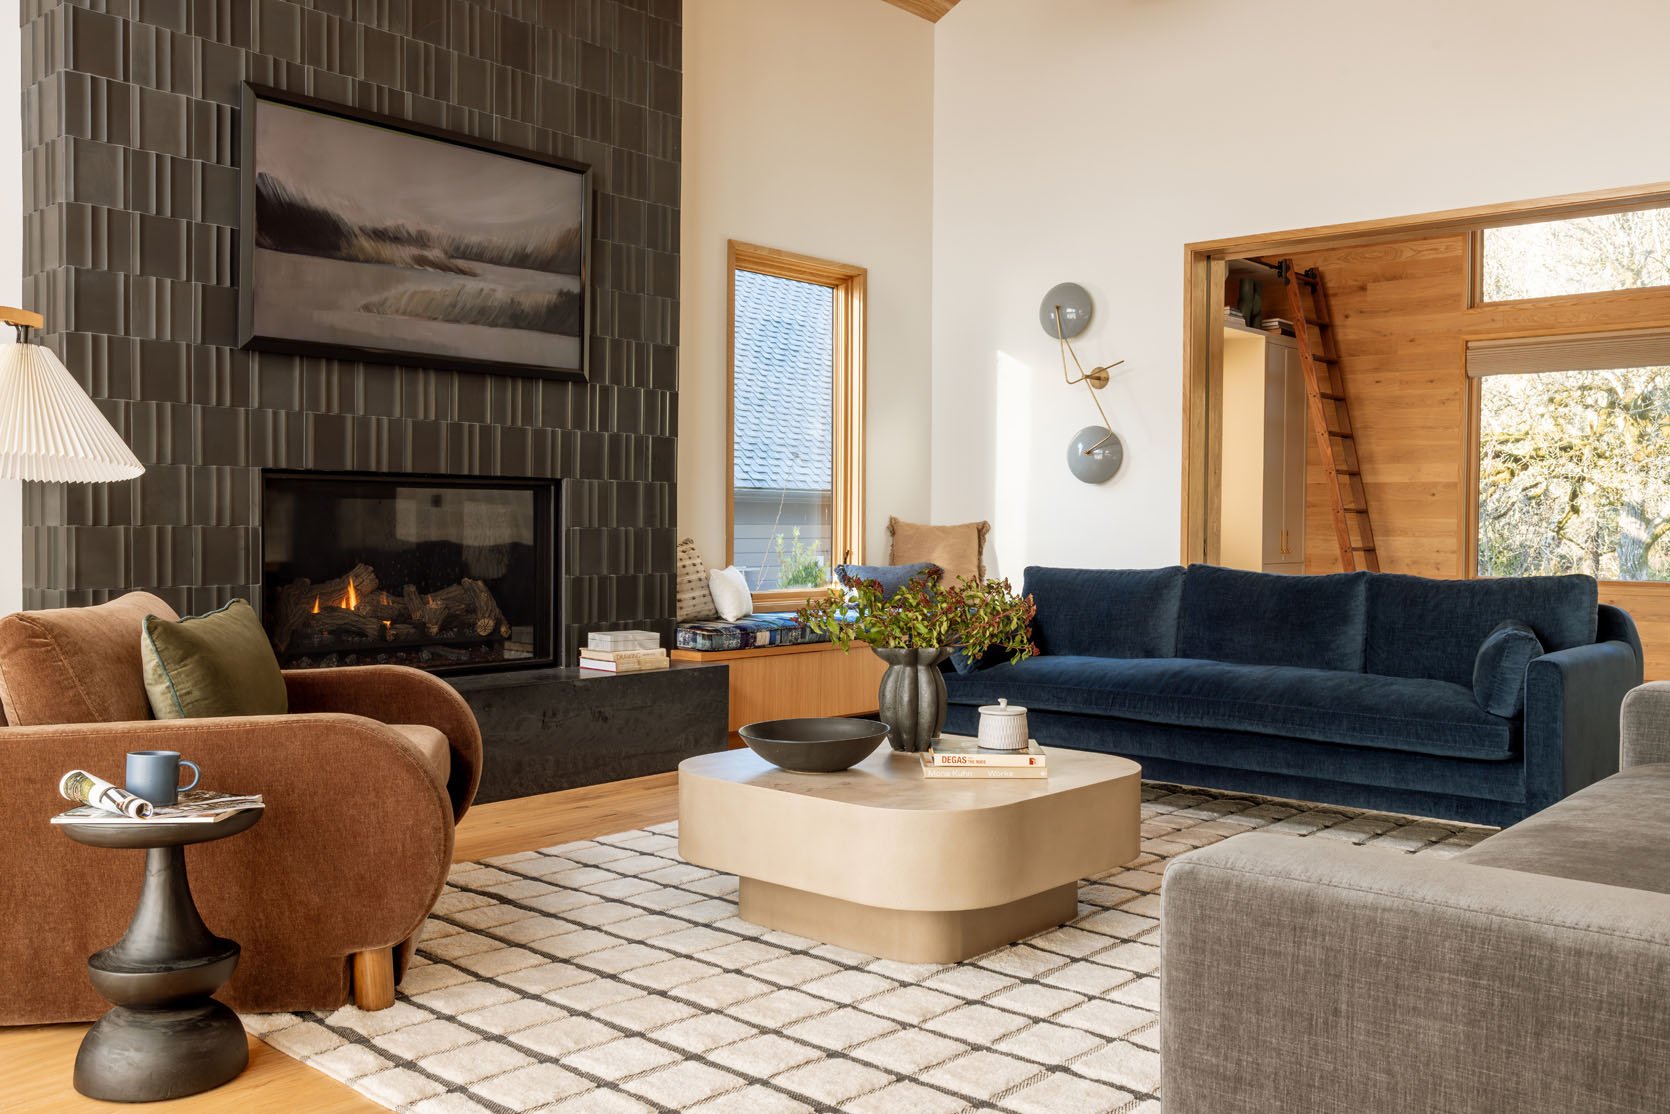
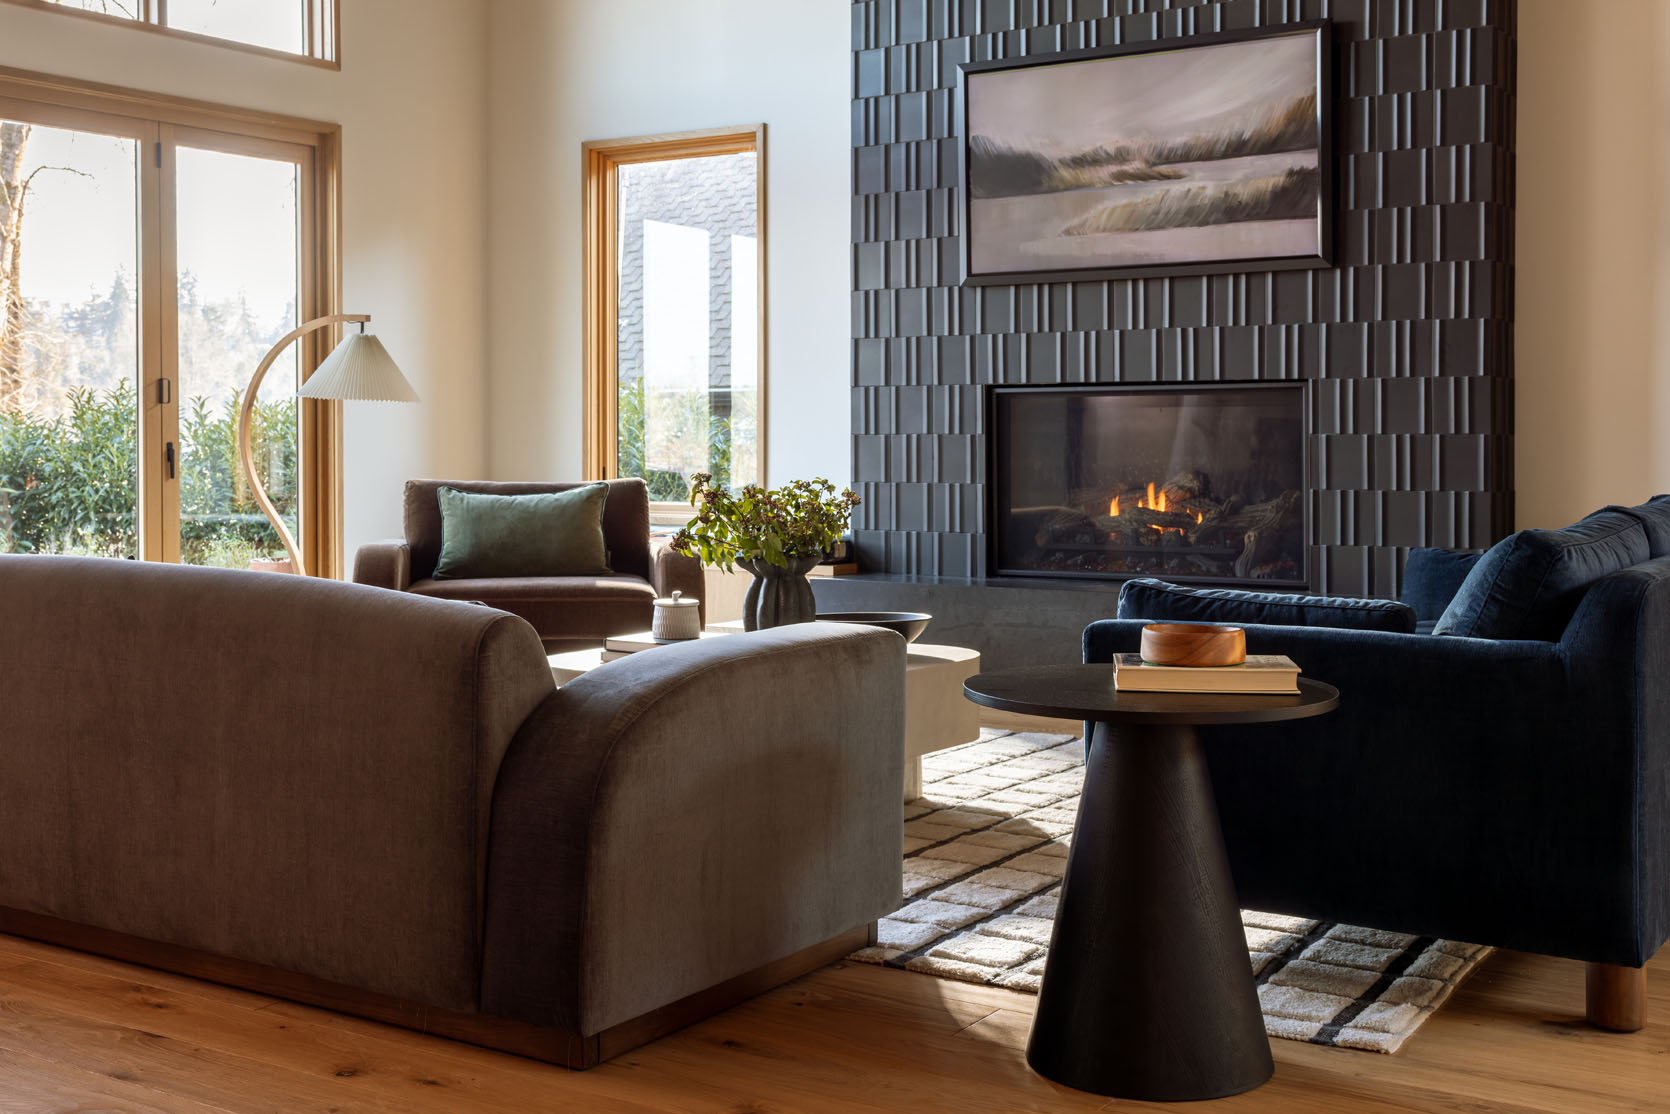
The Main Lodge Lounge
This is where we hung out most of our retreat – the living room and big dining table. Such an incredible mix of textures and patterns, and styles. Eclectic and cohesive FTW.
That epic light fixture was one of the first things purchased, bought from the Rejuvenation Vintage collection – a 1960s Italian piece. It was originally in the iconic Portland bar on NW 21st called Gypsy Restaurant & Lounge that closed in 2014.
This was one of my favorite places to sit in the morning with my laptop and coffee. Please note the seasonal stream right out of the huge picture window. The custom green leather banquette adds so much dimension – I love how they chose such tight tufts to catch the light like that, creating a pattern out of a texture.
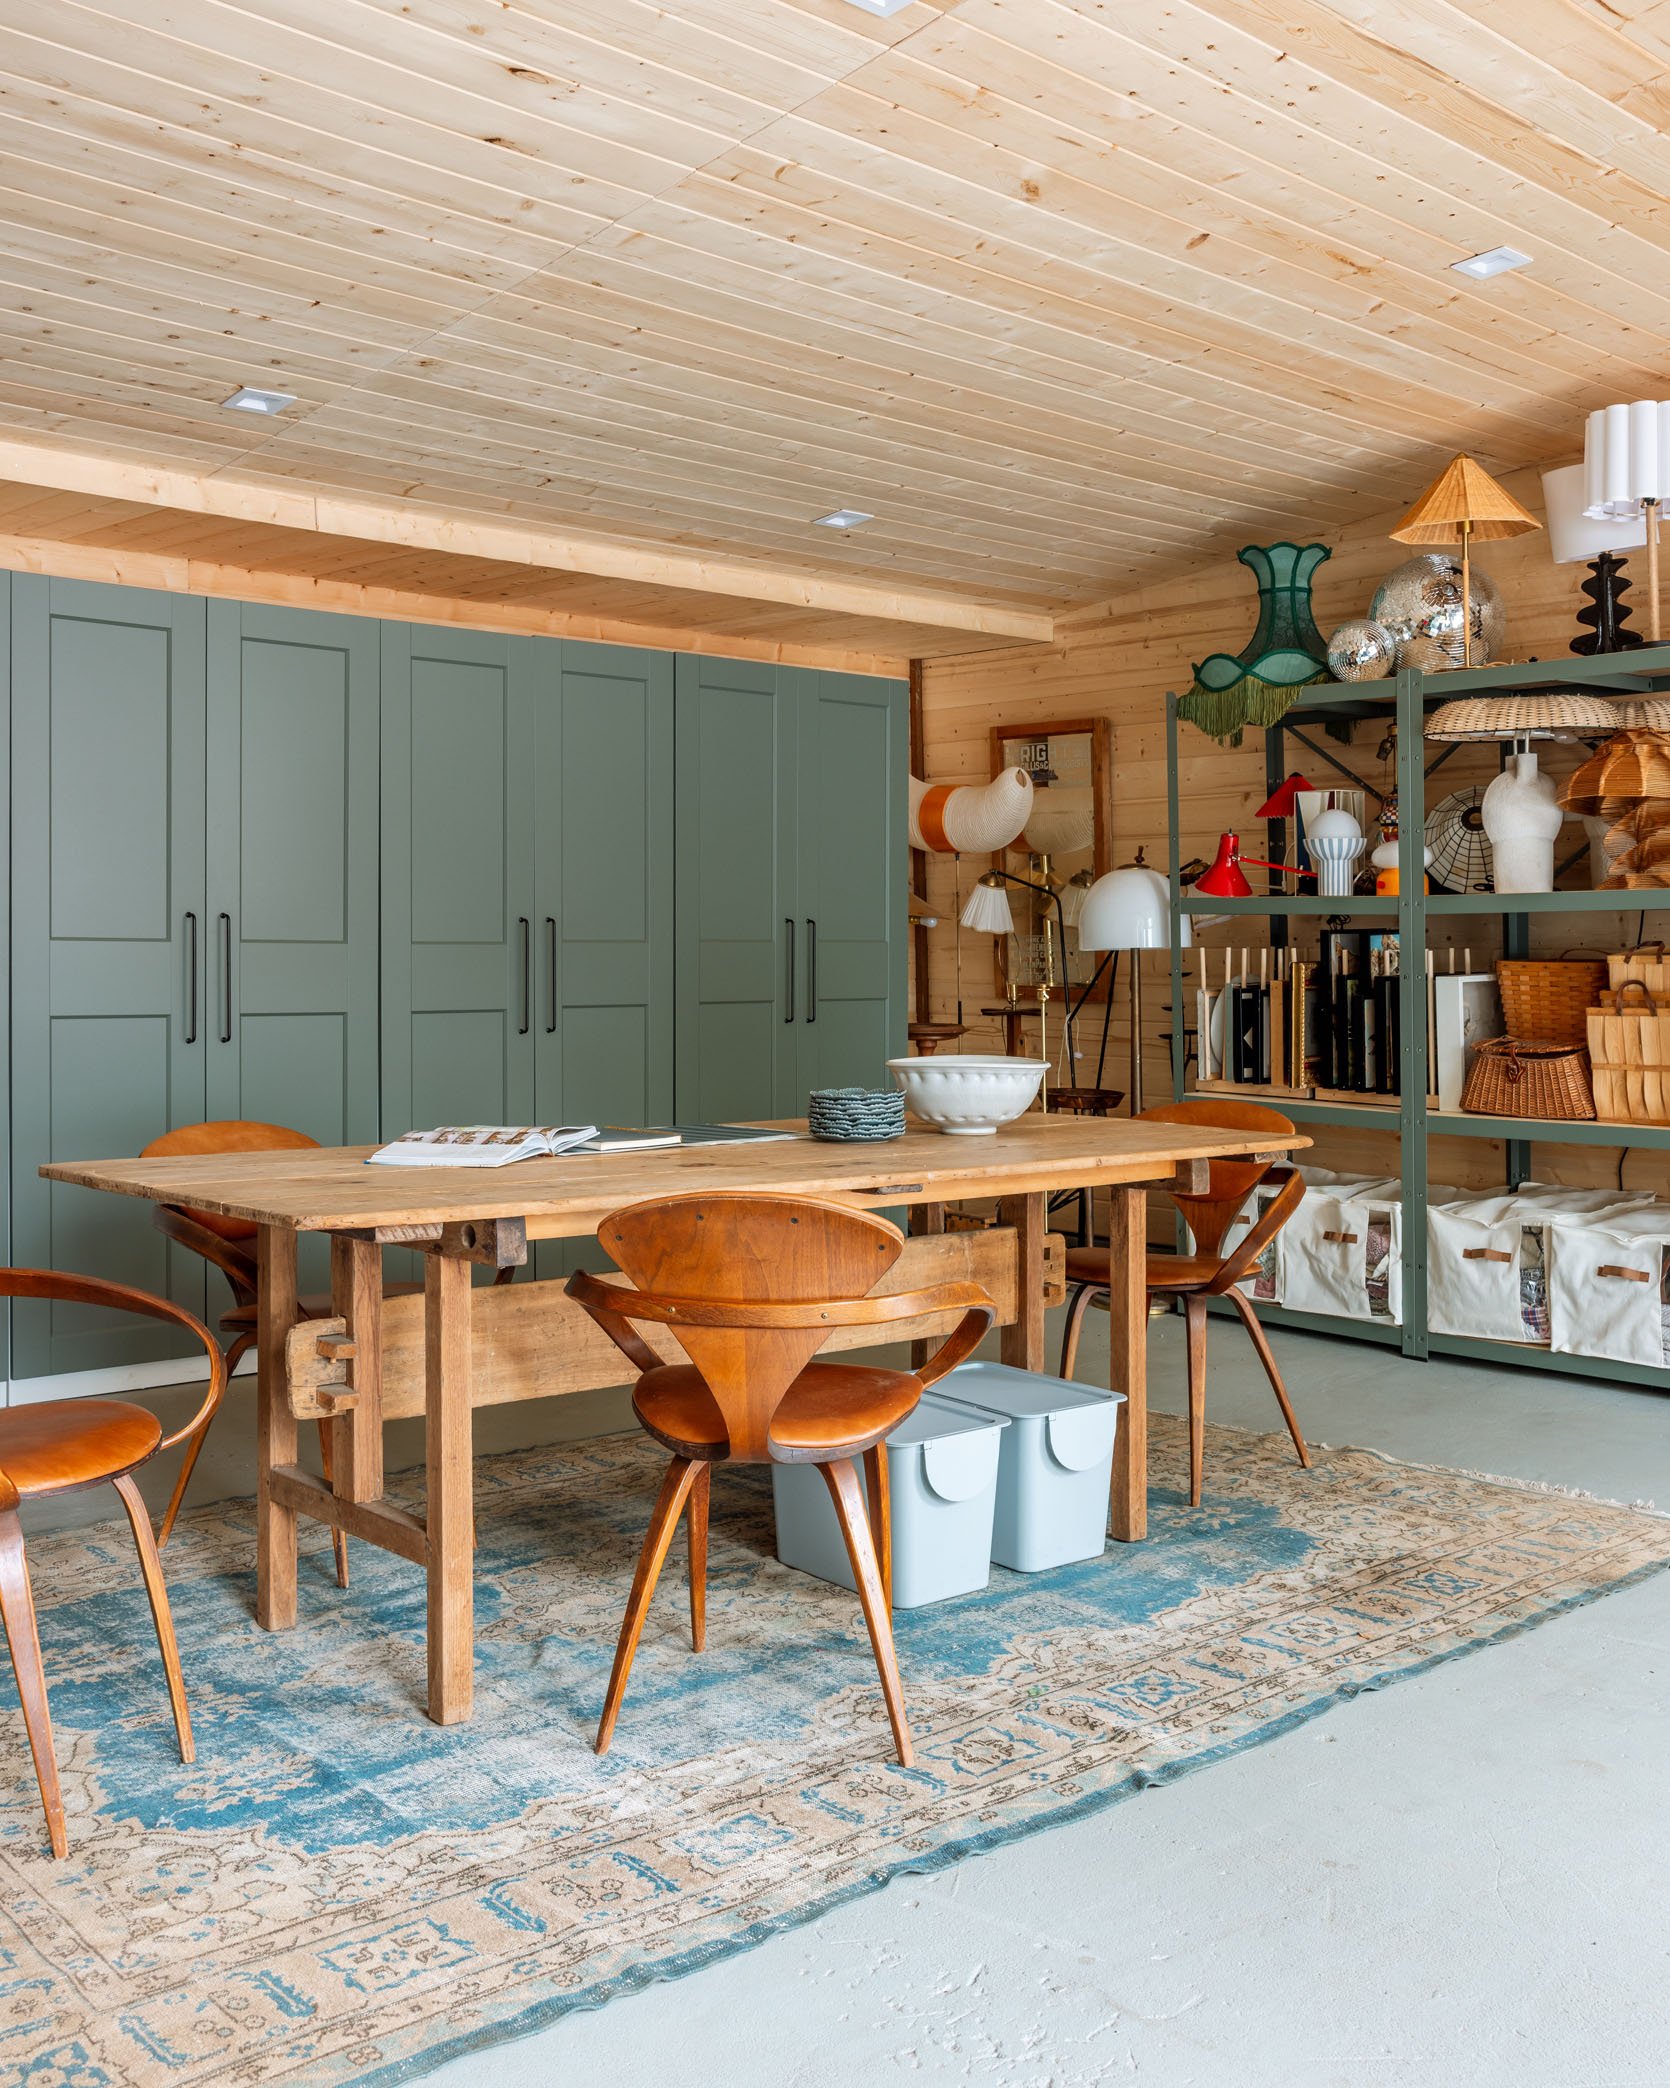
Happy Sunday, everyone. In case you missed it, the PDX gals made another incredibly fun and entertaining YouTube video about the garage’s storage plan (PS IKEA was the star. Please check it out, and if you aren’t subscribed, we’d really appreciate it if you clicked that button too:) Ok, let’s get to the links.
This week’s house tour is from the incredible mind of design studio Claves. It’s a newly rentable townhouse where “where surrealism meets art deco splendour”. You just have to go take a look:)
From Emily: I think the most important link this week is a huge shout-out to Gretchen and Marlee – my PDX DREAM TEAM, who are tag-teaming our YouTube series (amongst so many other jobs). I was nervous to add another platform to my workload, but they are making it so easy, so organic, just like following along with what we are doing, and yet shooting and cutting it in a way that is genuinely entertaining and funny. PLEASE PLEASE PLEASE, if you are a long-time reader (thank you!) or just landing for the day, watch episode 1 and episode 2 of the carriage house re-org (and yes, you’ll get a tour soon, I promise). And then for the love of the algorithm gods, like and subscribe if you are into it, heck, comment and share, too! (it makes a massive difference on how YouTube shares it with others). We are having so much fun, and they are working so hard on it despite both just learning on the job, so give them some love – they deserve it!
Also From Emily: Shout out to our new AI comment tech (thank you, Caitlin!) – We now have AI that can detect when a comment is negative and filters it out for human approval, while all the other comments get auto-published immediately. This is extra exciting because even though we’ve monitored comments for years I had to still see them as “pending” if I wanted to go into the backend and comment back to people (you have to be signed in to comment back as me, and once signed in you see all the pending in the same feed). While 95% of the comments are lovely, supportive, or even constructive (which we generally find helpful), the typical few meant to ruin our day made it hard to go into the backend, so I would often avoid it. While I have thick skin, the distraction and derailment was damaging and even worse, they could made me more cynical about the world at large – so bummed that people found such pleasure in saying intentionally mean things, happily ruining the day of me and my team that work so hard to put good things into the world. My anxiety would spike, and then dark thoughts about my career/future would spiral (helpful to literally no one, including and especially my wonderful team). So this tech is FANTASTIC because I can go in and engage immediately with your non-negative published comments, then someone on my team will also read through the suspicious comments and publish those later in the day, should they be appropriate. That’s all to say that if you don’t see your comment published immediately, it’s because the AI has found something in it that it thinks is negative. This has happened to me twice – I wrote “shoot” in one, and then “I hate…” in another, and it held those two for approval. So essentially, the AI tech can filter out what it deems “negative” and then a human goes in and publishes or not, but meanwhile, I don’t see any of them, and all the positive comments or questions get published immediately. Take my Belize post (the first post we tried this with), I was able to go in and with confidence answer all the questions, knowing that it was safe (and I wasn’t going to read a bunch of hateful things about my family, etc). This won’t be perfect, by any means, but it’s only been a week, and it’s been really fun to engage in the comments in a way that feels totally healthy and safe. Three cheers for using AI for good and EHD.
Also Also From Emily: Attn Portland folks (and anyone else who needs encouragement to be a tourist in your own state). We’ve lived here for 4 years now and I couldn’t love the nature of the PNW more (sure, Nov – Feb can be rough, but once we started skiing it got a lot better- rain here means snow up there). I’ve become quite nature-obsessed (it’s the main reason to live here, IMHO), but like the Virgo + Enneagram 7 that I am, I want a really fun weekend agenda. So I have four books that I reference ALL THE TIME. I know that you can get a lot of info on the internet, but I don’t love being on the internet all the time, so I have my own little library that I reference on Saturday morning while I plan out how I’m going to torture my family through waterfall hikes. 1. Oregon and Washington 50 Hikes with Kids by Wendy Gorton. The kids will thumb through this and help pick, too. 2. Portland Family Adventures by Jen Stevenson. A fantastic, thorough city guide of all the best things to do with different aged kids (inside activities included – and day trips). 3. The Portland Book of Dates by Eden Dawn and Ashod Simonian. I LOVE this one – yes, more for grownup dates, but gives you a lot of good ideas of really unique things you can do, odd sites to see, not just restaurants or more predictable date night stuff. 4. Citi x 60: Portland (60 local creatives bring you the best of the city). This one is more about cool design, art, and creatives – so less family stuff, but if you have friends in town, a great insiders perspective of inspiring stuff. Also please let me know in the comments if you want my guide of “what do do while visiting Portland” – I’m not an expert (again, only 4 years back here) but I have my favorite SOLID hikes that please every Californian that visits us, the restaurants that hit every time, the bike rides that avoid cars, the parks that wow even in the crappier months, etc. I love an insider’s itinerary, so just ask and I’ll write it all up:) Obviously buy local when possible (Powells!) but I linked up for convenience.
From Gretchen: If you’re like me and love the smell of sunscreen or just wish you could bottle up and wear the scent of a sunny beach day, you absolutely can. And don’t be surprised if people compliment you on it! Anthropologie’s “Beach Trip” perfume has been my go-to smell this summer. It’s light and airy, slightly floral, a little coconut-y, and neither is too intense. It smells perfectly sunscreen-y to me, and I just can’t stop spraying it. Perfumes normally cost a pretty penny, but Anthro’s line is only $24 for a full-size bottle. A few of the reviews mention the smell subsides after a while, which I haven’t really noticed, because I have a little trick for that; When I rub a light layer of vaseline on my skin first and then spray, the smell stays on me wayyy longer. But beware, you will get complimented when going in for a hug!
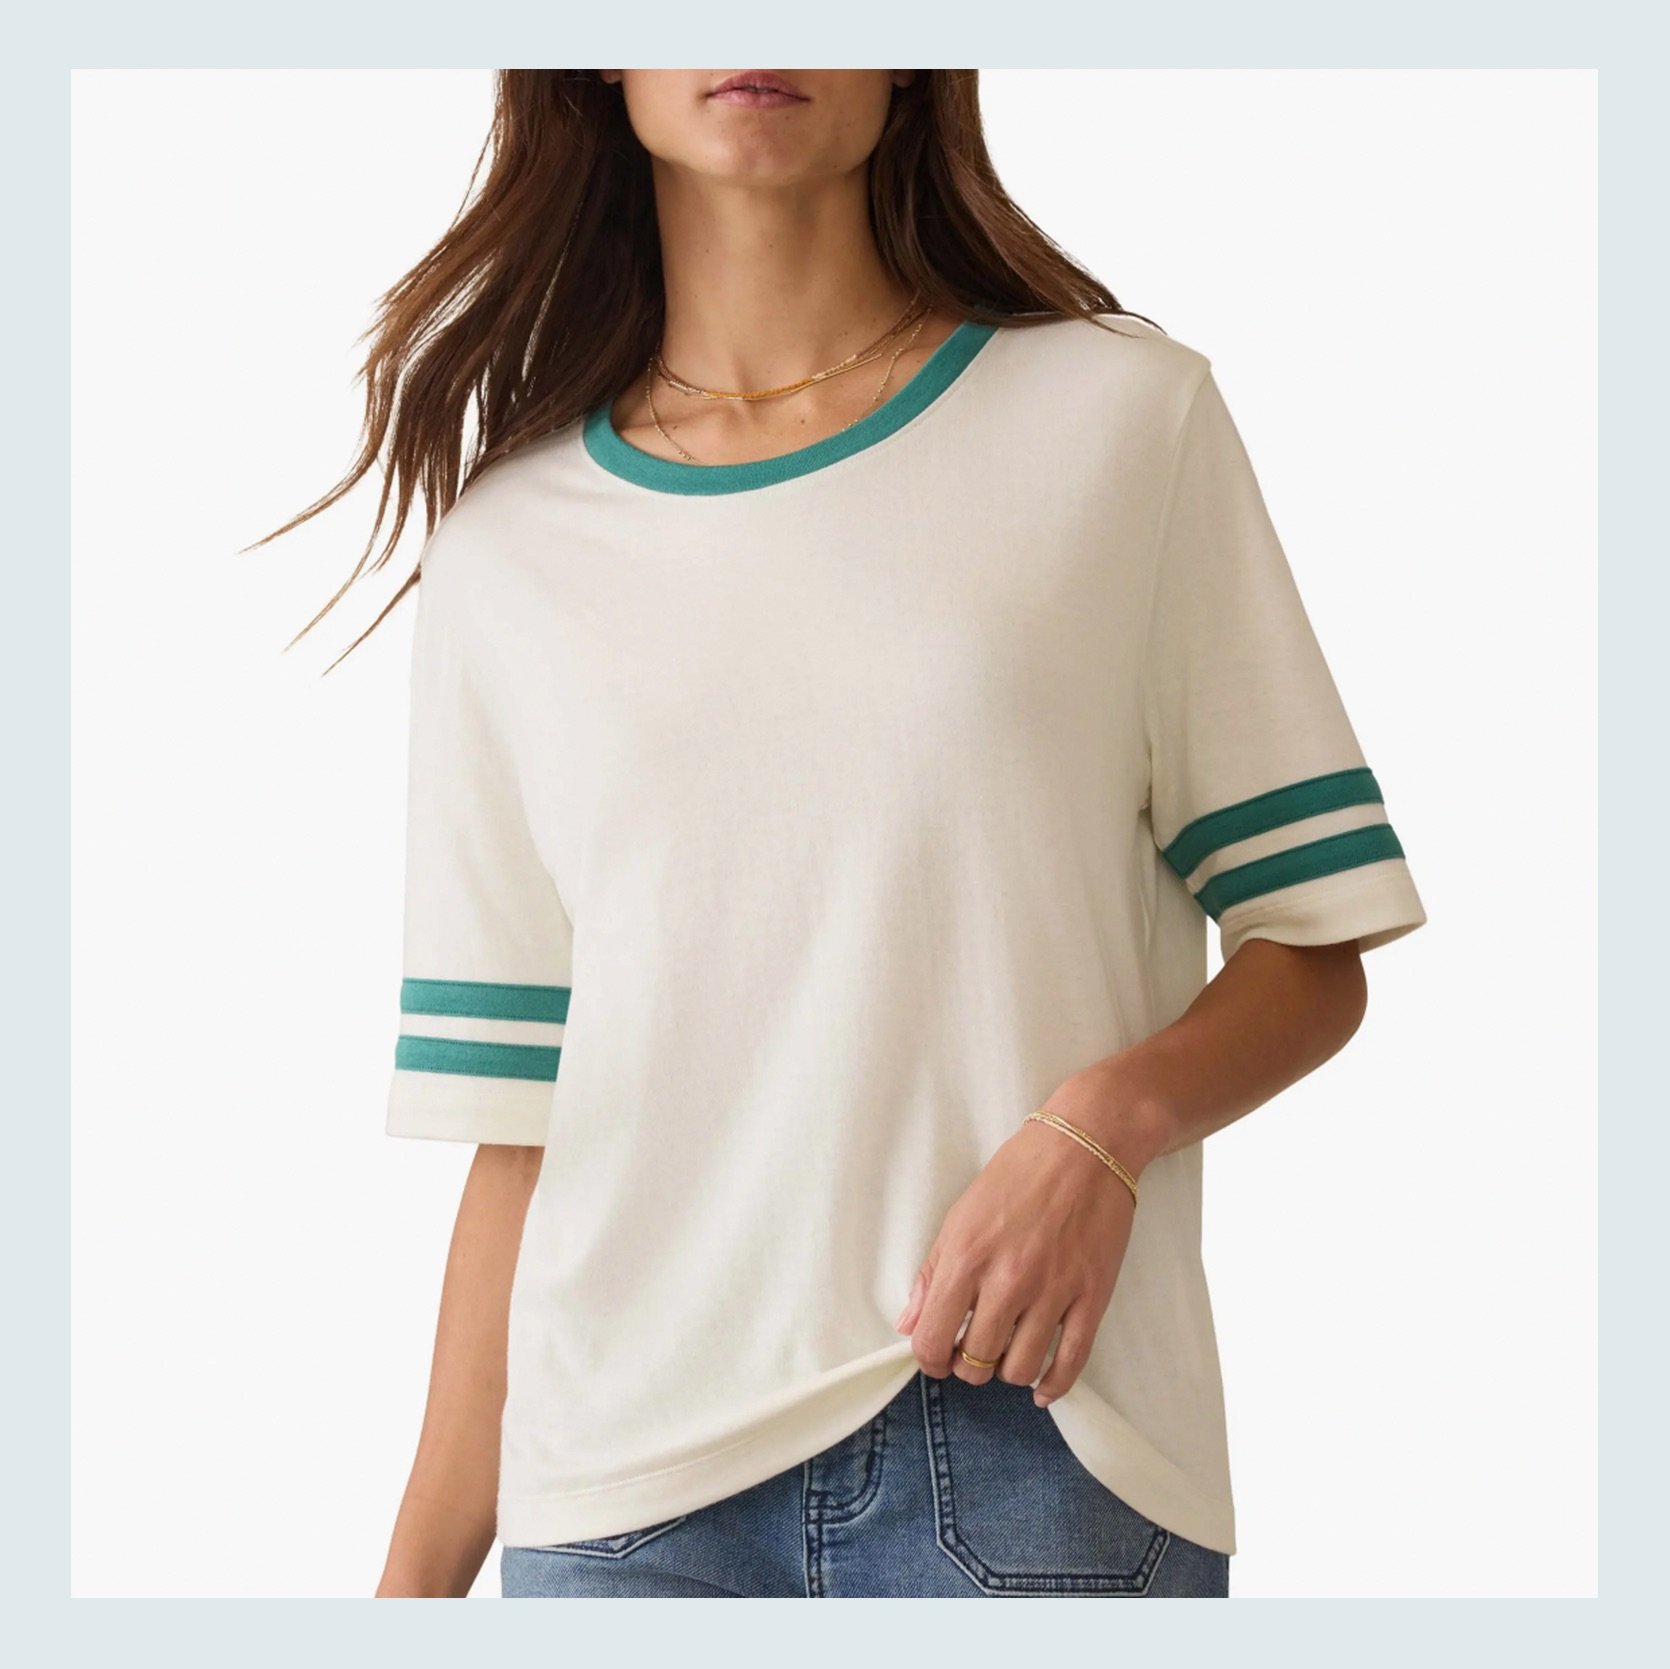
From Marlee: I’m always looking for shirts that are a step up from a t-shirt or tank top, but nothing too complicated – this shirt from Madewell is exactly that – I grabbed it in white, but I might have to go back for the striped one. It’s a super simple loose fit, but I love how it has a little cinch in the waist and drapes over the sides. It falls right above my hips (I would say I have a somewhat shorter torso, so it might be more cropped for someone with a longer torso), but I like that I can make it more cropped if I’m wearing it with something more high-waisted. It’s a super soft fabric, not see-through, and super breezy/airy. I got a size XS because they were OOS of S at the time, and it definitely fits fine, but I would size up next time for an even looser, drapier fit. I can’t stop wearing it – I’ve repeated the same outfit 4 times in the last week:)
From Arlyn: As I was running out of my giant Costco moisturizing shampoo and conditioner, I wanted something lighter, fresher, and easier to travel with. Years ago, on my old personal blog, I did a review of shampoo bars, and the one from The Earthling Co. was by far my favorite, so I tapped back into that this time around, and I’m so happy I did. My hair is clean, feels bouncy and not weighed down, and I don’t have two enormous plastic bottles taking up room on my shower caddy. WIN WIN! I also picked up the conditioner bar and this silicone storage/travel case, which I keep right in my shower to stash my bars. Oh, and the best part? Everything is 20% off all month for their Plastic Free July Sale, so stock up!
From Mallory: Have you ever packed a suitcase for a trip and forgotten something critical?! Well, I packed for Hawaii and forgot bathing suits (cool!), so I had to do that classic “SOS, I need to go get a bathing suit or two right now” shopping trip. I then stumbled upon the most affordable and SUPER cute swimsuit!! It was $20 for the bottoms and $25 for the top, and has the cutest little ball details on the tie, plus the fabric looks expensive. They have it in white and red, and when I tell you…this is now one of my favorite suits ever.
Also from Mallory: I snagged this cover up set (top and bottom) from H&M when I was there too…it fits great and the stripes are so adorbs.
From Jess: I was bopping around with my cousin on Sunday, and we stopped into RG, a small, woman-founded, affordable jewelry shop, in Atwater Village. While there are some pieces that are a little more expensive, most of what I saw (and bought) was so reasonable. I got these thin, everyday gold hoops and these sweet little tri-crystal cluster studs for my new second hole. Both were under $50 and I love how special…but simple they are:)
Also From Jess: I finally invested in a couple of new bras that I LOVE. I’ve tried Third Love, Negative Underwear, etc., and was never all that impressed. I really dislike any added padding, so I’d been wearing inexpensive mesh cup ones that were on their last leg. Then, when one of my best friends was visiting last month, she was raving about her Fleur du Mal bra. I tried it on and immediately ordered it. I first ordered the lace one in black because their “t-shirt bra” was out of stock. Once I got it, it was the only bra I wanted to wear because it was comfortable but still a little sexy. When the t-shirt bra came back in stock, I hit add to cart and got it a few days ago. The cup is soft (not padded!) and so smooth under tops. It’s also just so freaking flattering. I feel incredible in both of them, which is such a good feeling. No more kinda sad bras that fit “good enough”.
From Caitlin: I was lucky enough to spend this weekend with my mom, and she treated me to the cutest pair of summer pajamas! They’re from Jockey (!!!), they’re super budget-friendly, and the top and bottom can be purchased separately to best fit your sizing. I LOVE THEM – the photos don’t do them justice! I’m obsessed with the piping detailing on the cami and around the legs; I can’t get enough of the ribbon tie on the bottom; and they’re SO COMFORTABLE to sleep in. I got an XL on top (though I could have sized down here, and I’m a 36F!) and an XL on bottom, which feels great on me. They’re so cute that I feel excited to change out of my daytime lounge clothes and into my nighttime lounge clothes! Highly recommend for any summer vacations, slumber parties, or just as a general pick-me-up. I slept in them every night this week and am so pleased by the price:value ratio on them – they feel like a splurgy pair of Printfresh PJs at a fraction of the cost. Thanks Brenda!!!
We also wanted to give our love and support to those affected by the Texas flood. More than ever, it feels as though there is a never-ending occurrence of unbelievable harm and devastation happening, whether it be by man or by nature, and it’s especially heartbreaking when children are involved. We are so grateful for all of the people who are on the ground helping.
Thank you so spending a little time with us today and see you tomorrow for a really great reveal/tour. xx
I have a confession: I have the heart of a DIYer, but…I’m not sure I’m actually good at it. To the point that I know many of the projects I’ve taken on have ended up costing me more money by trying to save money. Oh, the irony. This is due to several reasons: I complete a project that eventually falls apart and needs to be replaced, I start a project and just never complete it, I take on a project where the material costs aren’t really much cheaper than just buying the dang thing.
Don’t get me wrong: I think DIY is an absolutely amazing thing, and have seen many people do things that make my jaw drop. DIY is a fantastic tool for creating your own custom-designed anything. Can’t find it on the market? Make it! Can’t afford what’s on the market? Make it! Want to renovate rooms in your home little by little without the wild cost of labor? DIY it!
But I think to say DIY is always a money saver, no matter what, is simply just not true. In fact, at times, it may cost you *more*. Sure, you get the satisfaction of completing something, learning a new skill, and putting a personal mark on your home. But things don’t always go according to plan. The Internet has fooled us all into thinking we can and should just do it all ourselves (more on that later—keep reading) but, ::gestures with finger to come in closer:: …we don’t.
Now, there are some things I’m fully adept at doing, and we each have our own list of things, even if it’s a short list. I can sew, am fairly handy with crafting, am a very good wall and furniture painter, can install my own lights (thanks Jess for teaching me!), and I can work a drill fairly well. Do I dream of being able to use a table saw to build my own bookcases and raised garden beds? Absolutely! Will I have wished I just bought them or hired an expert to make three seconds into those projects? Absolutely!
My DIY Successes: A Short List
Let’s take a look at what I have done successfully, and then we can explore all my failures.
For my bedroom reveal a few years back, I sewed that extra-long lumbar pillow because I couldn’t find a king-size pillow in a fabric I liked. I’m very adept at sewing easy things like pillows, so making soft decor items like these, napkins, curtains and even bedskirts will almost always be worth it to me. For a similar pillow, including the insert but not the fabric, it likely would have cost me at least $100 for a workroom to make (you can see some numbers on this site to get a sense).
Another DIY I made because it simply wasn’t something I could buy was my picture frame above my sofa. It was so easy, and is still going strong in my current dining room. The same goes for the window bench, though admittedly, I did not make the bench itself (Shade, Sara’s brother, made it for me but I know I could have done it with the proper tools and space). The bench cushion on the other hand was not within my wheel house and I ended up pinning parts of it together when I couldn’t figure out how to get the corners right…ay.
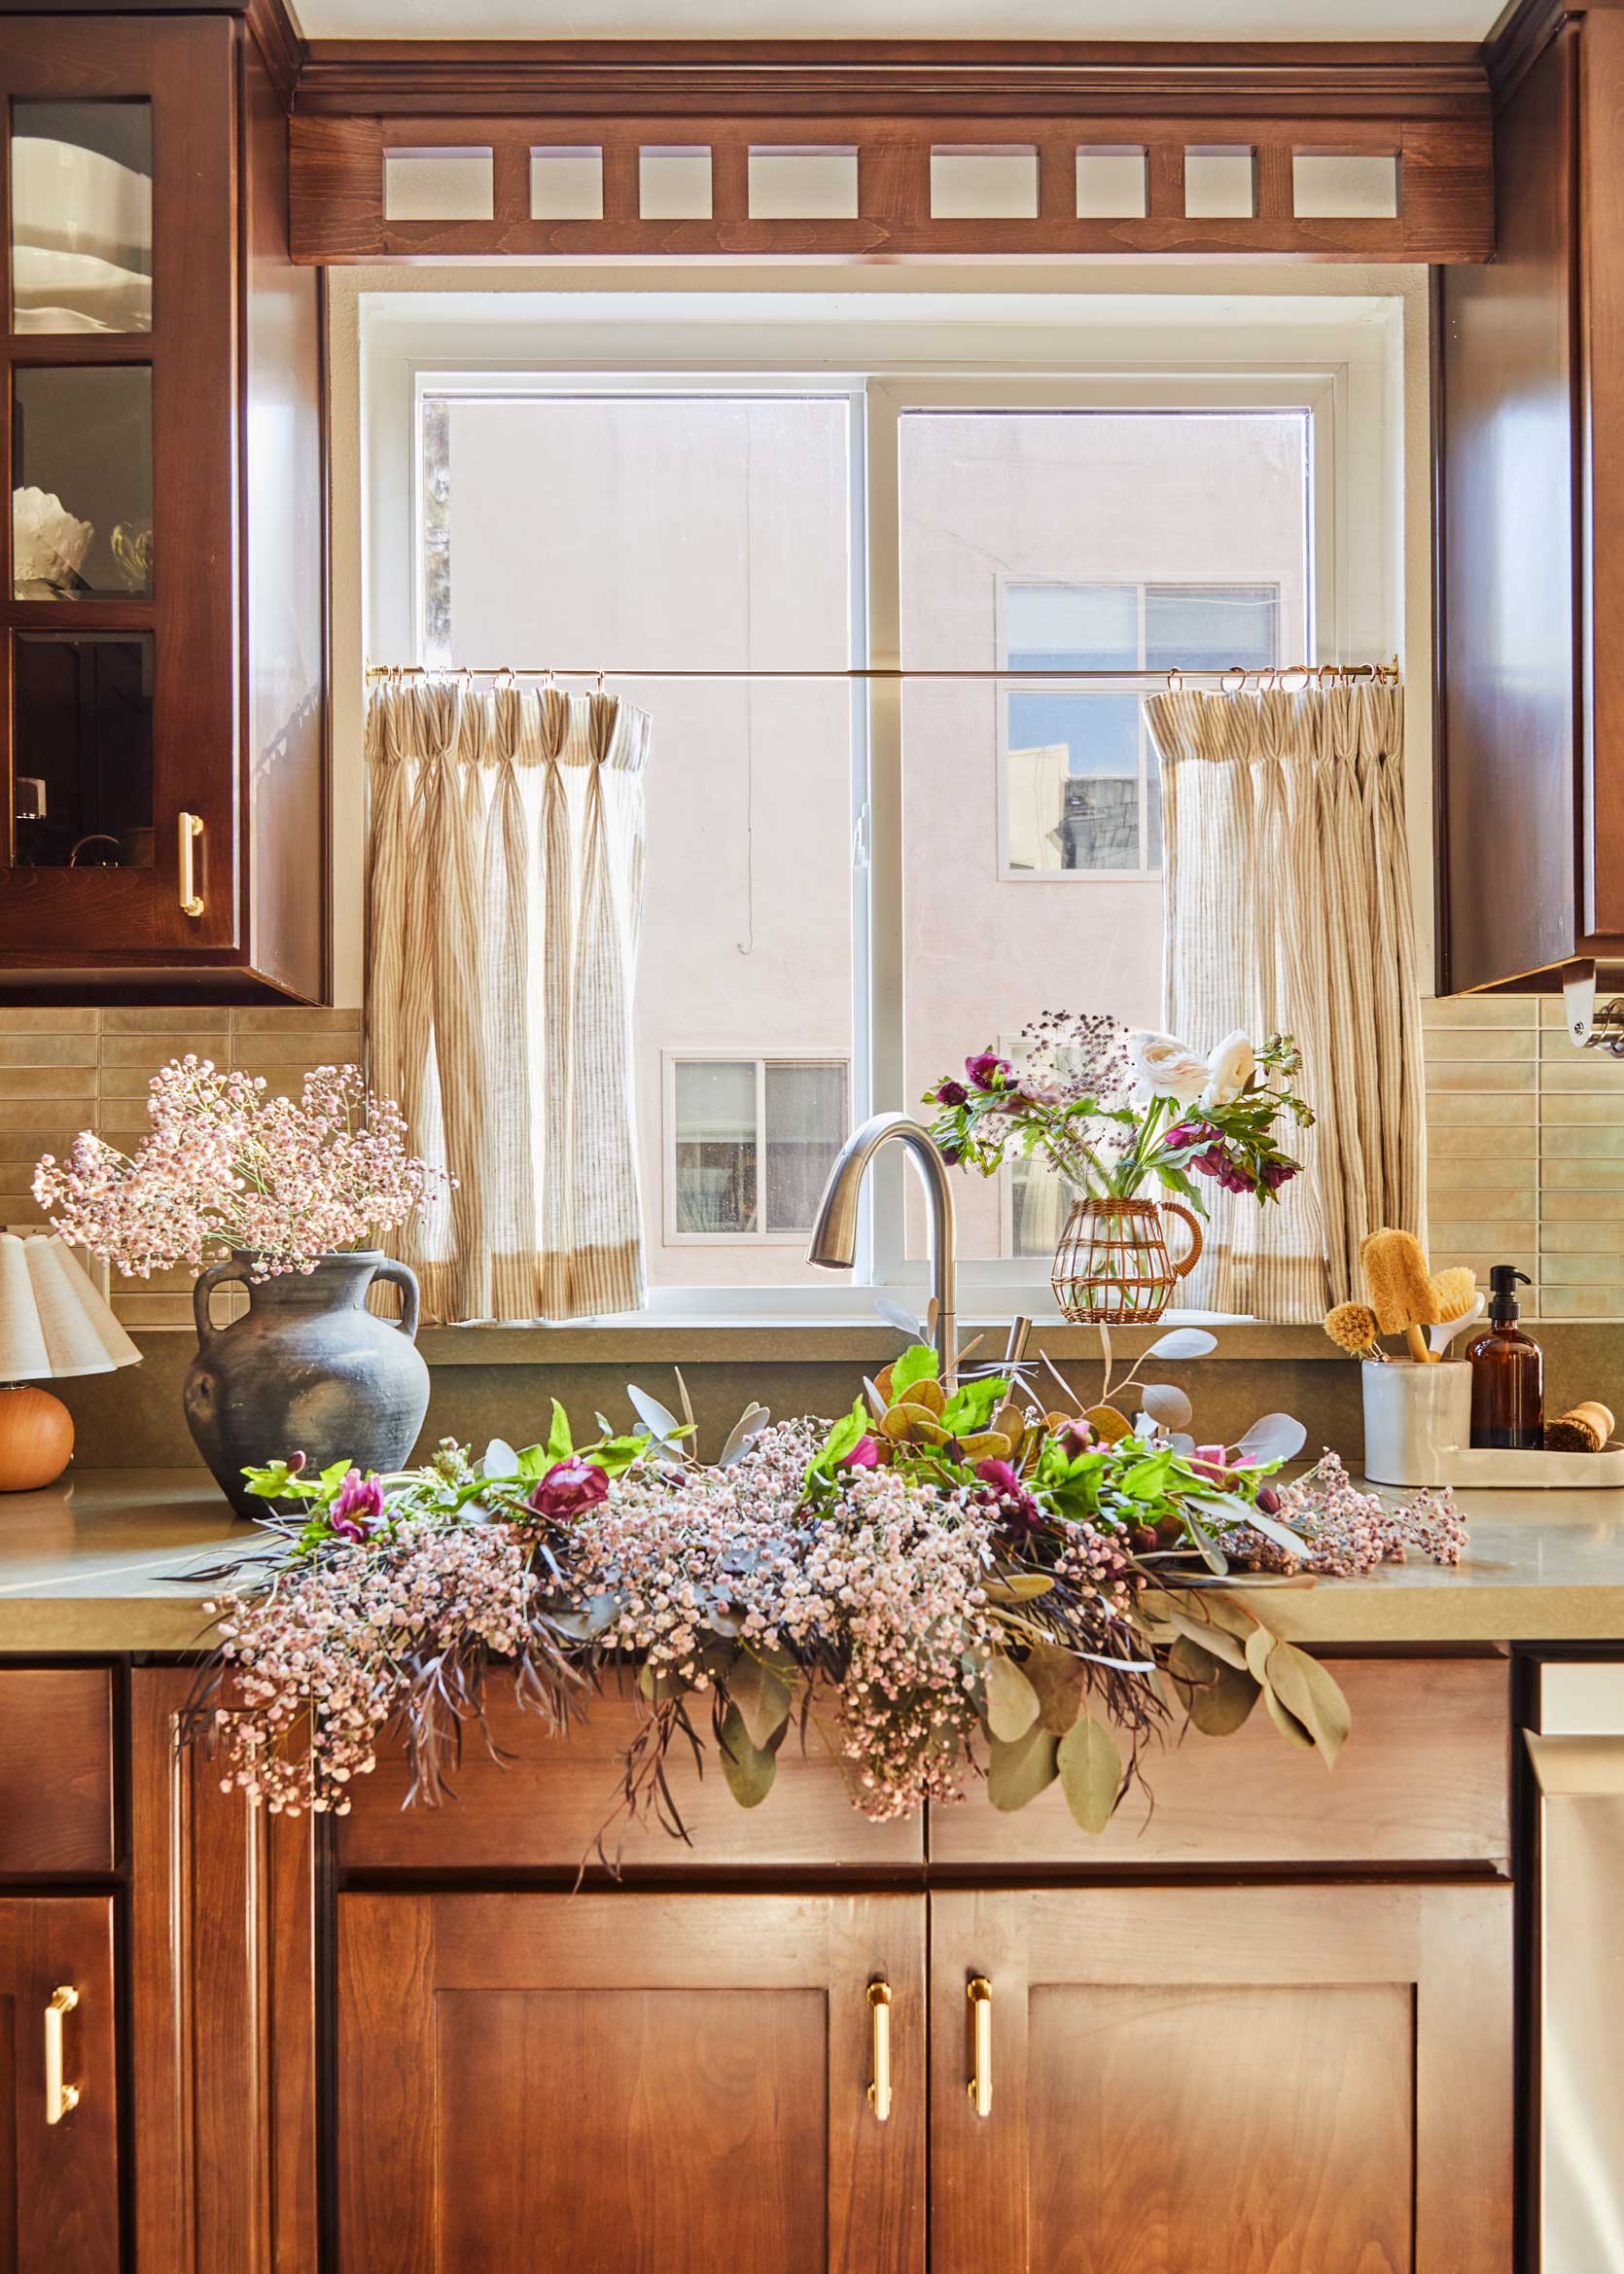
Two more sewing projects: The little chair pillow in my previous bedroom and the cafe curtains in my current kitchen, though if you look at the curtains closely, the edges are pretty wonky because I find linen very hard to sew square without bunching or shifting/stretching.
But alas, let us explore my failures:
DIY Kitchen Fails
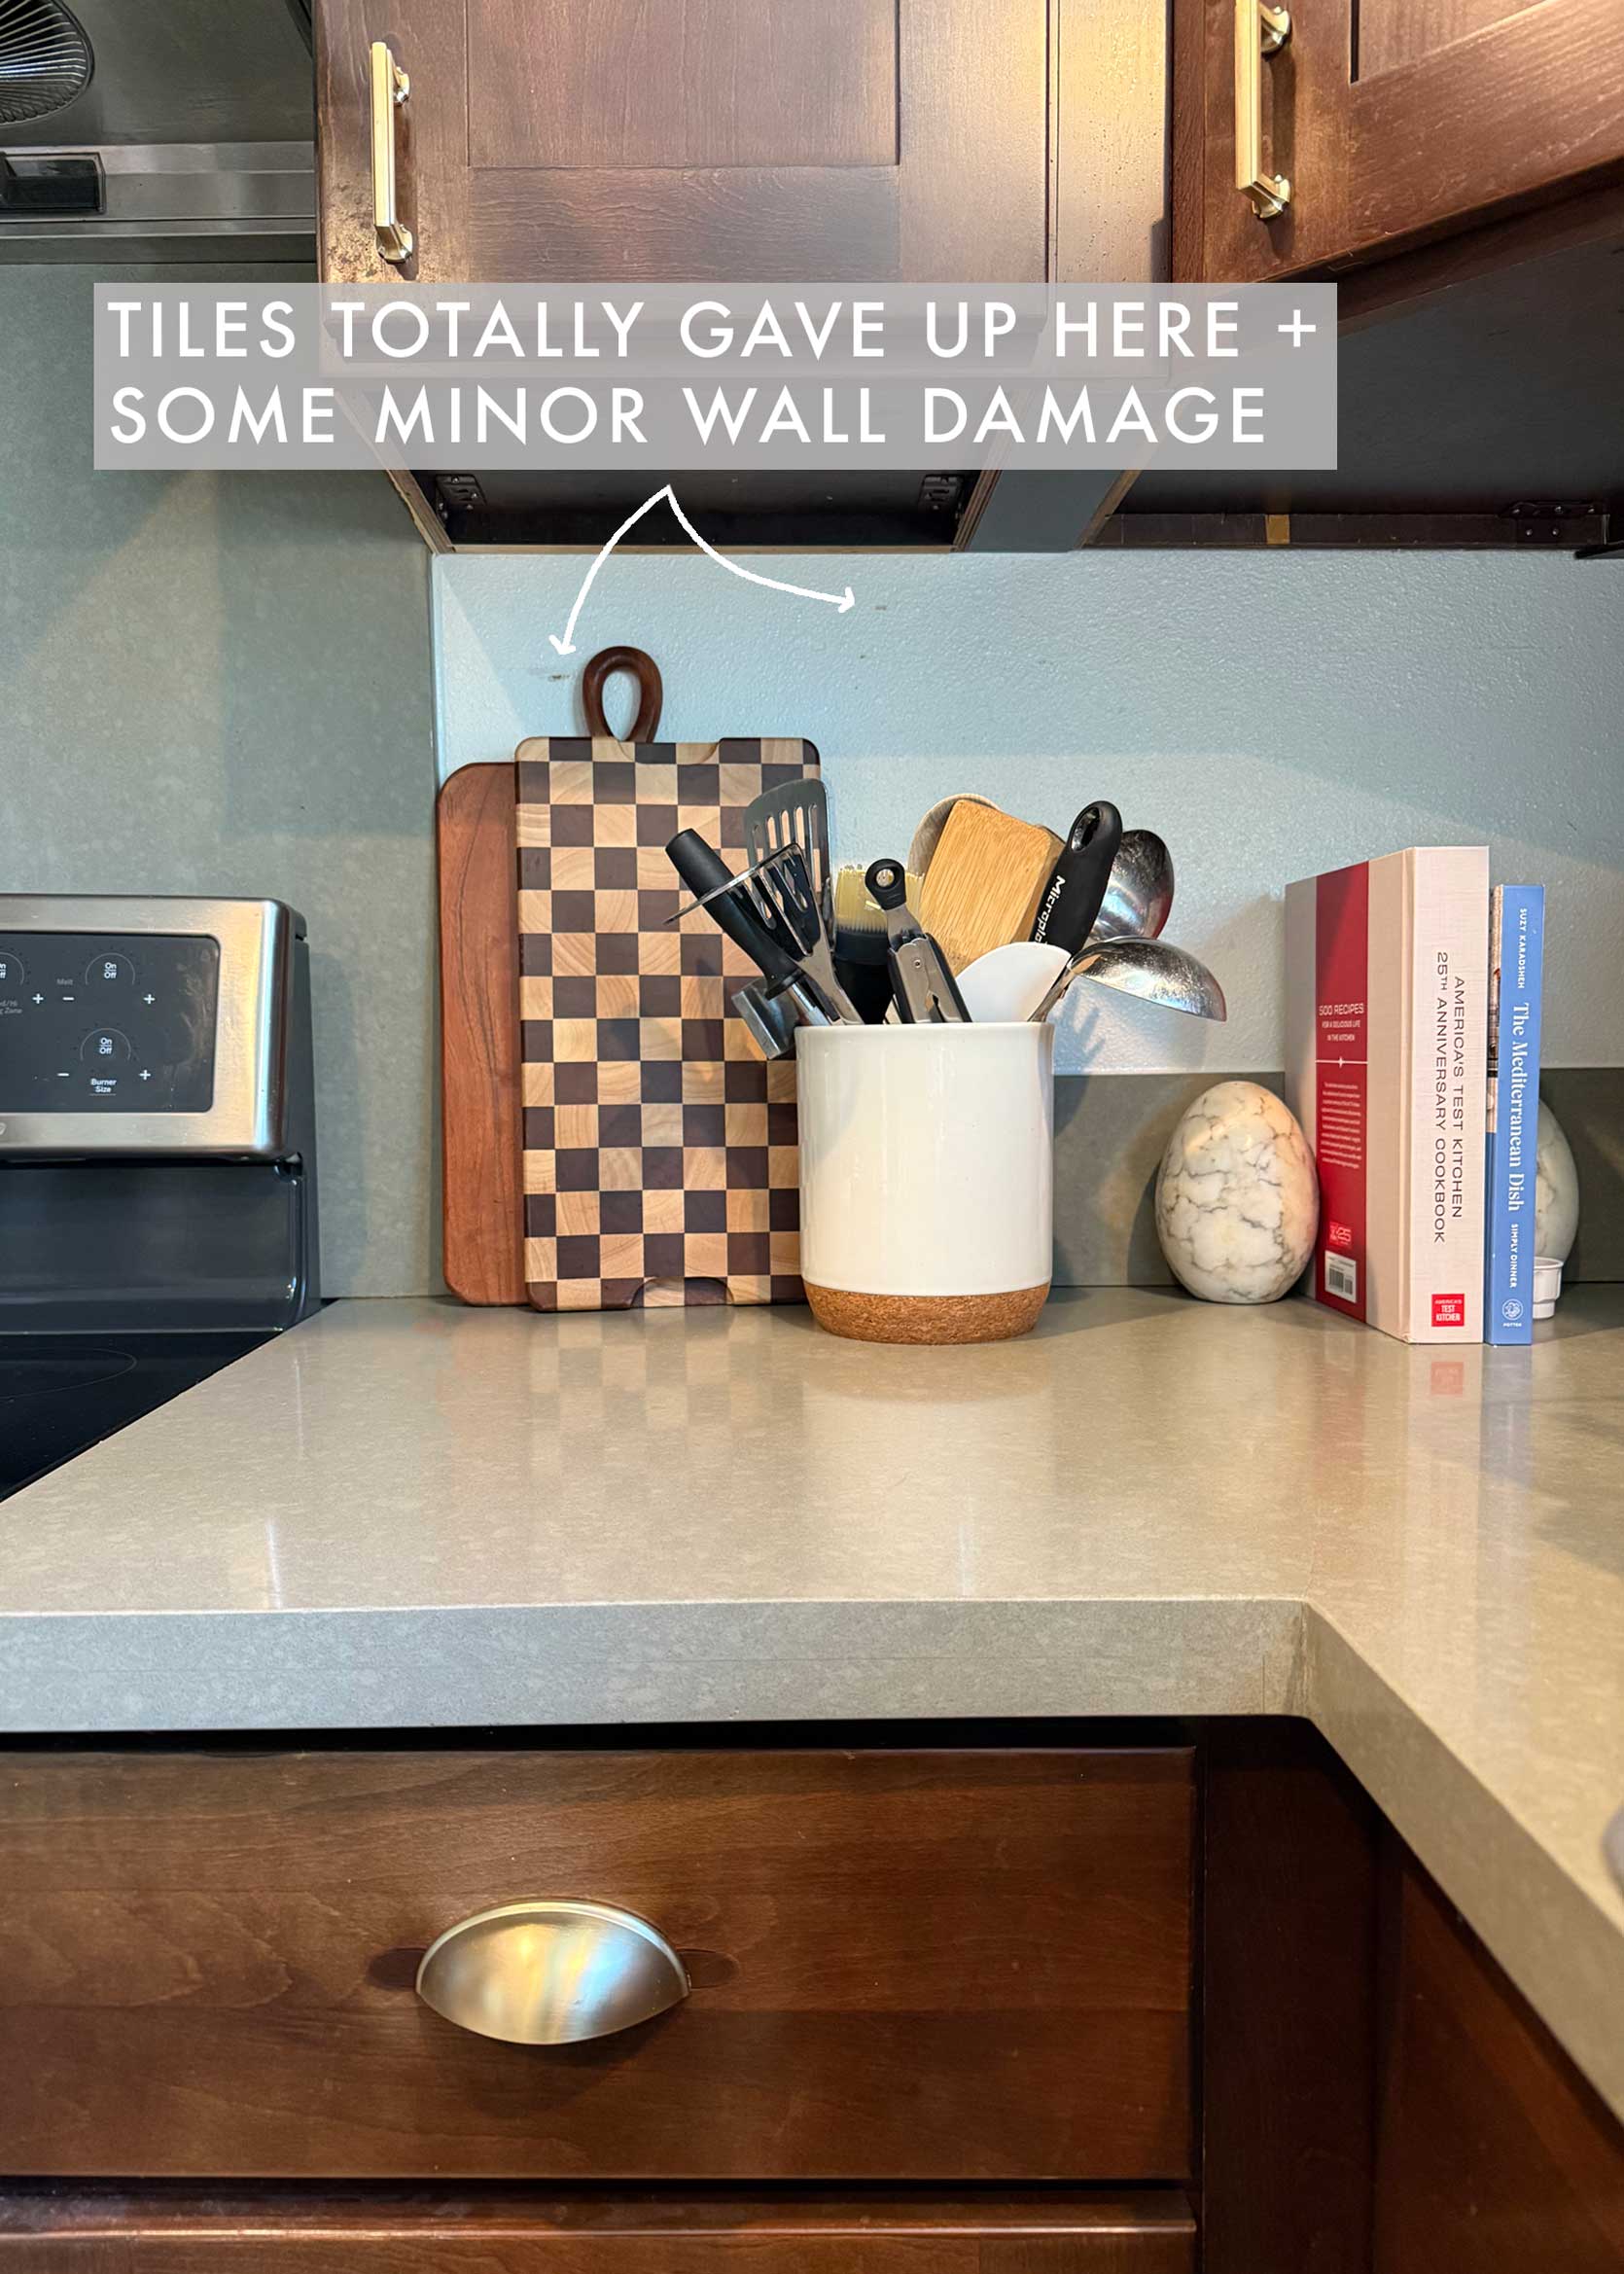
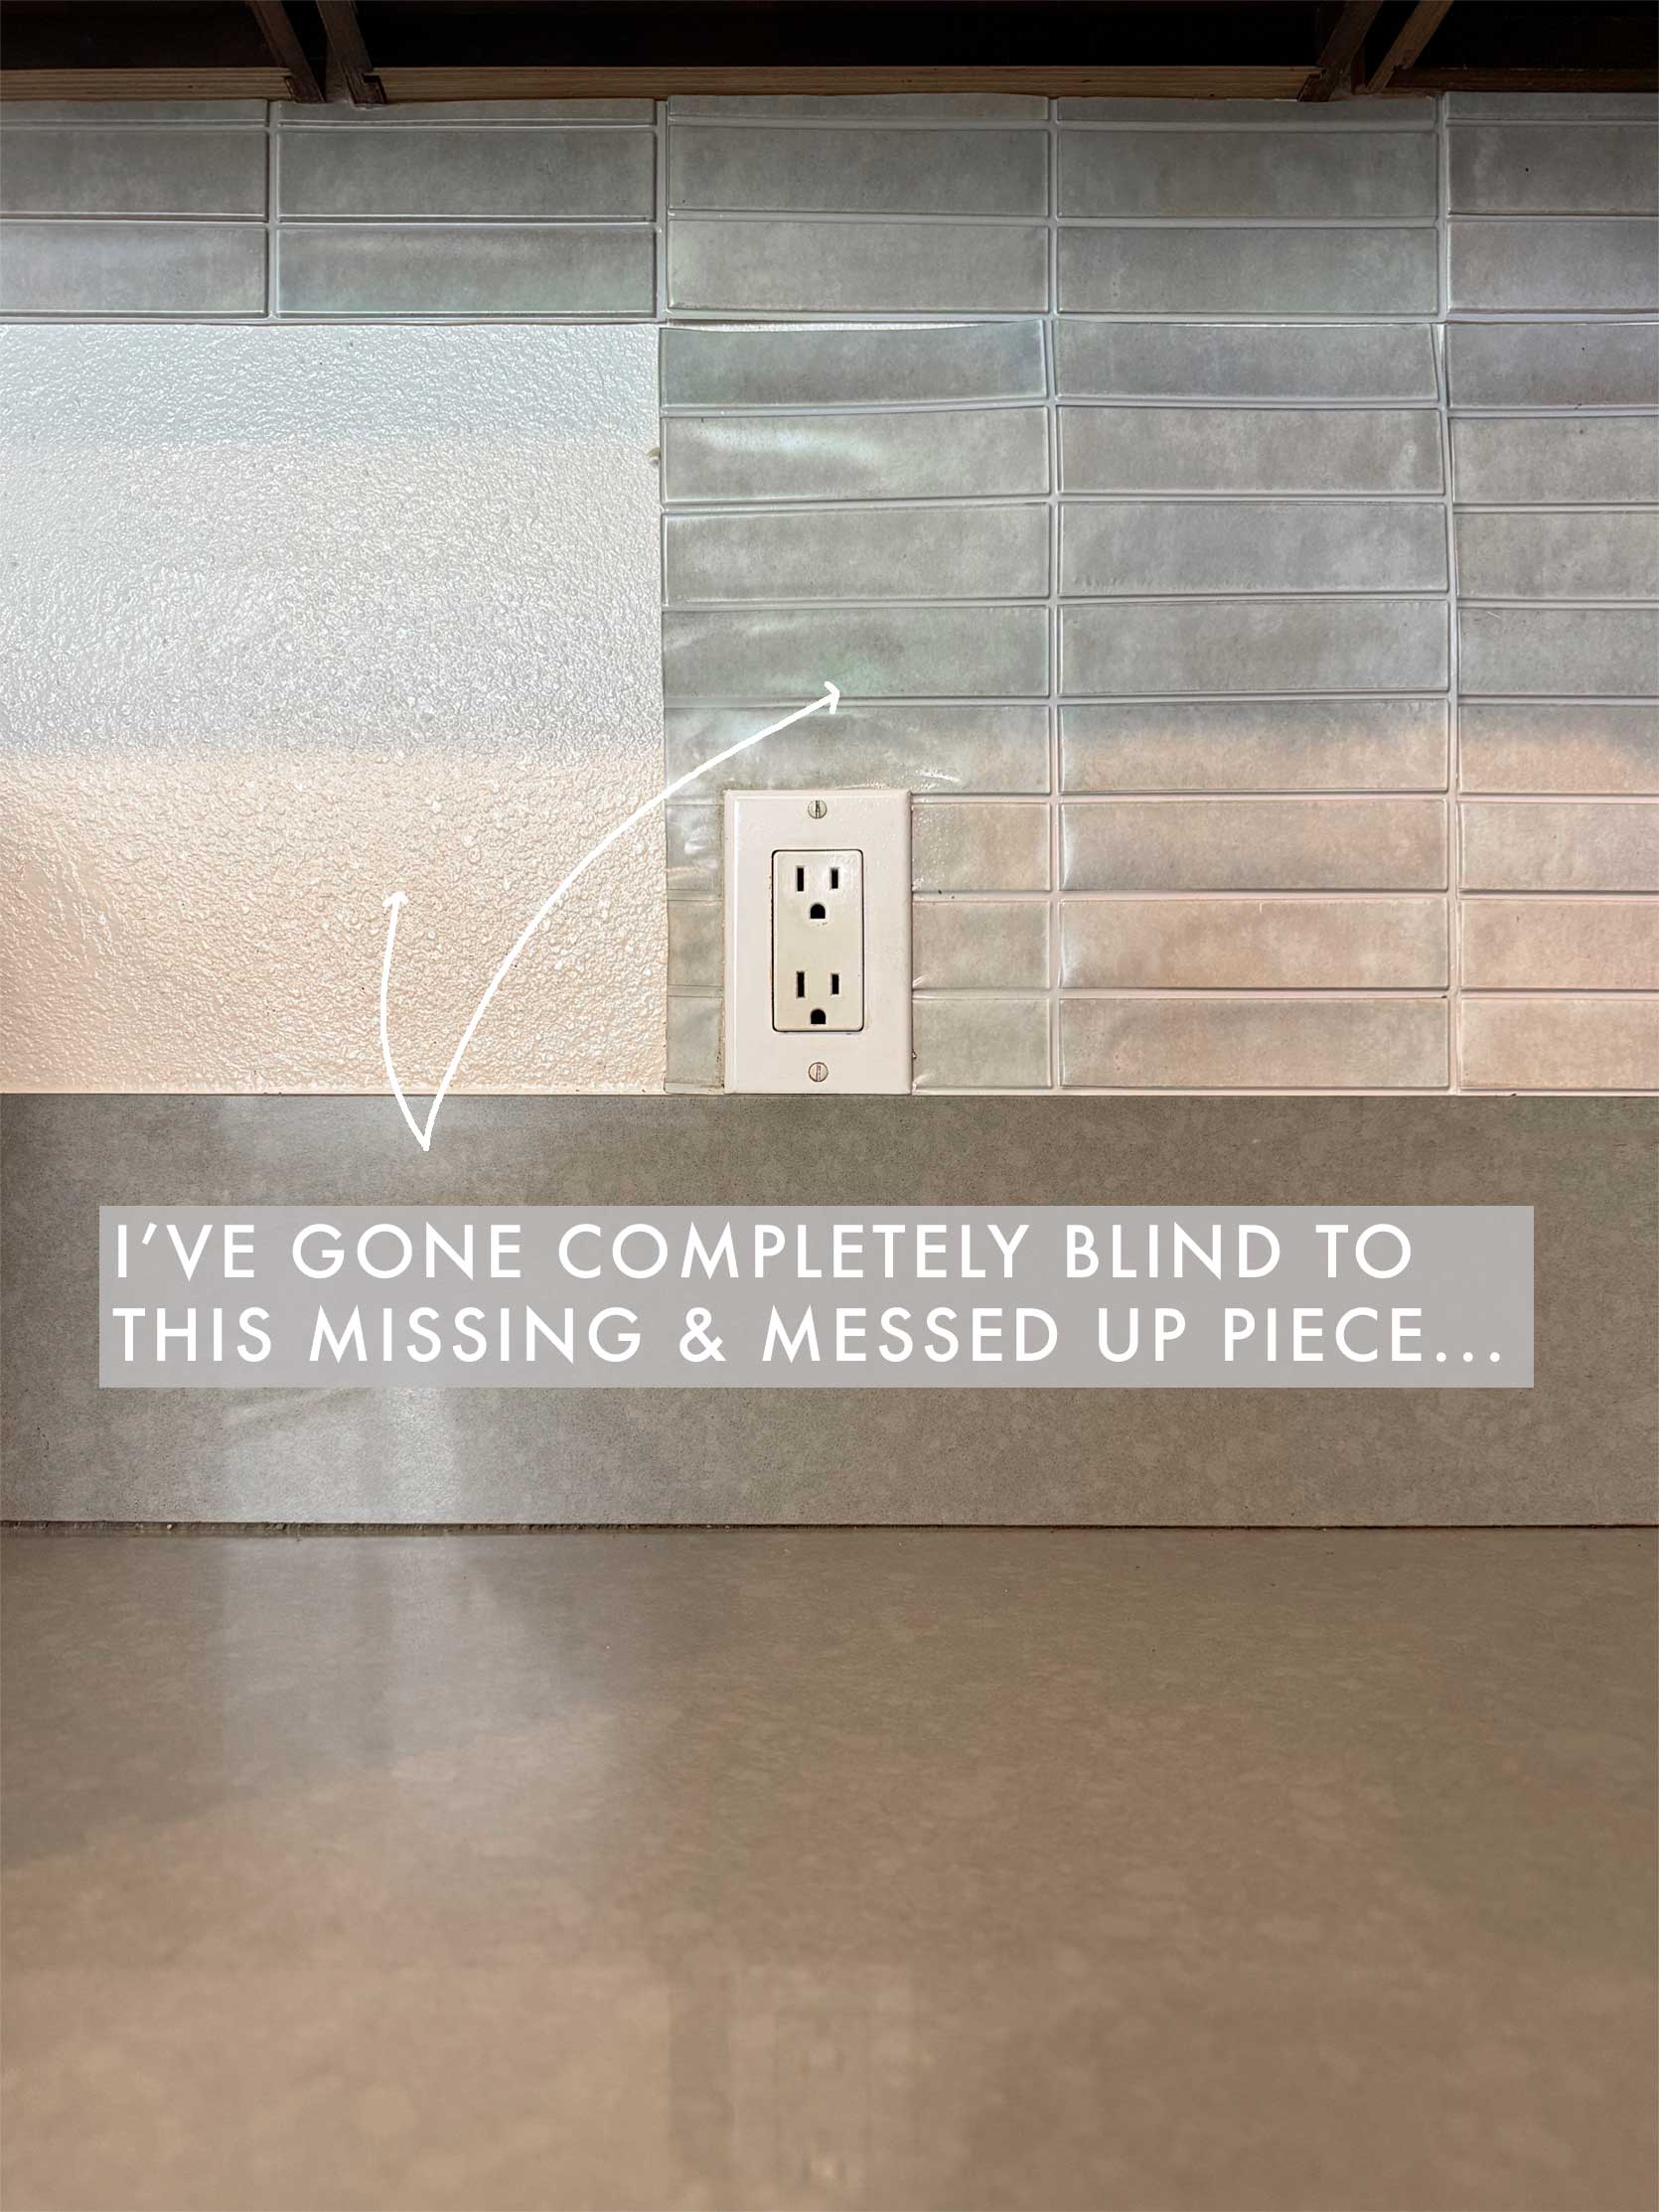
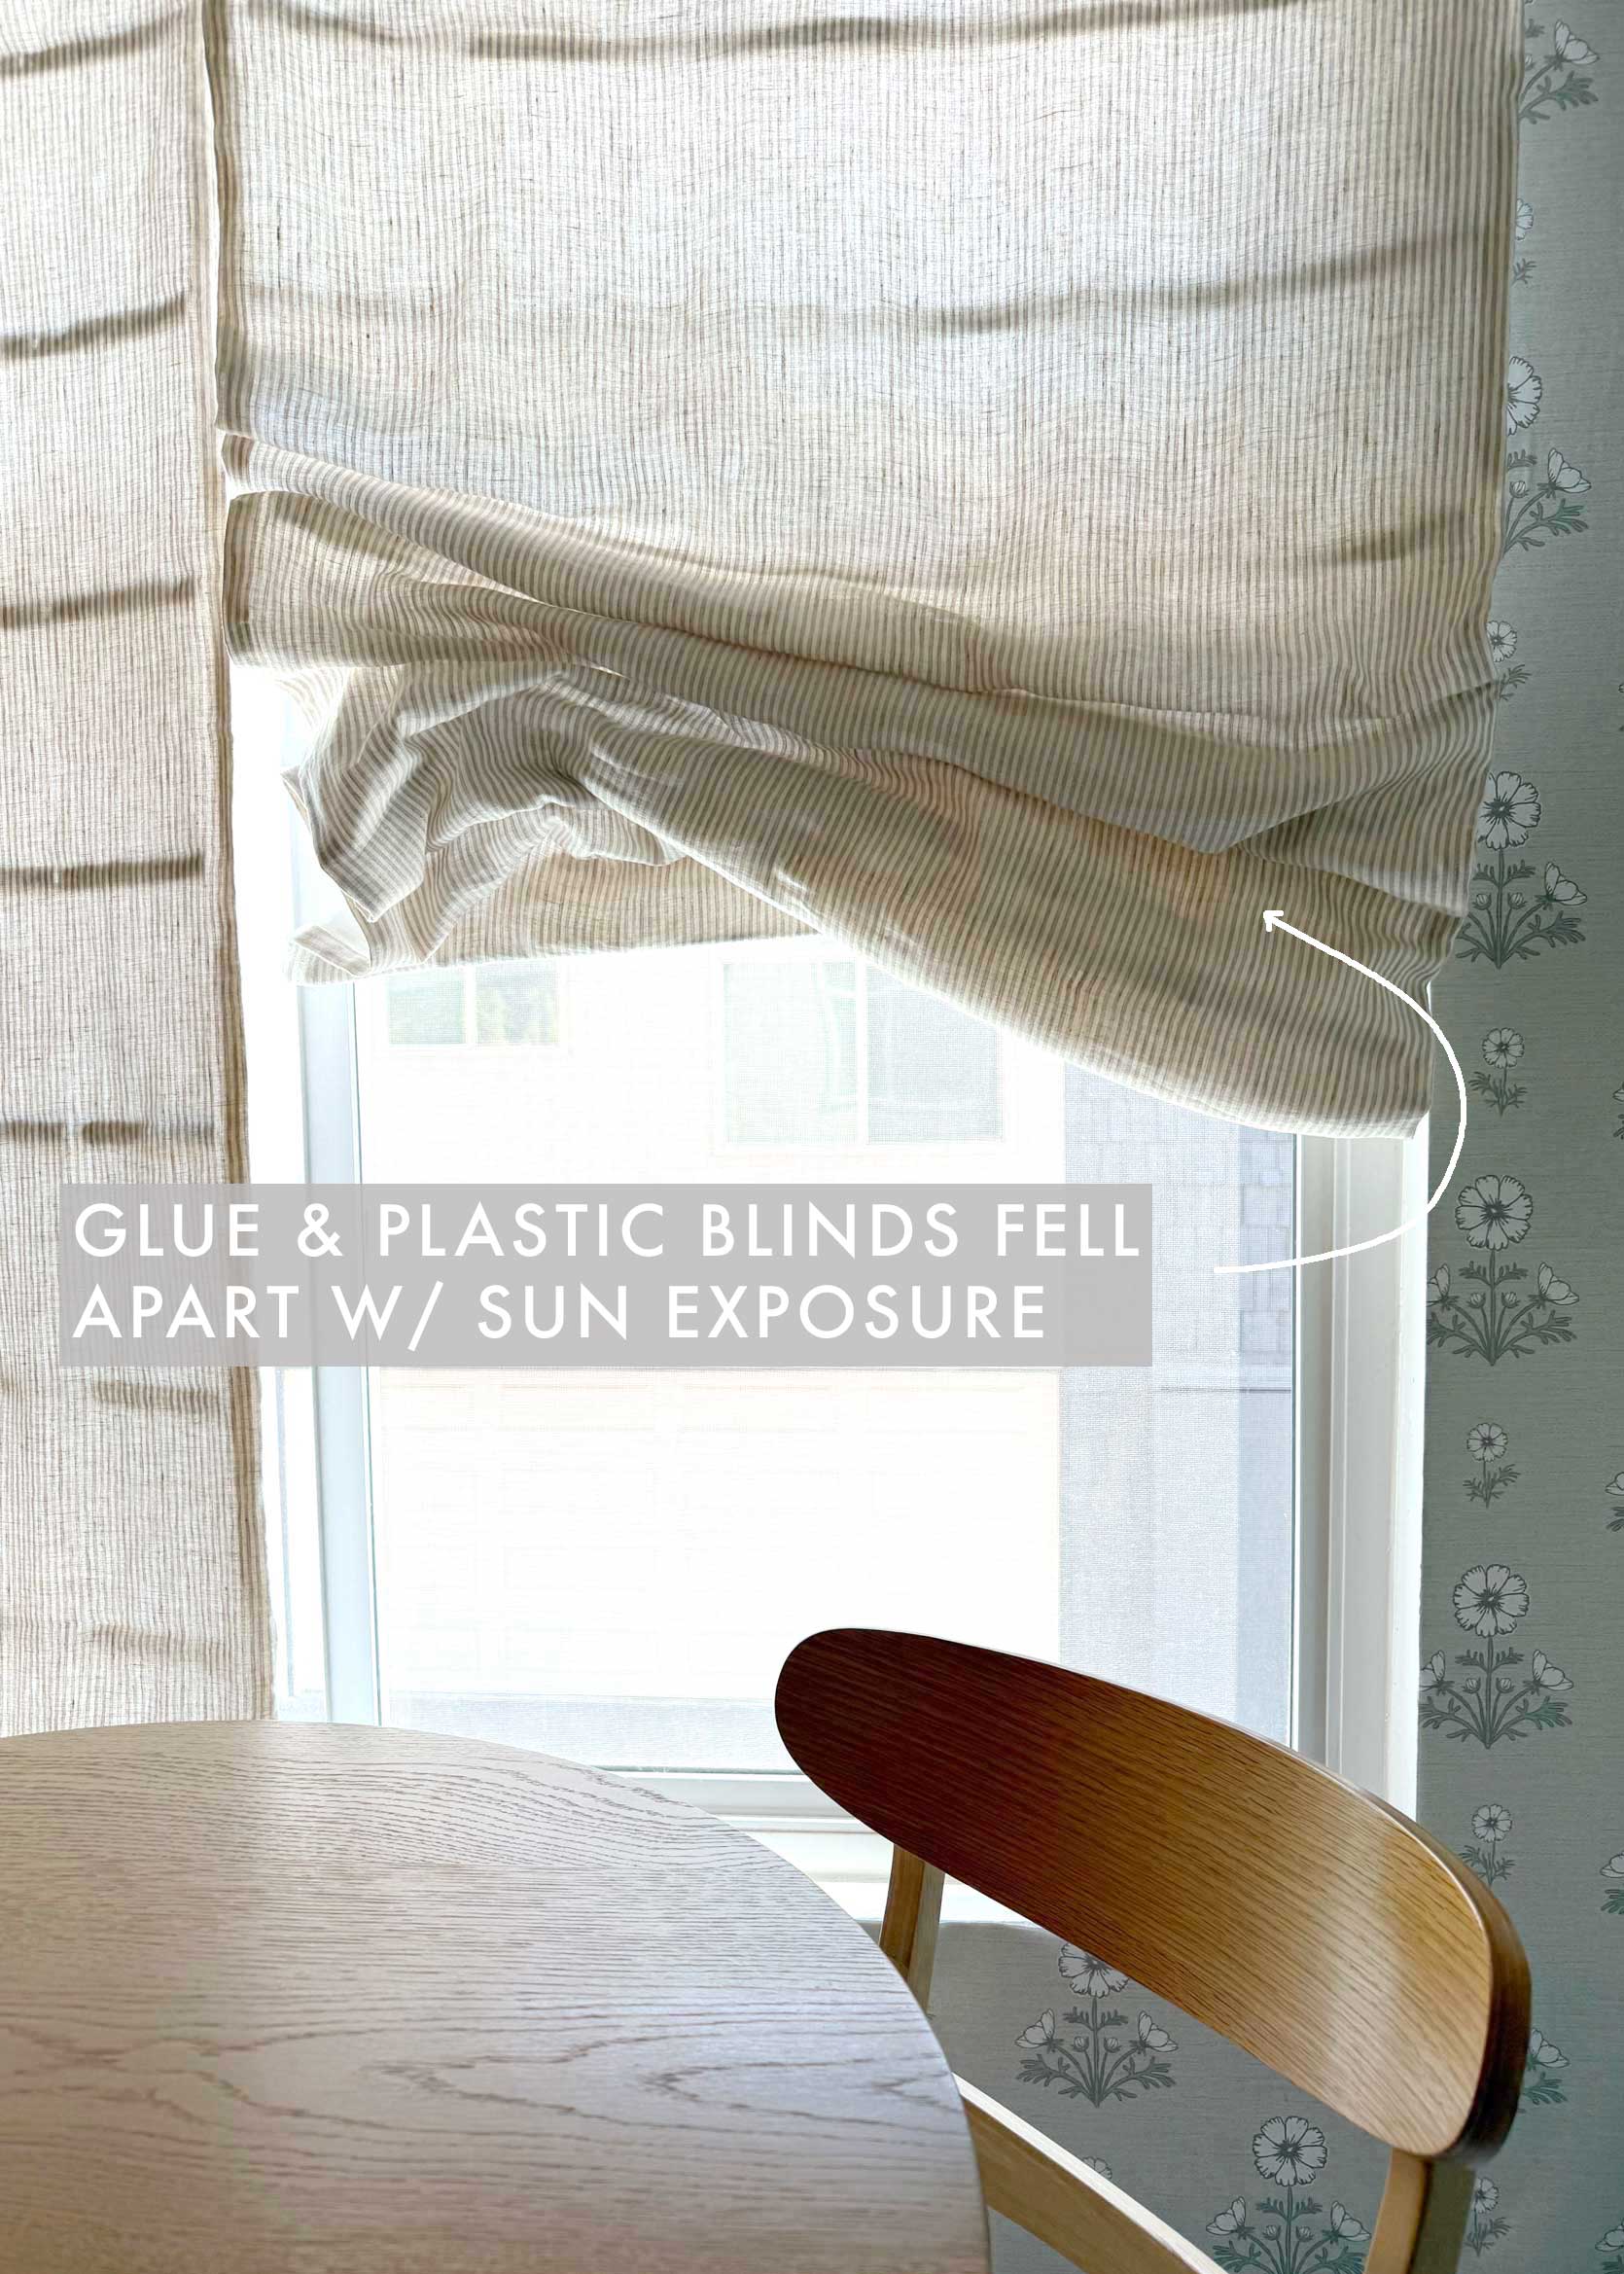
When I completed my rental kitchen refresh back in 2023, I was SO very happy with it. The end result looked great, warm and welcoming. I managed to save a ton of money buying second-hand appliances, making my own Roman shades, putting up a peel-and-stick backsplash and even making my own light fixture. But well, it didn’t all hold up its end of the bargain.
You know those things in your house that you’ve gone blind to? That you forget are the way that they are until someone new comes over and then suddenly you see EVERYTHING, panic, feel embarassed…all the things? That is my plastic kitchen backsplash. It was peeling off so badly on some stretches of wall that I just took it off. On the other side, only a piece or two are missing or kind of sadly just hanging limply off the wall. It’s so bad.
Honestly, I should have known. The reviews weren’t great, claiming the adhesive wasn’t strong. Some reviews said they had re-engineered it so I was hopeful, but from the very beginning, it was a bust. My walls are slightly textured, and the paint is semi-gloss, which together, works against anything sticky.
This was clearly a failure of product, not a failure of DIY, but still, I want to break down what I spent on this, and what I might have spent on a proper tile installation, just to see:
What I spent on peel-and-stick tile: $35.99 x 4 packs to cover ~30 square feet + 10% waste and reserve = $144
What a tile job might have cost: ~$287 for this tile. Install could be anywhere from $10 to $20 per square foot (it’s a simple subway tile with no funky angles, just three outlet cutouts, so it would likely be closer to $10-$15 per square foot, so roughly $500 in a best-case scenario). Total cost of material and labor = ~$800
So, while no, a DIYed peel-and-stick backsplash was not more expensive than a real tile backsplash installed by a tradesperson, I wasted $145 because I’m just going to peel it all back and then throw it away (god, that hurts with how wasteful that is). I will likely not replace it as this is just a rental, but in retrospect, if I were an owner, I know the sub-$1,000 project would be long-lasting and well worth it.
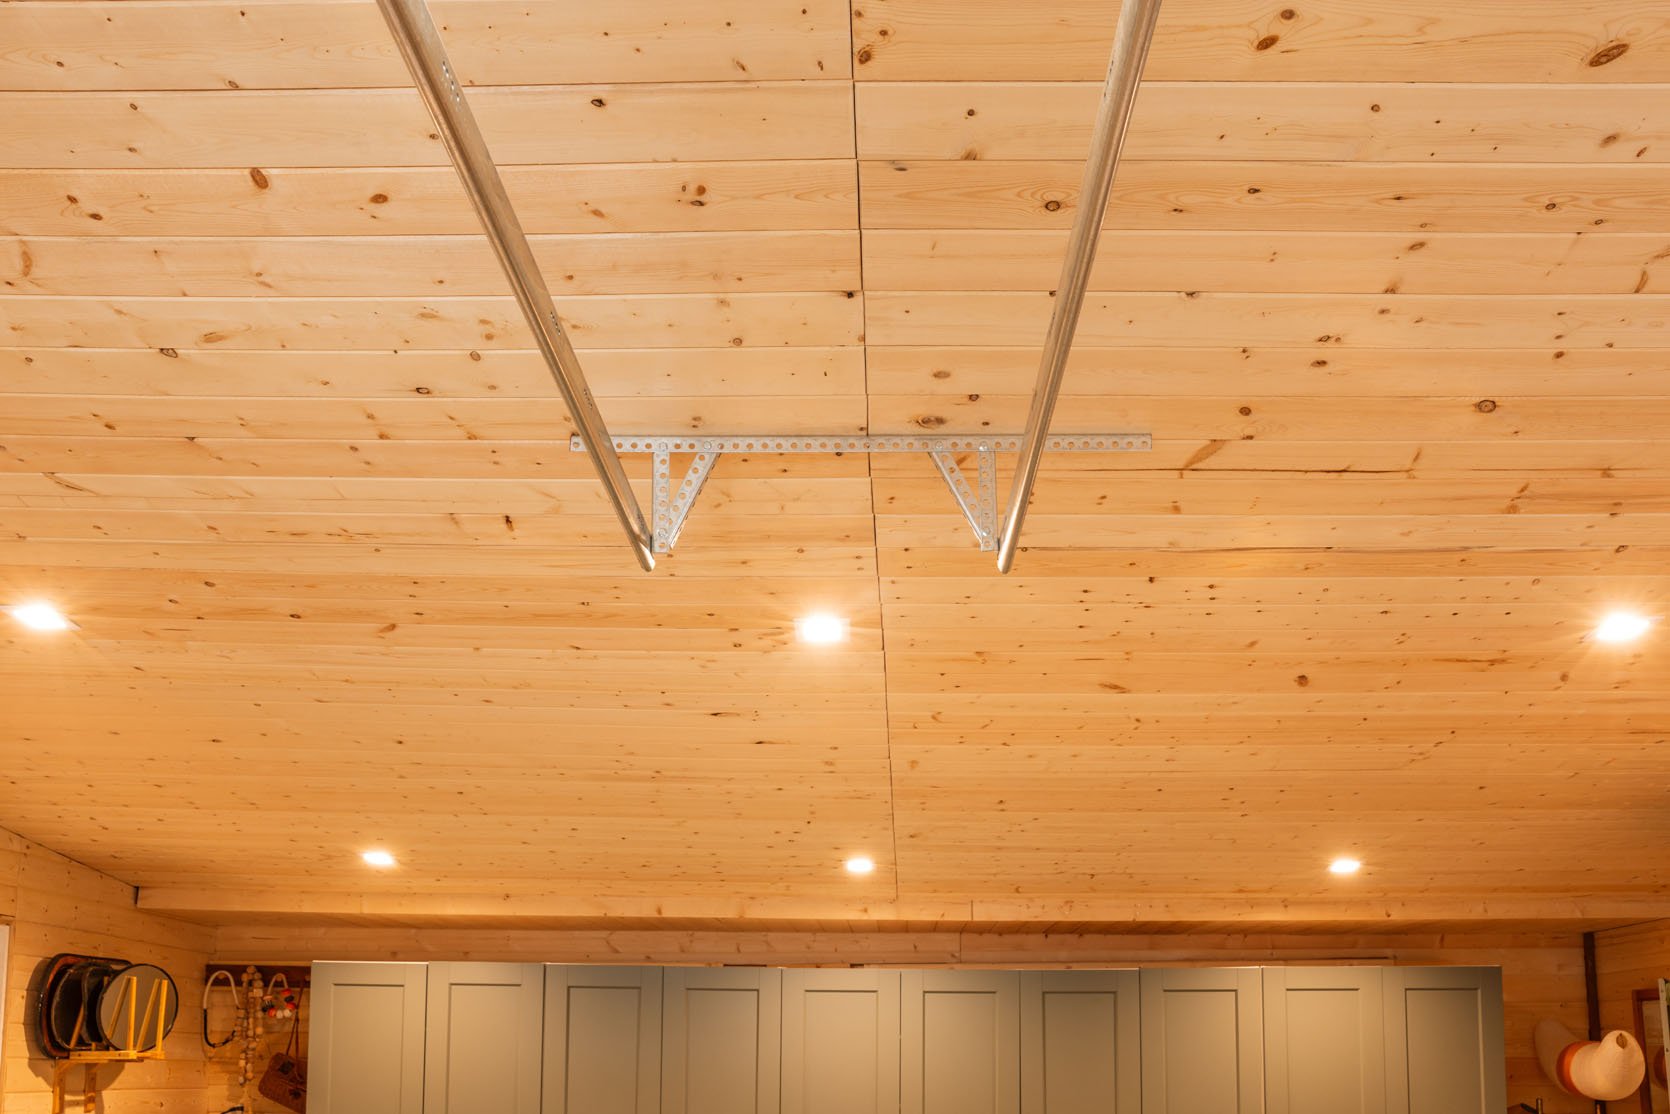
Warning: if you are currently renovating or building (congrats), do not just Google info about can lights, or rely on most contractors (no offense). I think we’ve all seen egregious can light crimes (which are almost impossible to change after the fact without serious ceiling and electrical deconstruction). You have one shot to get the placement and amount right, when your ceilings are open, before you finish drywall or, in our case, paneling (no pressure), otherwise back to the construction phase. I have a lot to say about can lights – warnings, learnings, anecdotes, and recommendations. But first…
“Can lights” are a type of “recessed light,” which is the broader category of lights that sit flush in a ceiling – the two words are used pretty interchangeably. Can lights aren’t most designers’ favorite type of lighting because the older ones can be eyesores – they are huge (6+ inches), bulbous (like an eyeball), oddly placed (not in a row, often random), and all those things can scream cheap construction, which is what makes a room look dated fast. And listen, some are cheap (some being much cheaper than others).
But there are good ones out there, and sometimes they are the best solution to lighting a room. For instance, I don’t mind them in our more minimal mountain house where we used 4″ white round ones that just disappear into the ceiling, minimally placed, and are on a dimmer. The ceilngs are low and I like how streamlined it looks. We also have them in our farmhouse kitchen (4″ square), placed for cooking and cleaning as support to our pendants and sconces (and in the winter we definitely need them).
Below, I started ranting about can lights – all my thoughts I would tell someone in person if they were asking, so I’m putting what appears to be my extreme can-light passion into numbered points here:
The reason cans can be so good is that the spread of the light is wide and even (generally untrue of a spotlight, in my experience, although track-lights can work, but very style specific). They can really light an entire room evenly, should that be your goal.
I personally don’t love the 10 flushmount or semi-flushmount look (not to mention that being much more expensive), so if you don’t have a tall enough ceiling for a multi-bulb chandelier, then your options, if you want a lot of light, are what? 10 brass spotlights? Good luck cleaning in the winter!
For most rooms, I prefer a pretty ceiling fixture (chandelier or a pendant/s), with a couple of wall sconces (when possible) – these are the pretty fixtures. But then I like it when these are supported by some overhead, minimally and evenly placed, small can lights. THERE I SAID IT. I like to see when I want to see!!!
I don’t love cans in older plaster ceilings.
What about wood ceilings? Well, in my brother’s house we chose not to interrupt the wood ceiling with black cans (I was team can, BTW) so we did less lighting, choosing some pretty spotlights in their bedroom, and you know what? He wishes he had more lighting in that room and in the kitchen. We fought and lost that battle, and now they have to live with it.
I prefer small, square housing (4″), and I like black cans on a dark ceiling and white on a light ceiling – see our current family room ceiling. Although a minimal round one is fine, too!
I mostly choose function but over fashion (barely), and it’s all a personal preference (some rooms I don’t care about as much, functionally, and will choose the better design and skip the can lights).
Vintage style homes want fewer can lights (they are era-specific, so use where you need, but not everywhere).
And while I personally have never ever requested photoshopping out can lights in any of our projects, many a photographer has taken liberty to do so on our behalf, which is frustrating because then the rest of us on the internet never know where to place these GD cans!! (You won’t see them in a magazine, ever – admittedly, they can ruin the shot!).
Be very very careful to place a can light over something unless it’s in line with the others and makes sense with the overall ceiling pattern – i.e., don’t just do a constellation pattern in a kitchen to light the sink. At minimum, keep it symmetrical and balanced (not a random eyeball by the pantry on a diagonal).
In today’s case, in this garage we need ample lighting in the winter, but we couldn’t have pendants due to the mechanism of the garage doors (pendants would hang down and the door would hit them). And living in an northern state we can’t always just rely on those cute/sweet spotlights that don’t do the job after 4 pm (I’d love to know if anyone has a recommendations for a spotlight that does create enough light – I think it’s a designer conspiracy theory to get us all to use them, but I have it on good record that they don’t create enough actual light to live!).
OMG I’VE GOT TO GET TO THE POINT. That’s all to say I had to figure out on my own (oof) how many can lights for our studio garage, how far apart they should be, how big they should be, and what wattage/lumens they should be (without anyone to help me). NO THANK YOU, SIR. In this space, can lights were the only real option that made sense – so what do I do????
If you Google “how many can lights for a room that is 22×21” (our size), it says, “16 – 24 CAN LIGHTS”. LOLOL. That’s disgusting. Not only would this look so dumb, it would be so bright it would be annoying to live in (true story – my brother’s garage is over-lit and it’s annoyingly bright in there). I’m not performing surgery, folks! Of course, this depends on your lumens and personal preferences (perhaps you are a garage surgeon?)
For this room (22’x21′), my brother and Nick recommended between 9-12, but even 12 felt like a lot. I ended up choosing 9 lights, evenly spaced 6′ apart (technically 6′ left to right, 7′ front to back since it wasn’t a perfect square). This also might have to do with your ceiling framing and where your beams are (they need to attach to the beams).
I chose these, which are 4″ white square cans. We are VERY VERY happy with them. Now a few things you should know.
4″ isn’t really accurate – the light source is 2.2″ and the overall visible width is 5″. Additionally, these are for a specific type of rough-in that your electrician would need to do (so check with them to make sure that these are compatible). Regardless of the rough-ins, what I like about these is the following, in case you want to find them compatible with your kit:
4″ Inch Square LED Recessed Can Lights
14W=75W (adjustable/dimmable)
5 Color Options 2700K-5000K (2700 is my usual, but 3k in a garage is good – you can always adjust after).
950 Lumens (I don’t really get this, but this is what ours are and I like them)
How Far Apart Should They Be?
Listen, if there are any lighting experts here, please weigh in as I think it’s a formula based on the height of the ceiling, the width of the room, and lumens/wattage. But most importantly, it’s a personal preference which no formula can tell you! We placed our 6′ apart (on center), left to right, and 7′ front to back (consistent with the shape of the room).
At night (which would be before 8 am or after 4 pm in the winter,) there is plenty of light to do our job in here, which again, is NOT surgery or any sort of lab work. It’s a lot of even light without being annoying.
But I was nervous that choosing only 9 for the whole room and choosing the smallest 4″ cans (which is very small). Would this be a mistake? So I did an experiment – in the other garage, that is purely storage, I decided to amp it up, see if more would be too much or better.
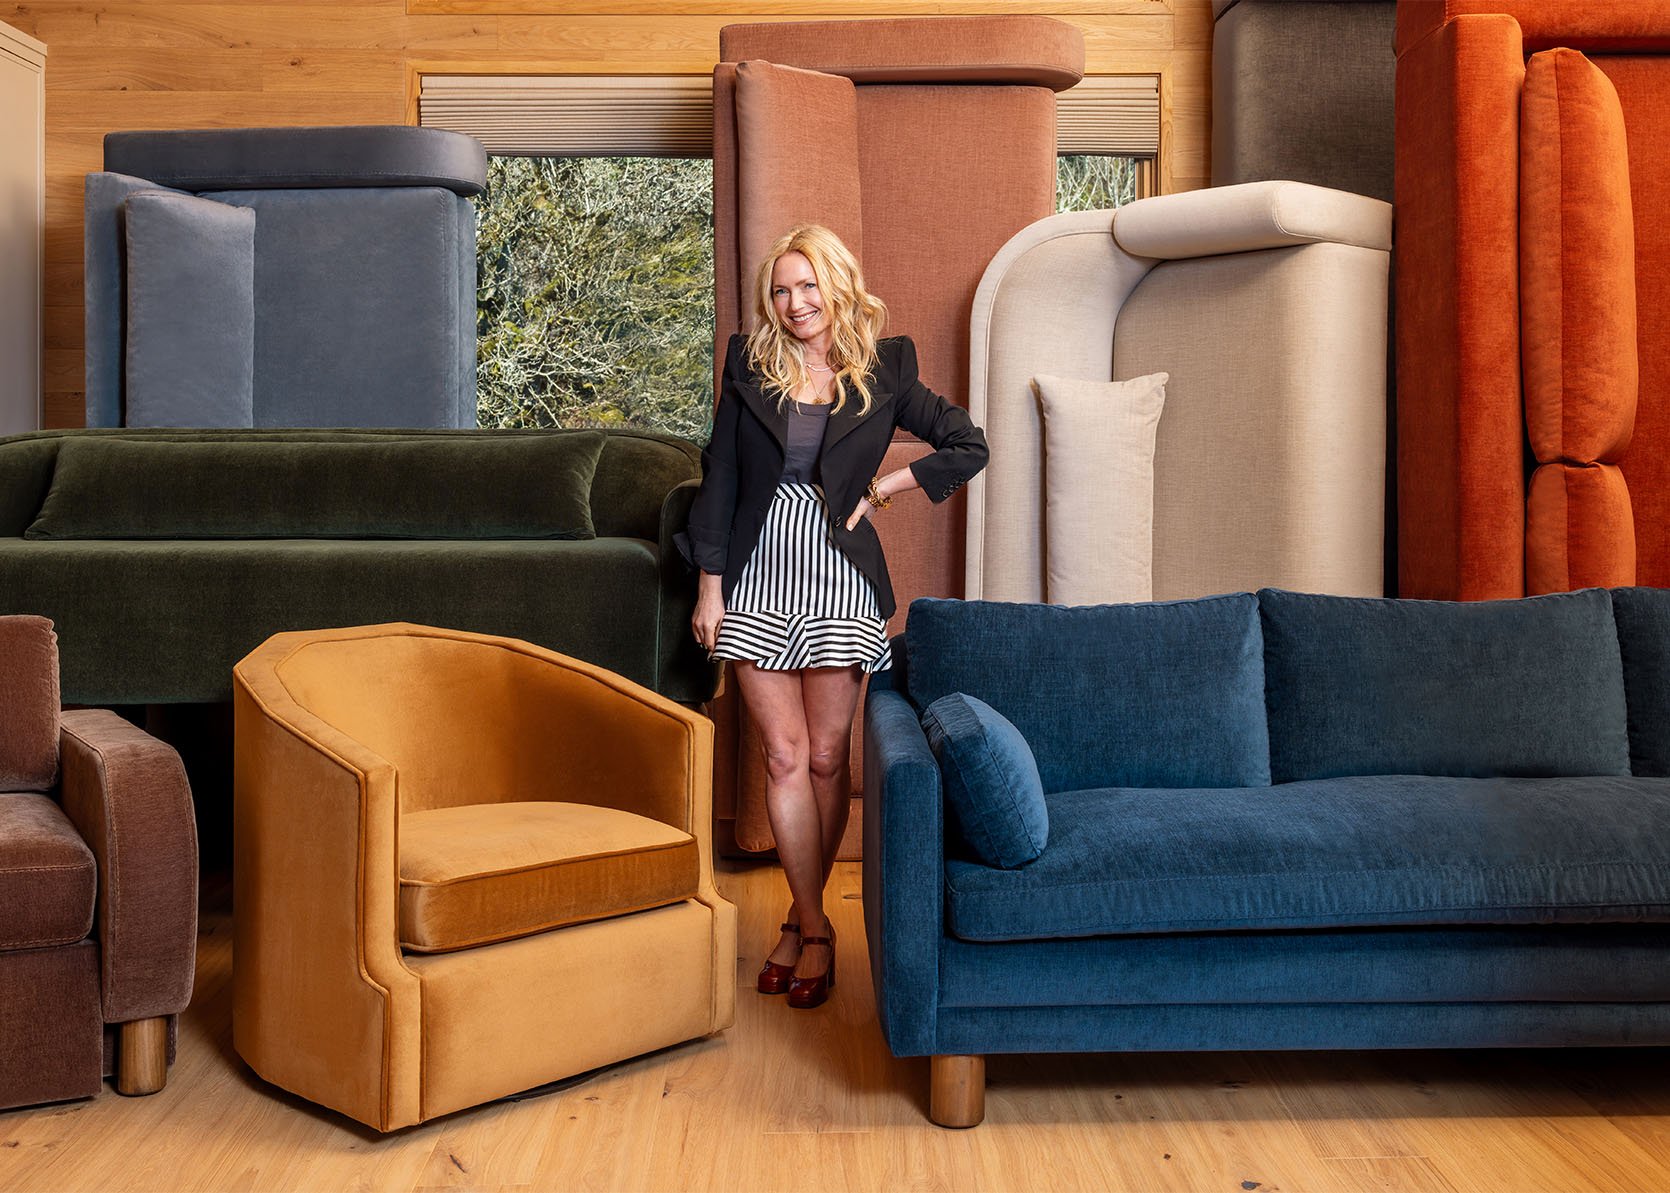
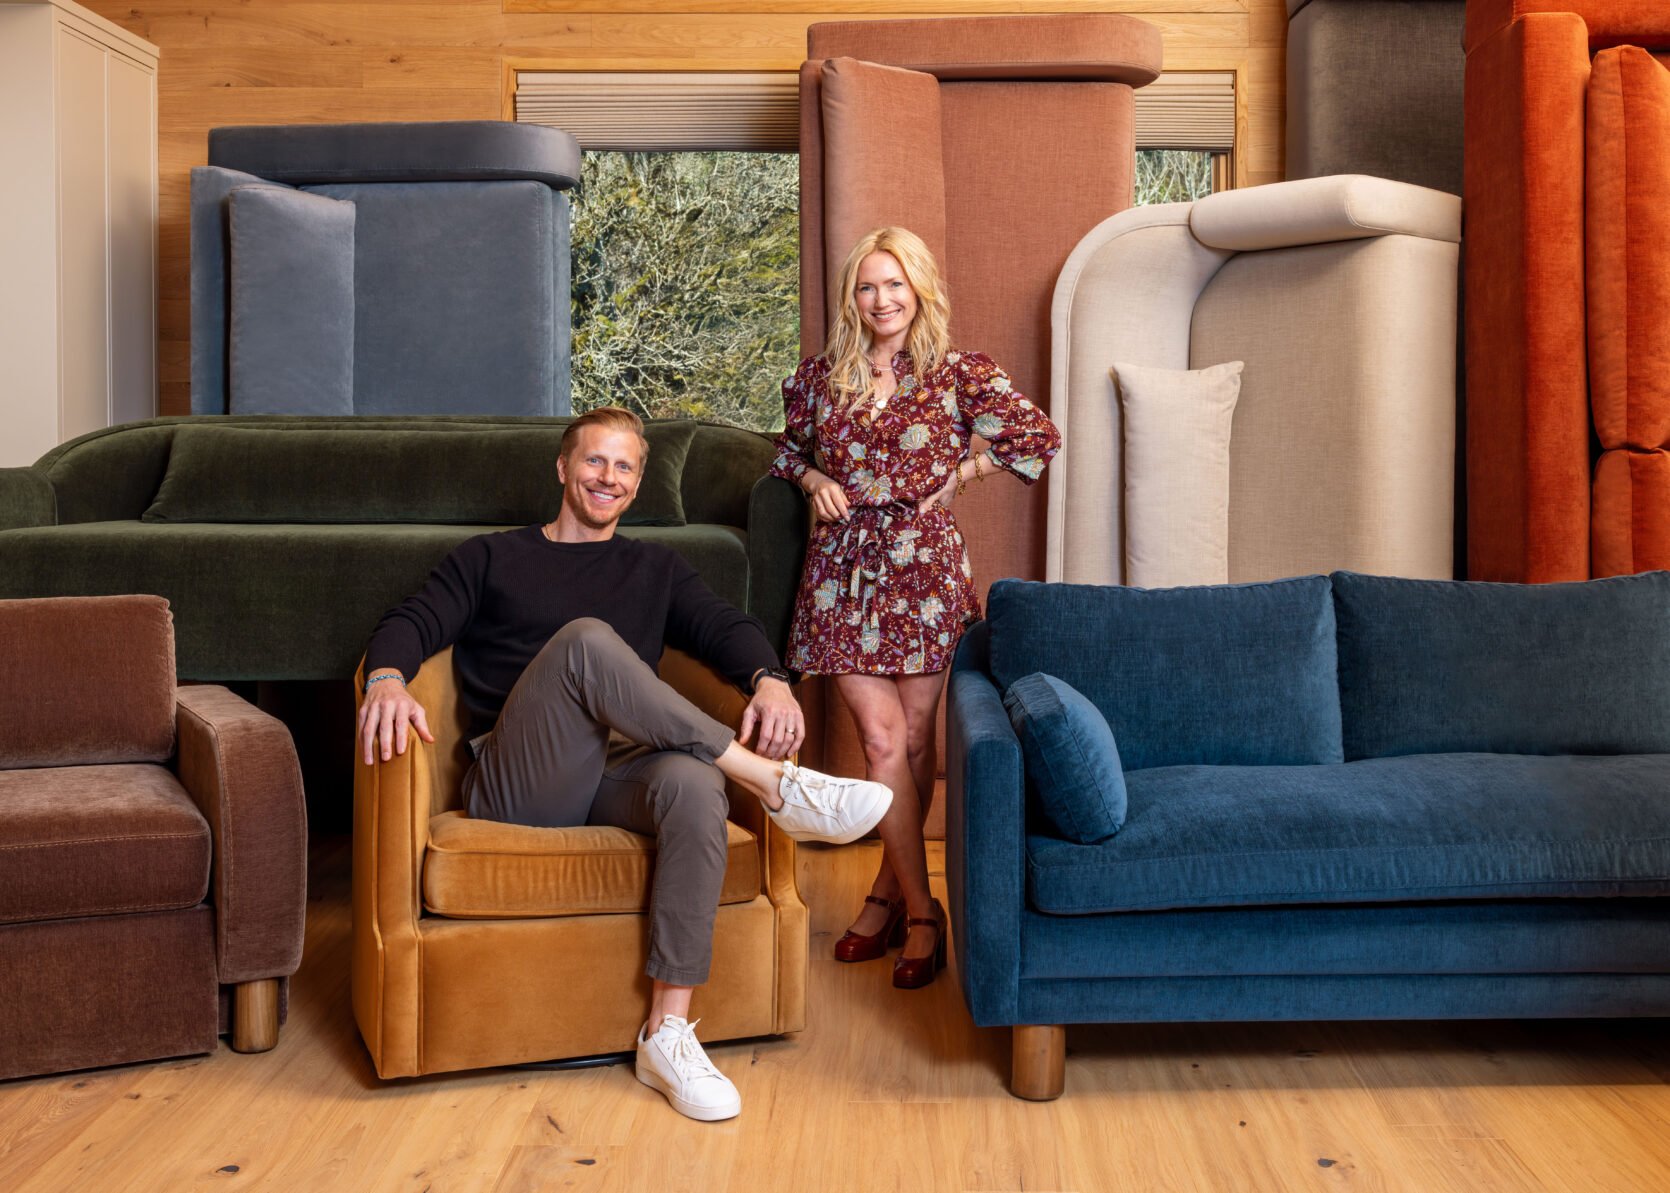
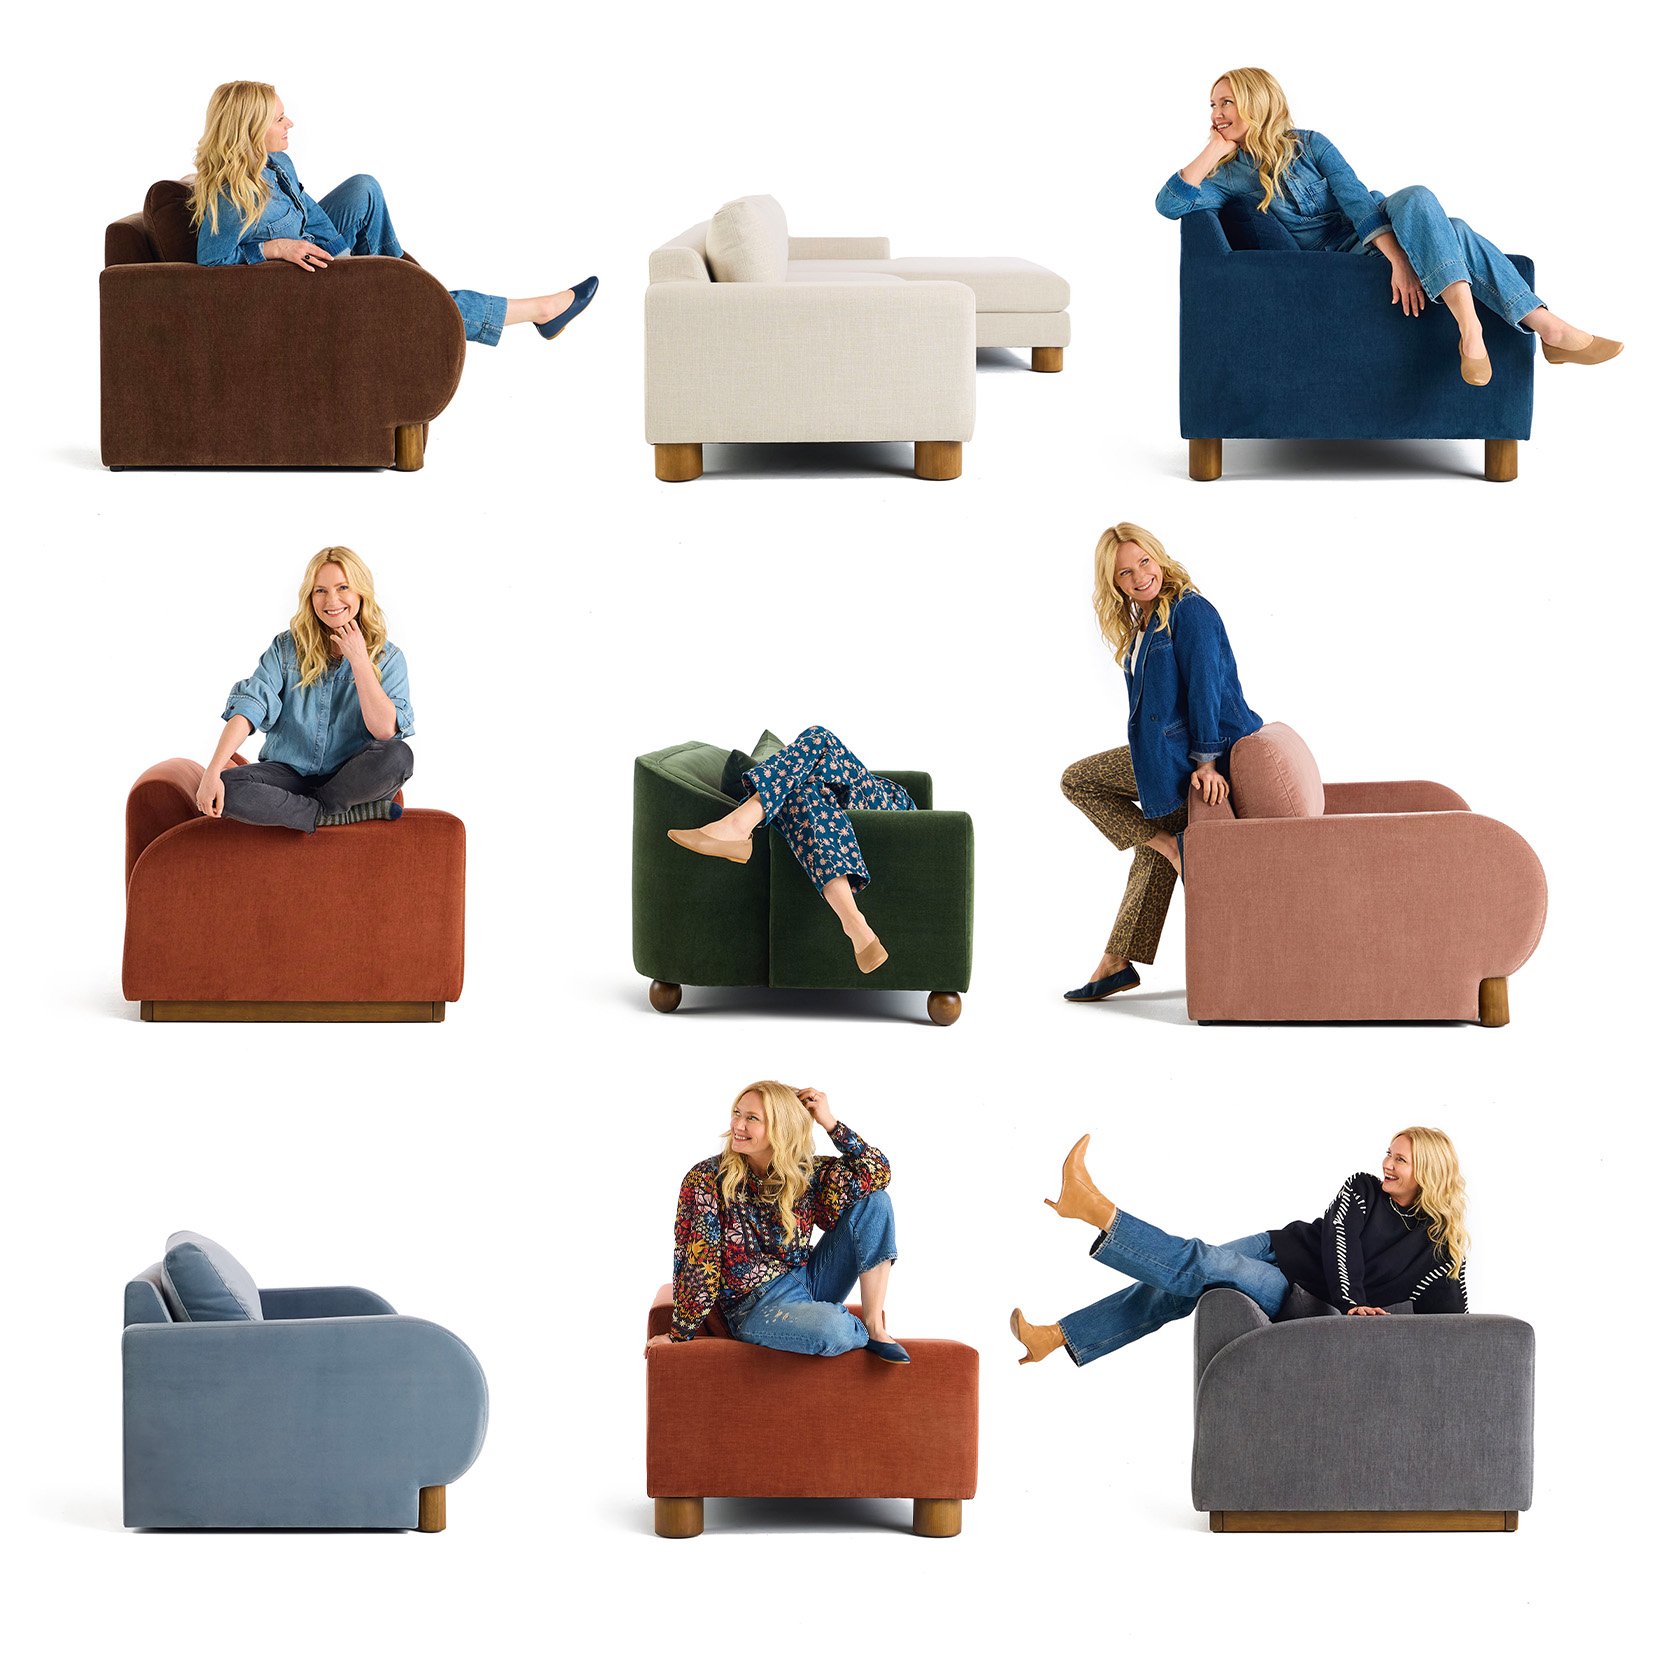
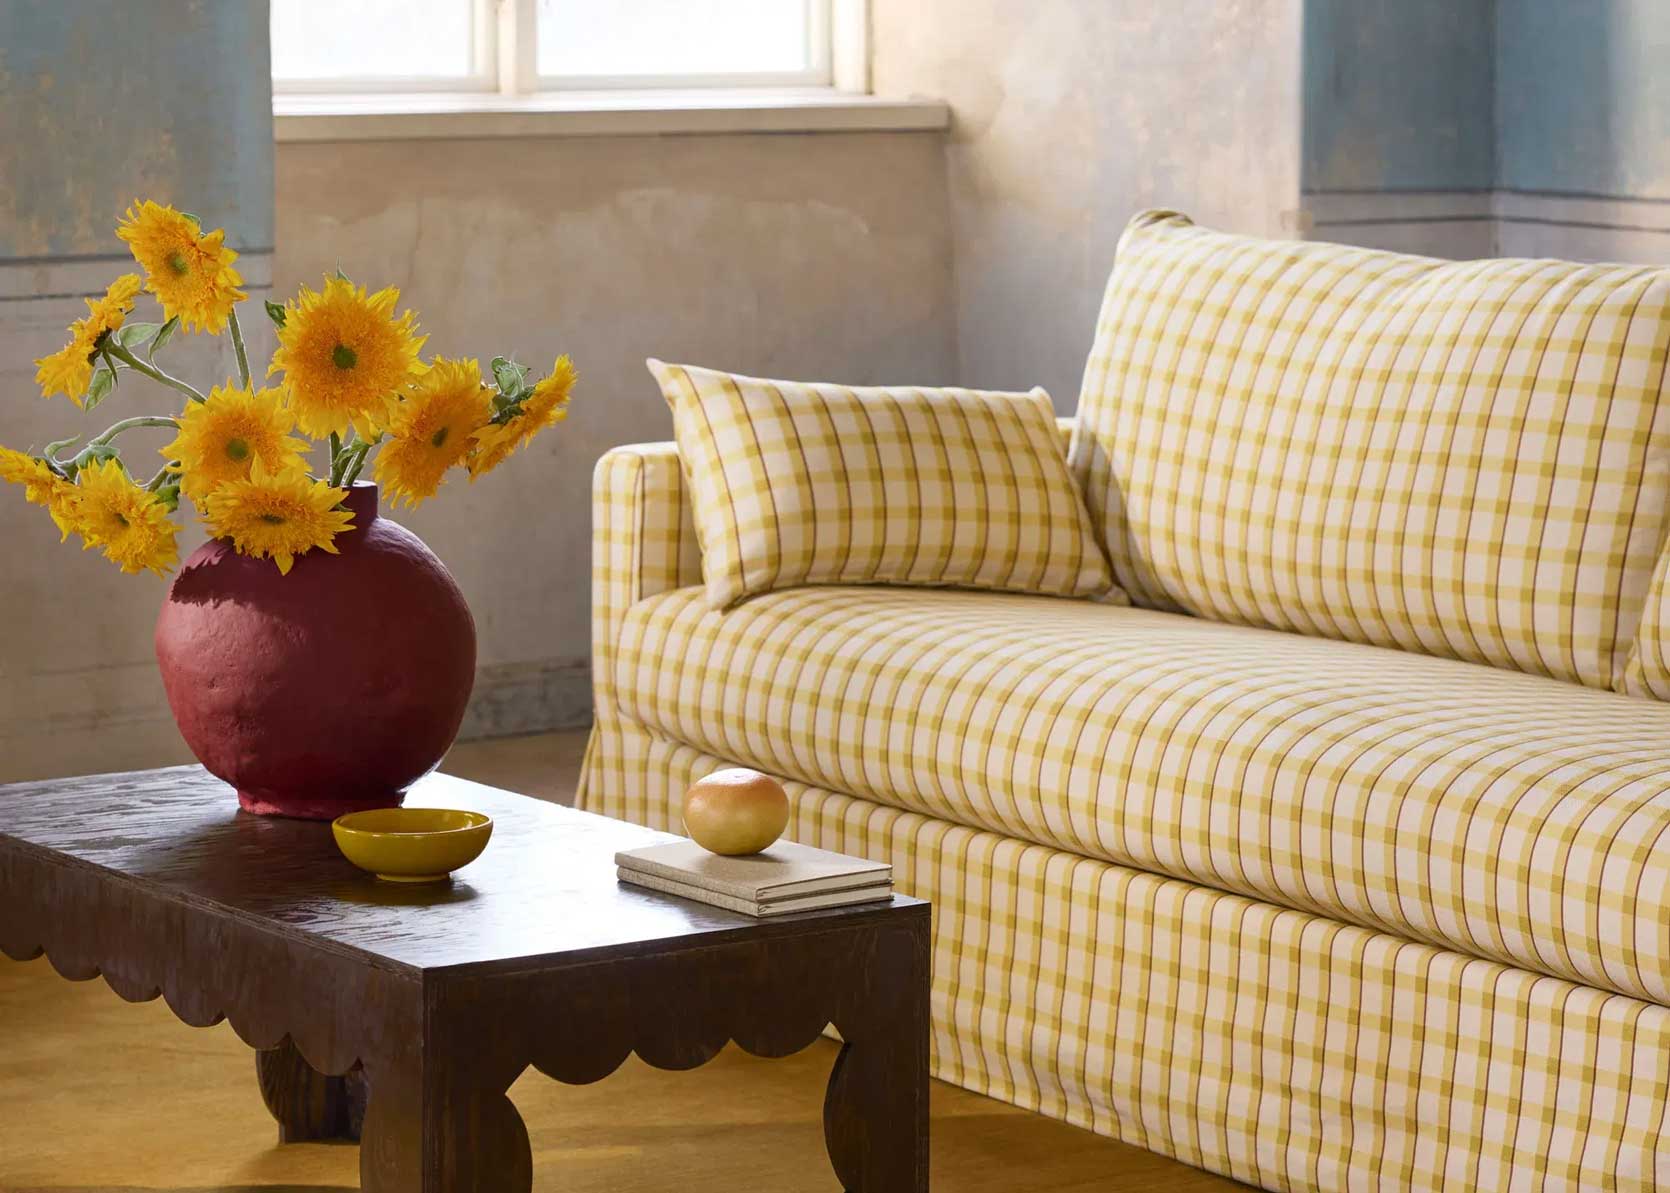
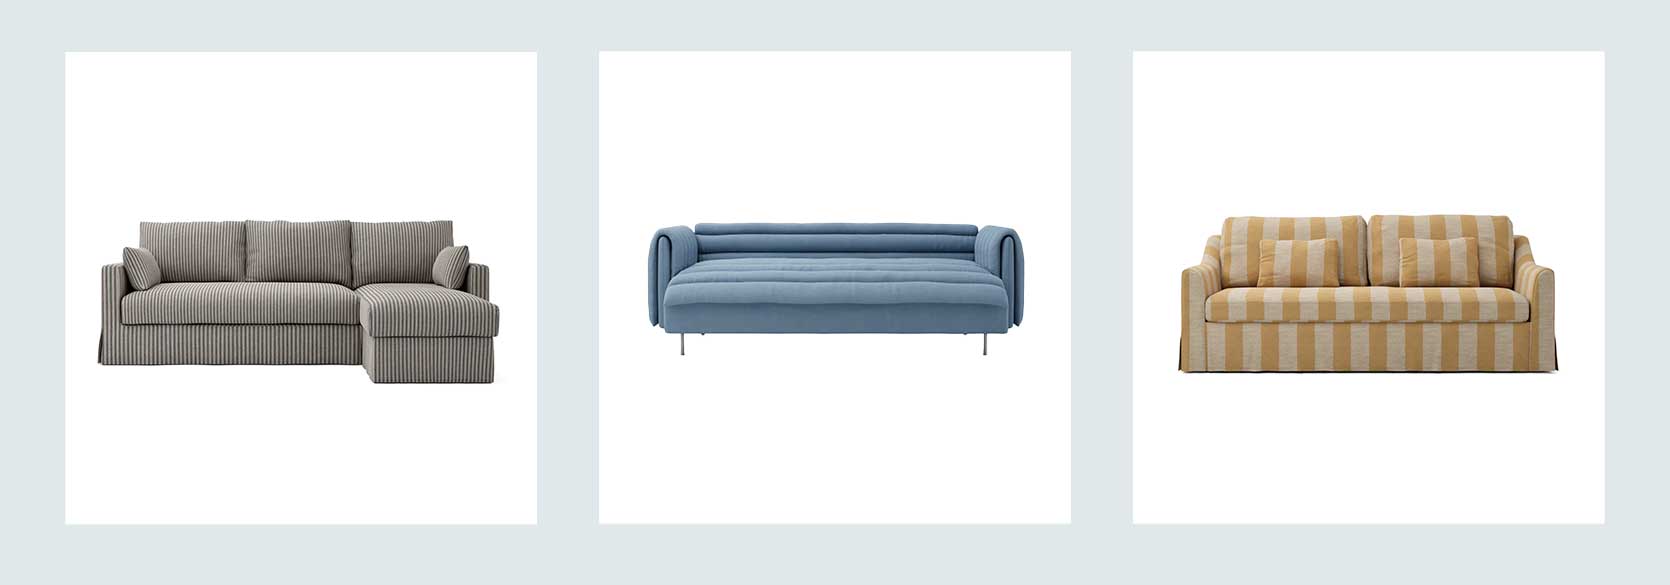
I’m so excited to announce the launch of our first furniture collection – Room Service by Emily Henderson. I love these pieces so much. These 5 sofas and 2 chairs are readymade in America, to you in 2 weeks (when in stock), designed to be comfy, family/pet friendly, and design-forward without being overly trendy. My team has been working on this for over a year, with our business partner Sean Lowe (yes, the bachelor), and it’s being sold and sold through and delivered by Wayfair (who can do it at such a low cost). Y’all, we LOVE every. single. piece. in this collection so much. They were all designed for real living, for many different styles of homes in colors that can make a statement (and let you not worry about life stuff). Let’s see them:
For the first launch (which we are already adding to), we have 7 different styles, and they all come in a few colors and sizes (some sofas + a chair). The design process was both super enjoyable and very painstaking, with three trips to the factory to ensure that our vision and level of comfort were perfectly executed (with many tweaks along the way). We prioritized comfort and style equally (which is hard!!) and tried our best to keep the price point affordable enough for high-quality pieces.
We chose the fabrics to be mostly performance-based – there are many mid/dark colors that are so beautiful and instantly inject style into a room, while also being more forgiving (I like a light sofa in theory, but prefer a mid/dark-tone for my own life with kids and pups).
While we did the design 100% in-house (led by Jess), we needed a partner on the business side. Enter Sean Lowe and Clay, his business partner and best friend, who have a ton of experience in the furniture manufacturing world (I didn’t know either!). They became our partners in all things operations, manufacturing, inventory, delivery, and customer service. Read more on how the partnership came to be (it’s a wild story). It’s been really incredible. They handled helping us bring our designs to market with such ease and professionalism. It was such a lovely process full of trust, mutual hard work, and a shared goal of great furniture. First time in collaboration history?? 🙂
We shot this catalogue at a studio, my brother’s river house house and rented a more traditional home in Portland (produced by us – go Gretchen!). We styled with 100% Wayfair products (and our rugs), so what you are seeing today isn’t the reveal of my brother’s house – it’s just staged for this shoot (reveals coming in the fall).
I clearly designed some of these sofas for this home, not just the color palette, but comfort, family friendliness (they have two kids and a pup), and just overall a vibe that I think would be really popular in a lot of homes.
We also shot at our friend Catherine’s home in Portland, that is gorgeous and offered a more traditional vibe. I’m so proud of every shot, every angle, every sofa, every floral arrangement. What a dream it was 🙂 So let’s meet the family! (And yes, many were named after my family of pets).
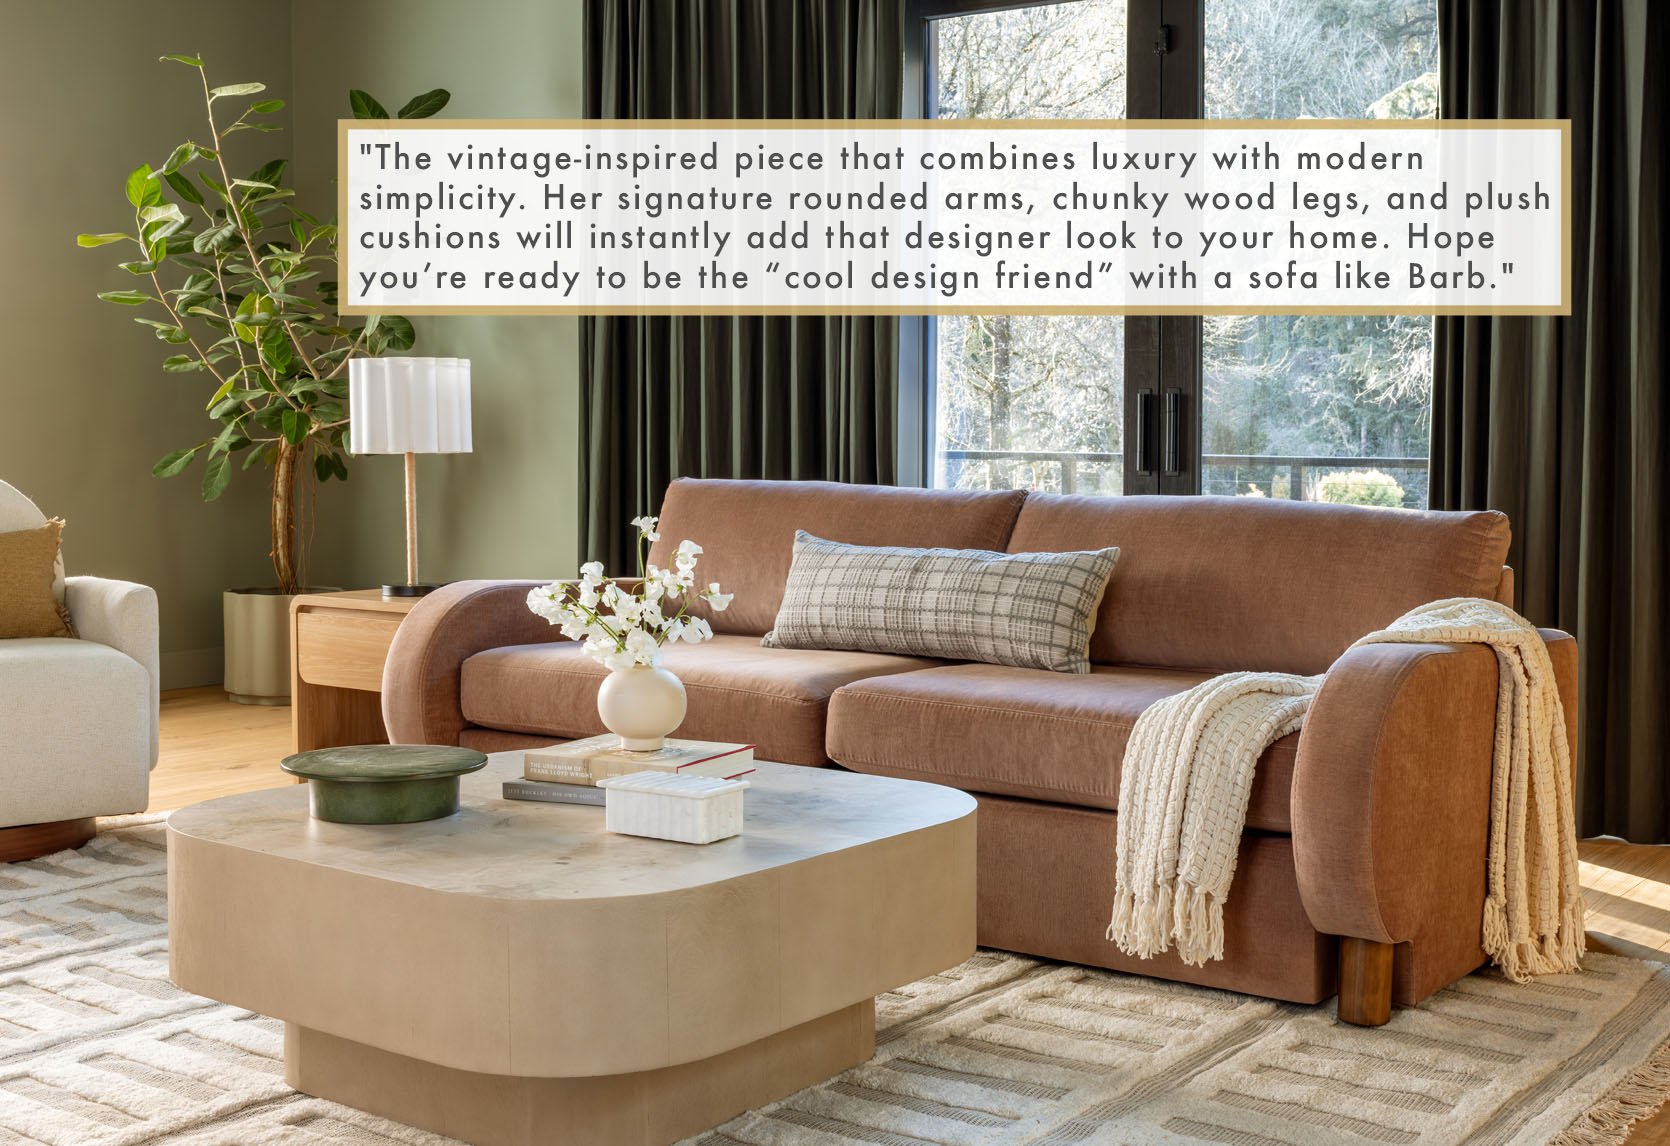
And yes, Barb was named after our pig Barb, meant as a place holder name but it just stuck!!!
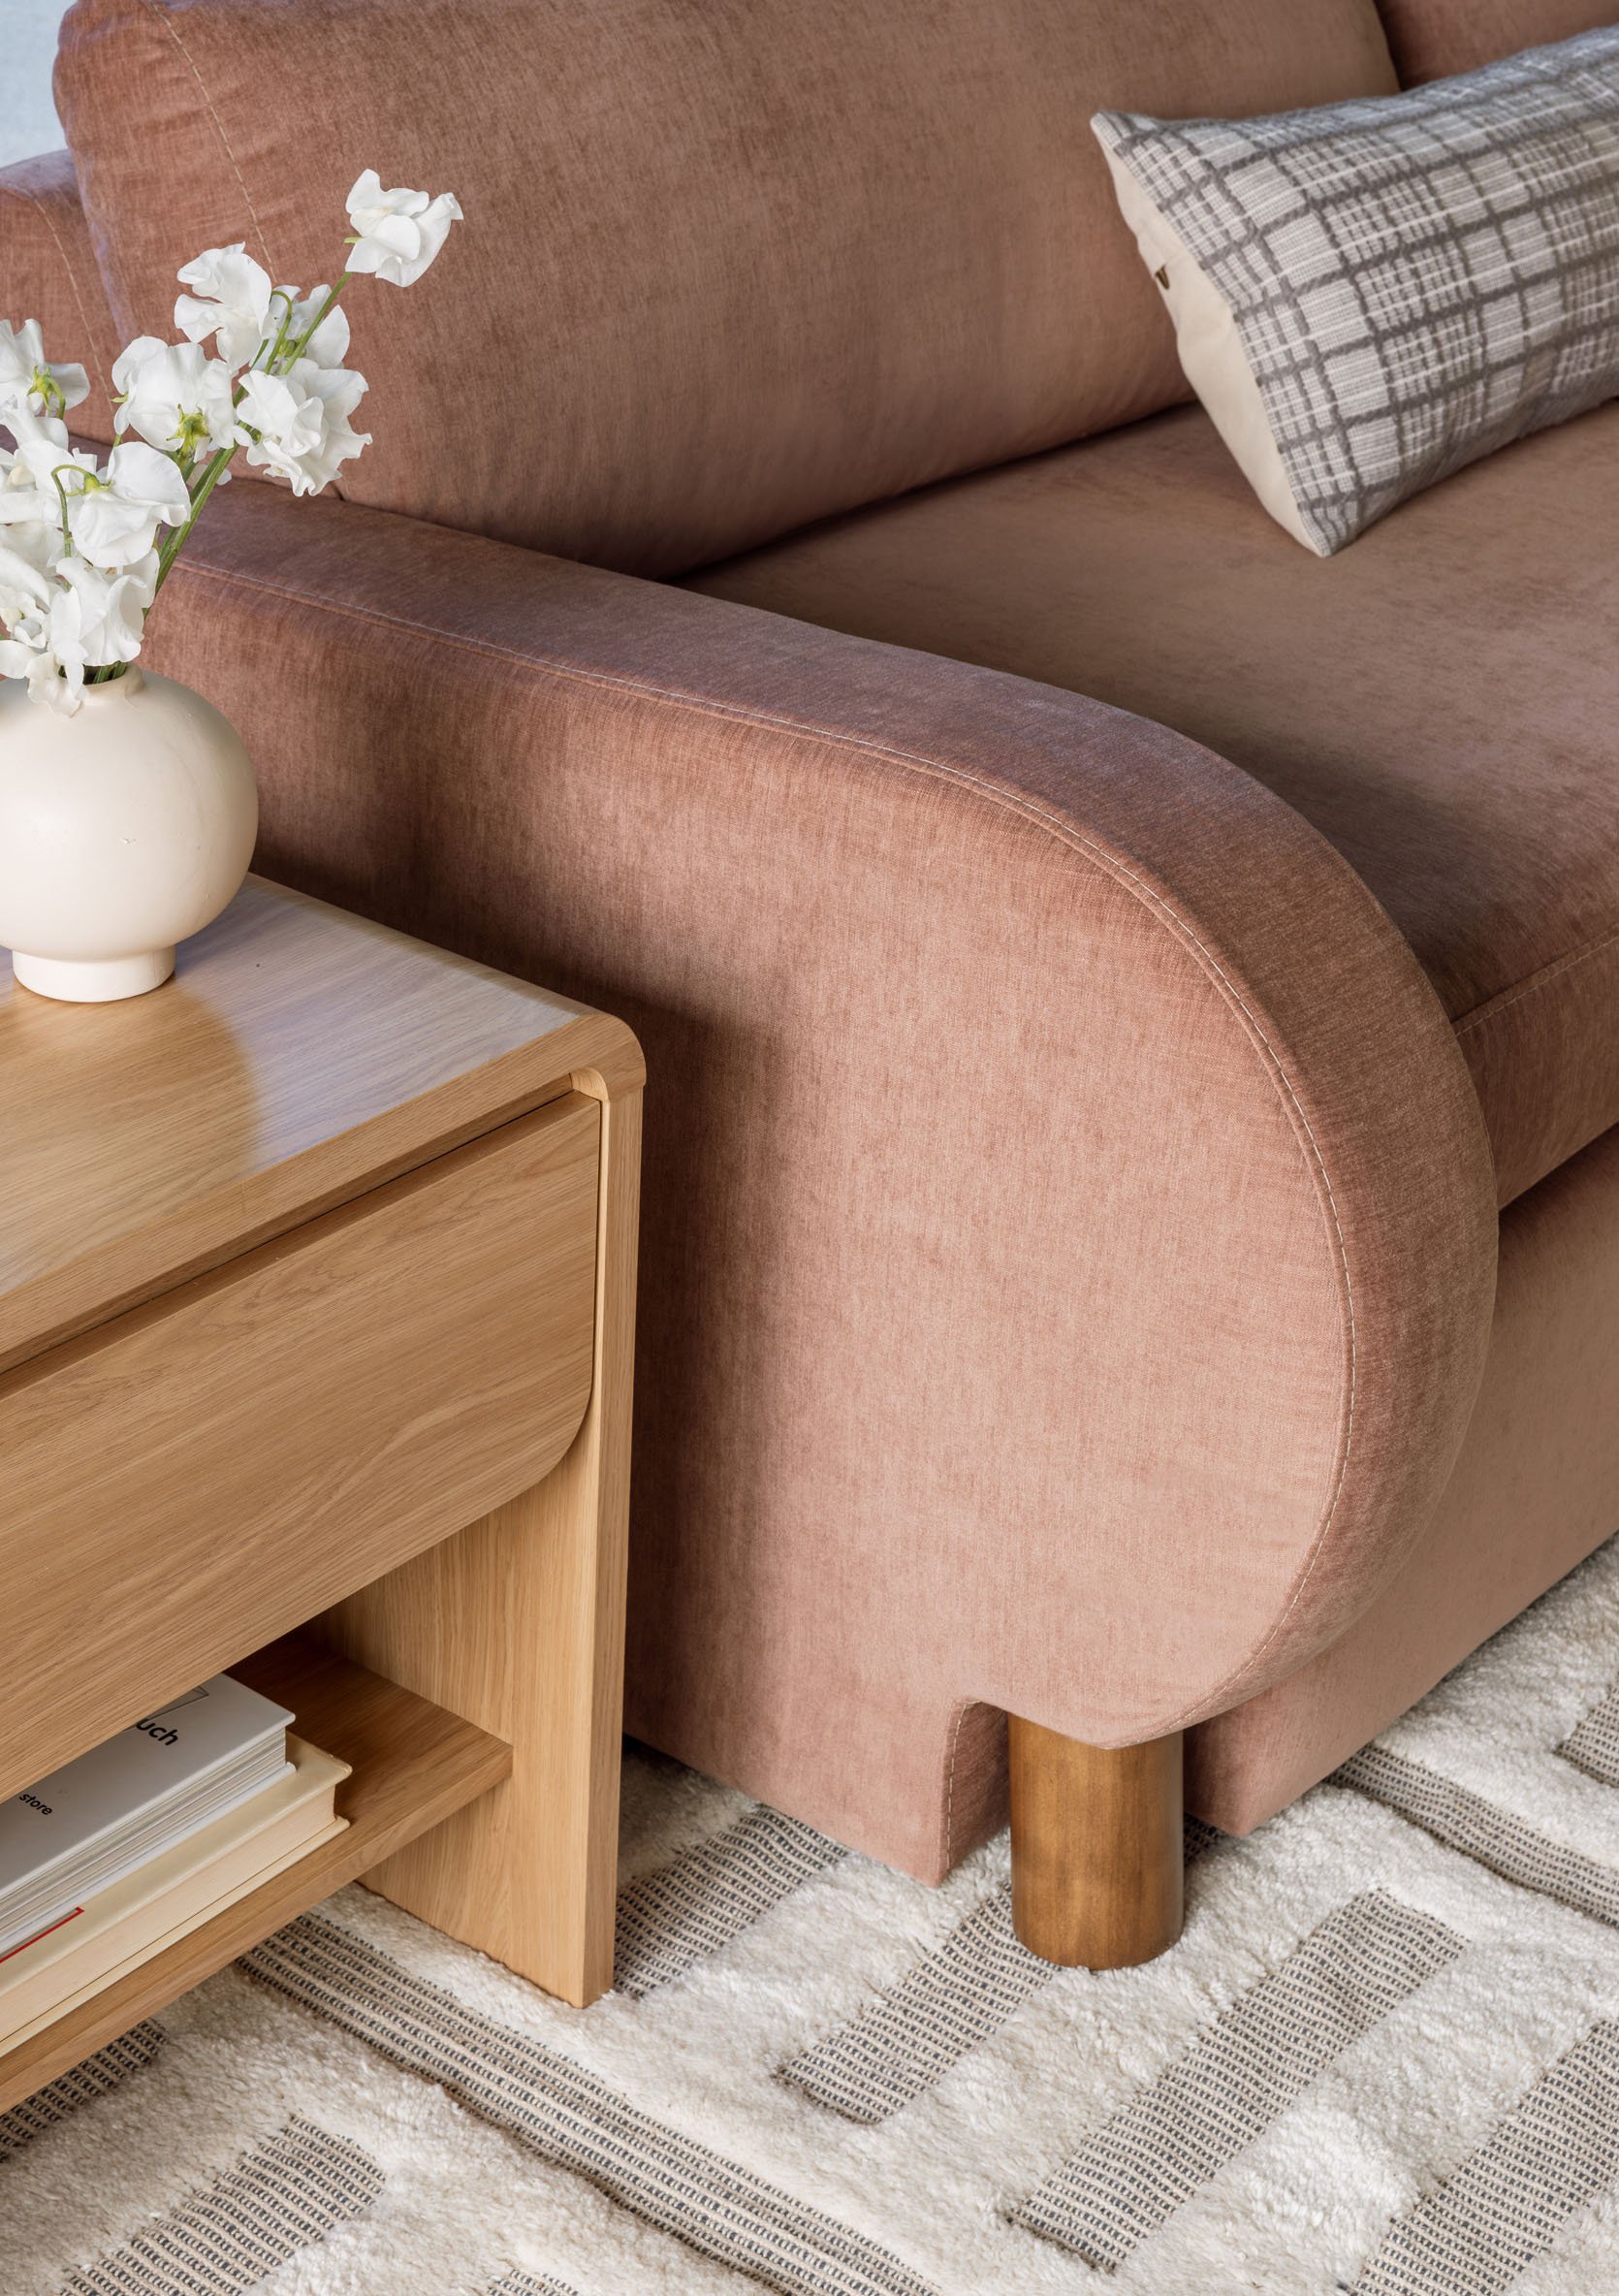
Barb was the first sofa we designed, just so excited about that curved arm and unexpected decorative rounded leg. This is Jess’ baby, and it set the tone for the rest of the pieces (comfortable but with unexpected lines and legs).
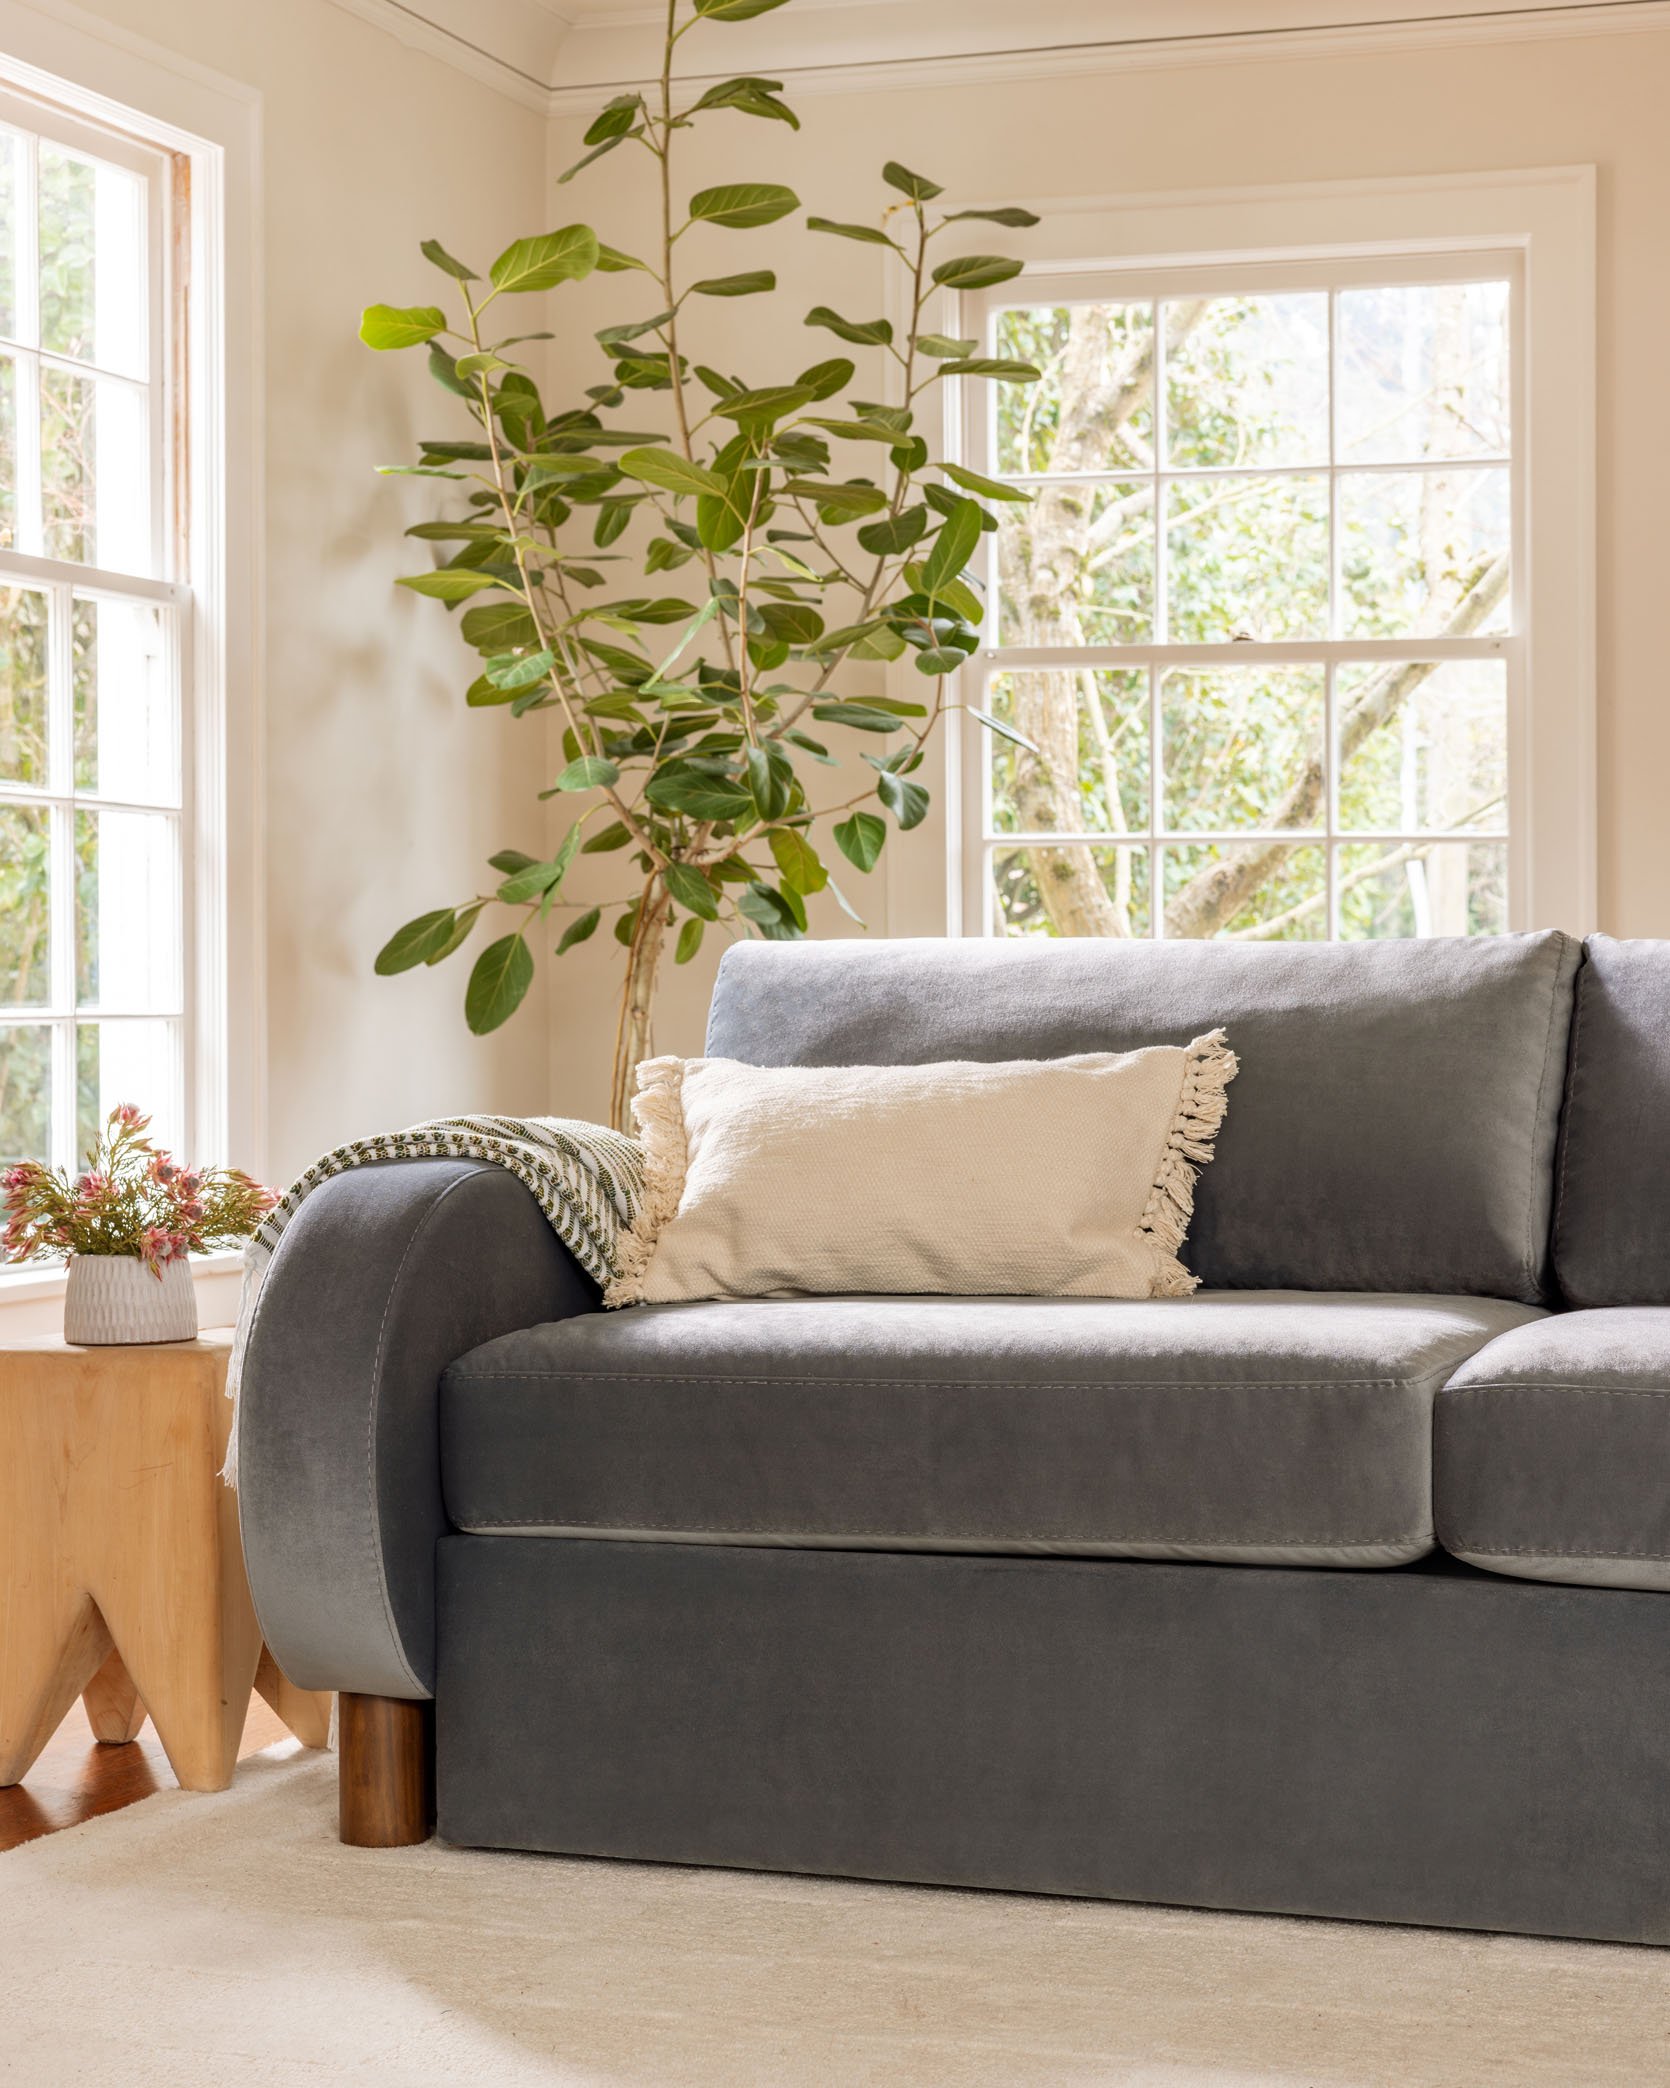
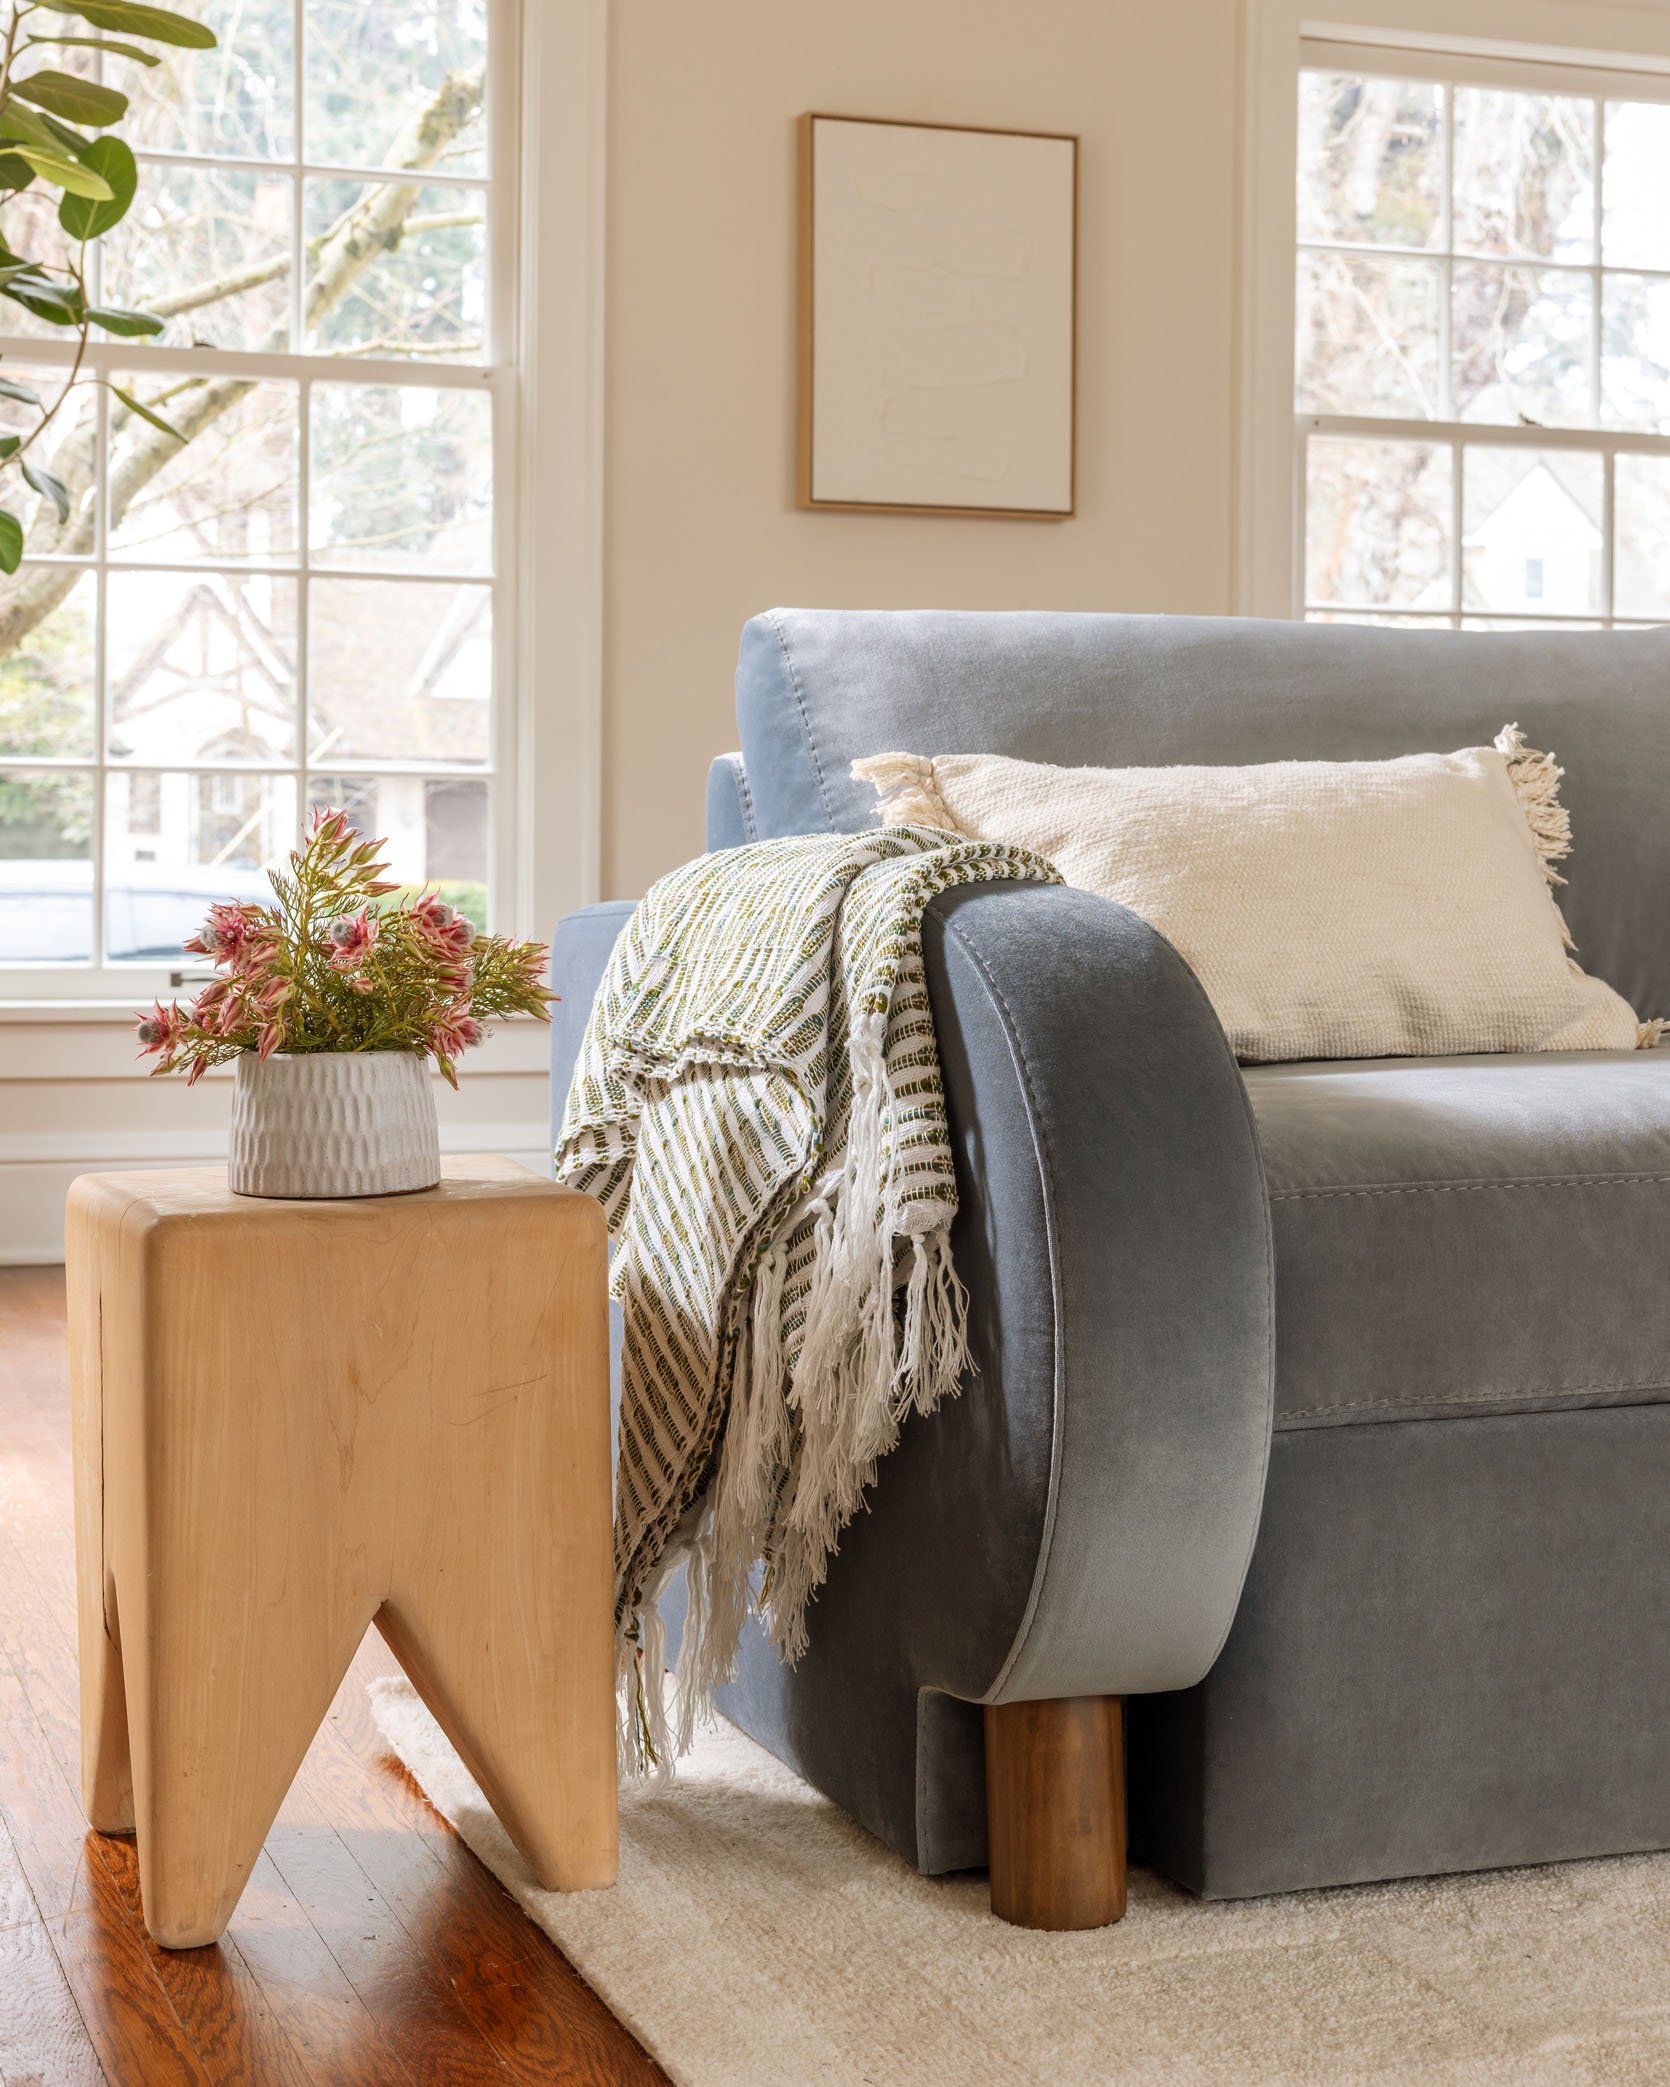
The Barb is really ergonomic – it sits really comfortably as either a lounge sofa or more upright (not too deep, not too shallow), and the back is higher than others, making it more supportive. We designed it to come in that beautiful rose color, powder blue velvet, and chocolate brown velvet. The seat is very comfortable, while still holding its shape, and we made the back cushions even cushier than the seat to ensure you could sink back enough. I would 100% have these in my living room if I could keep my dogs off the back cushion (see the “Alice” sofa I designed for this exact purpose).
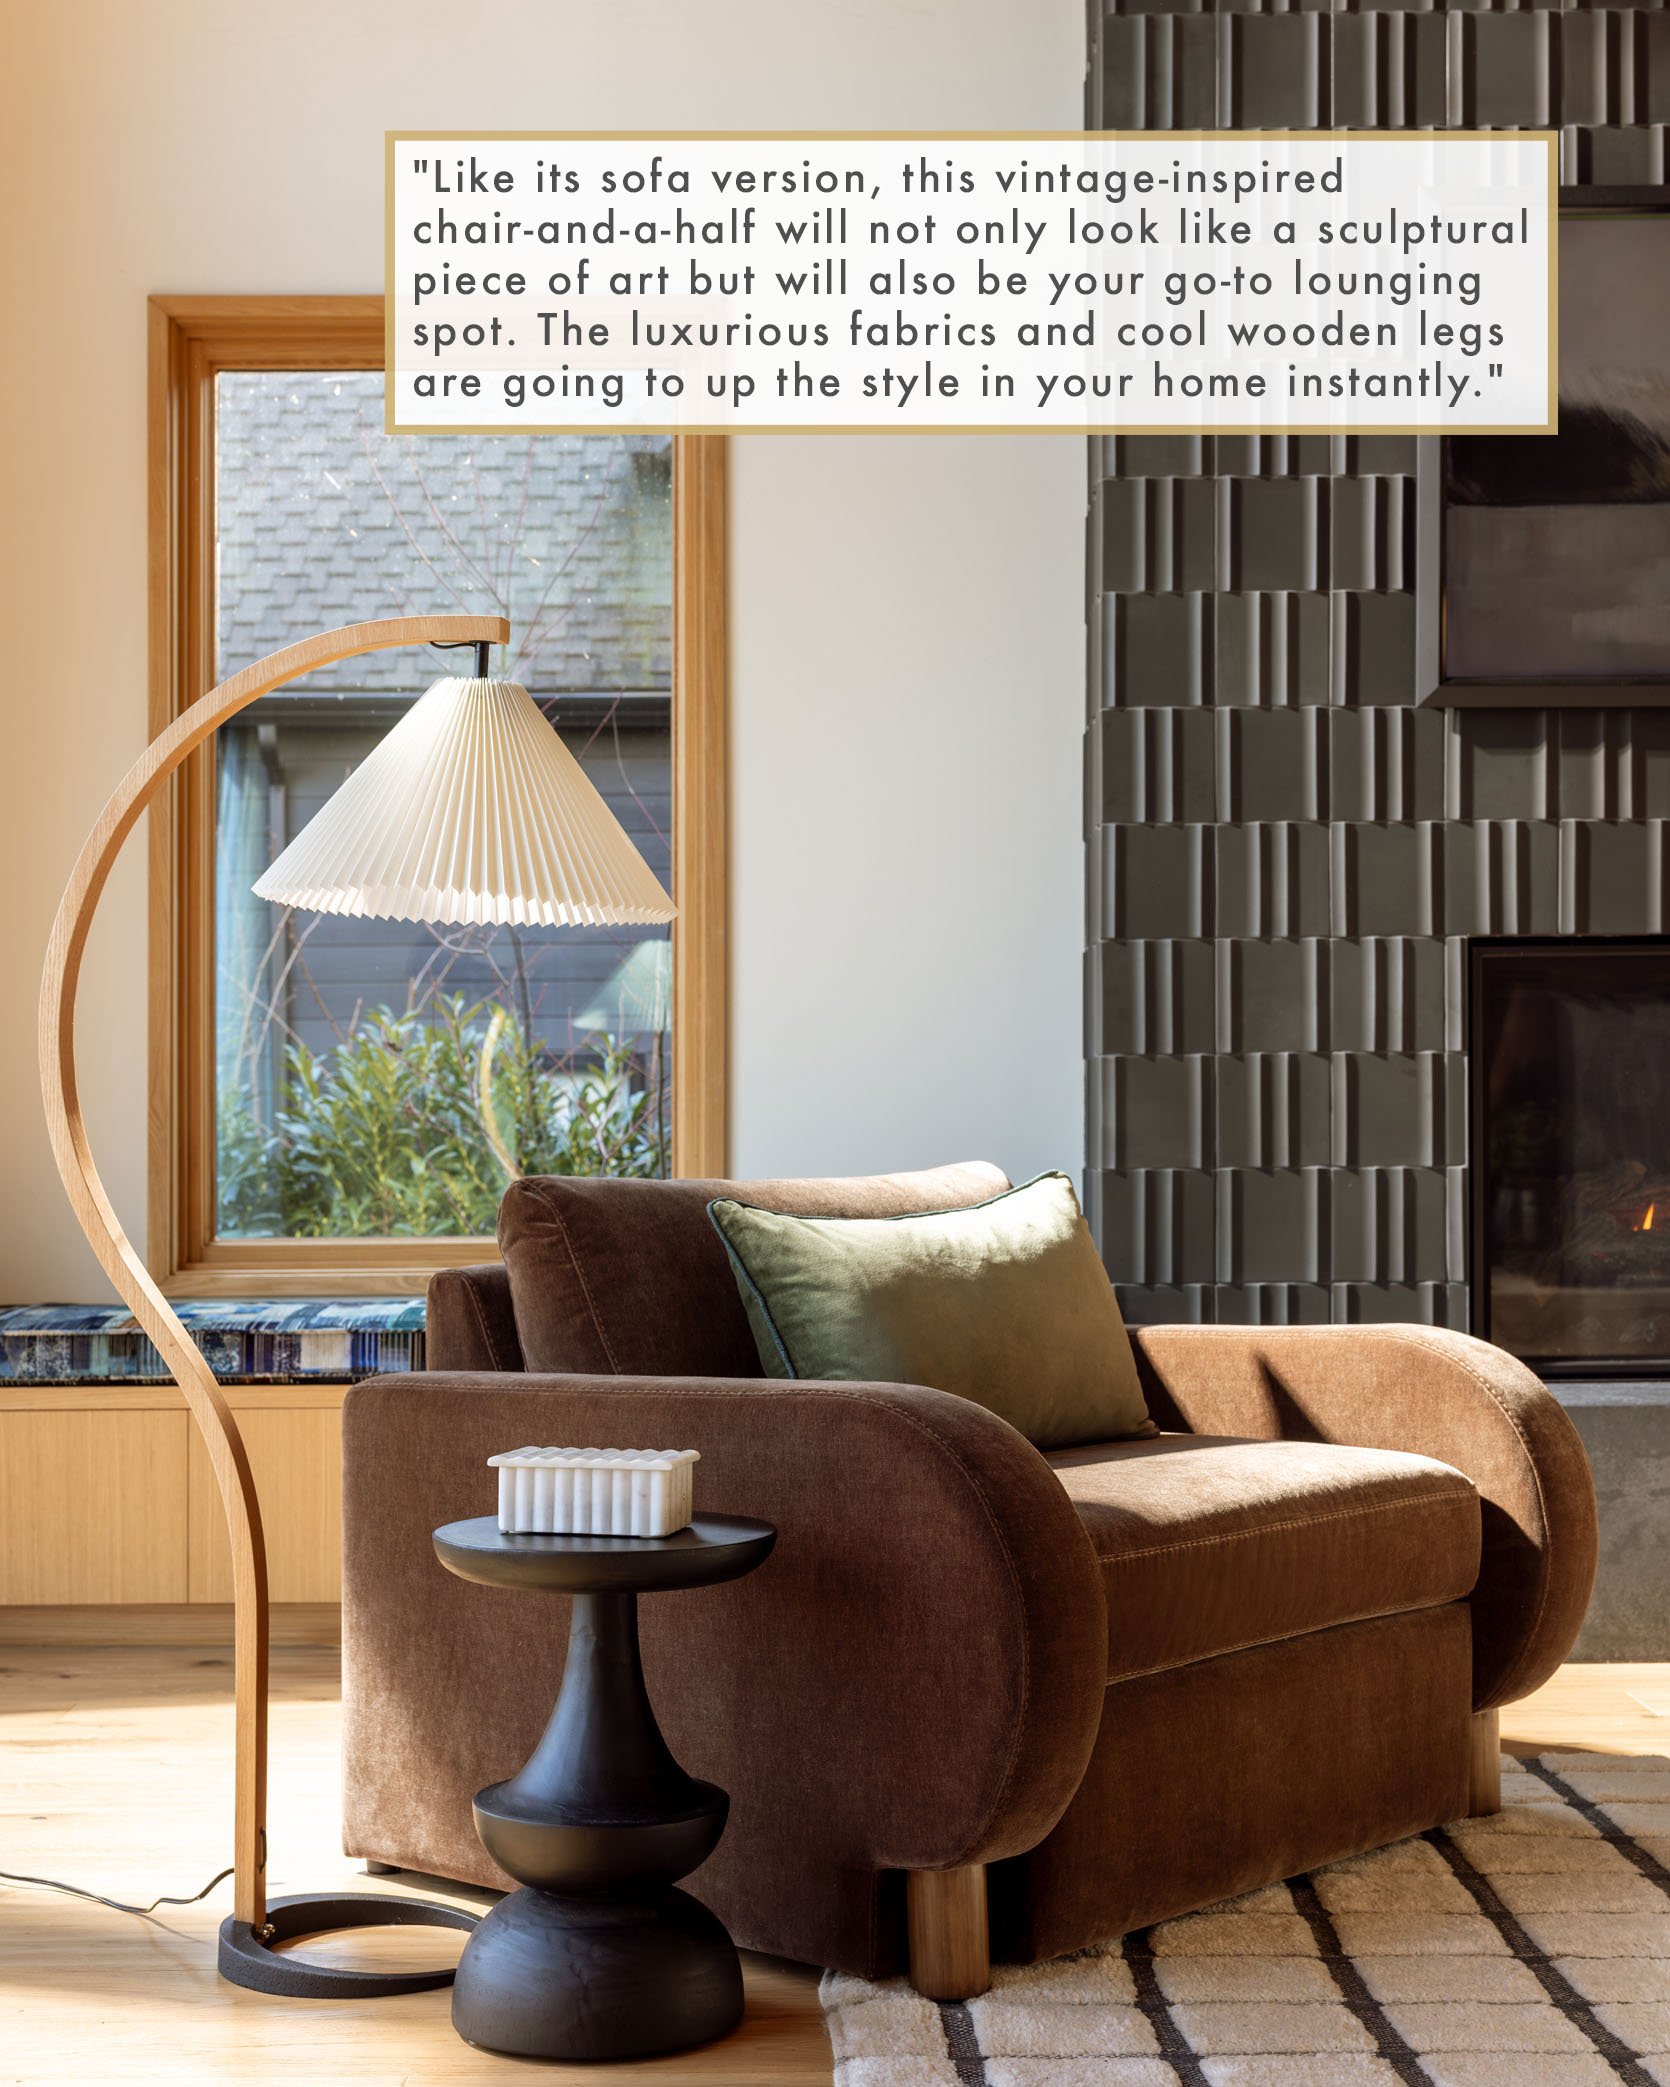
The truth is this chair, the Baby Barb, is absolutely, ridiculously awesome, and we all fought over keeping the sample (shown here). My brother won because he’s a big guy and it’s a chair and a half (and I legit didn’t have a place for it YET) and frankly it looked so beautiful in his living room that I couldn’t bear to steal it from him. It’s so beautiful, so comfortable, and yes, so big (so check your measurements to ensure that it will fit!). A grown-up and a kid can easily sit in this chair together – we are obsessed with it.
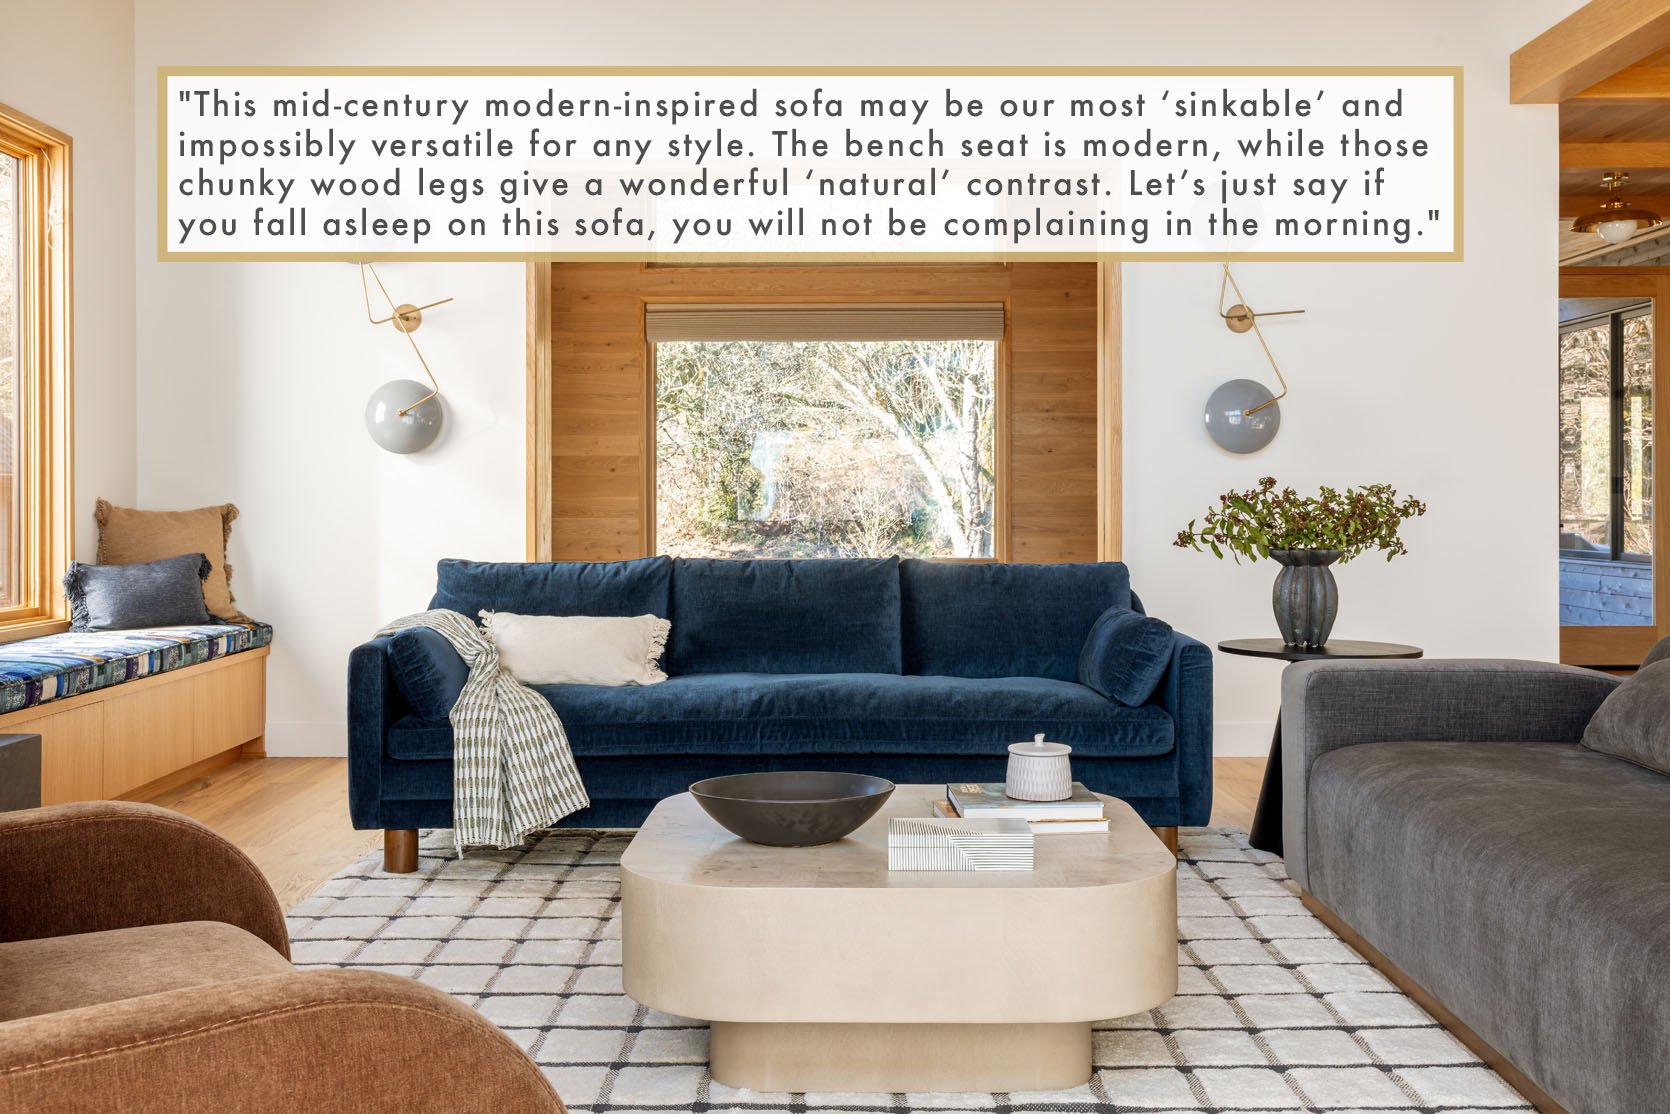
Oscar is hands down the most squishable, sink-inable sofa in the line. We designed the lines to be so comfortable, deep, and ergonomic (still supportive). But what makes it so comfortable is the seat cushion formula. It is a bench seat (not multiple seats), and it has a combination of foams that makes it so comfy from day one. Now, due to the level of sinkability, the seat cushion isn’t as tight as others; it can’t be – it’s meant to look casual and comfortable. I would also 100% have two of these facing each other in my living room if my dogs didn’t sit on our back cushions. It’s an excellent sofa – such pretty lines in the arm, but with extreme comfort. I’m very jealous that my brother has it.
Happy Sunday, everyone. Didn’t we tell you last week was going to be filled with awesome content? Well, this week, in our humble opinion, is just as exciting. Emily is currently exploring the great outdoors with her family, so you’re just getting the team today, but we promise the links are VERY good:)
Here’s this week’s Carriage House YouTube in case you missed it!
From Caitlin: Earlier this week, I found myself glued to my sofa while binge-watching all 6 episodes of Netflix’s new series, Hitmakers. It’s a quick, easy watch that follows some of the world’s leading songwriters through three different writing camps. I LOVED IT. I worked in a recording studio in a past life and had never seen the creative process documented so accurately – it felt like I was back in a room, pitching ideas and phrases. It was a BLAST, and the show reminded me how fun it was to tap into that creative, collaborative energy! (PS. Here’s the biggest hit that my team wrote – the demo was spun up during the 2012 World Cup. The original chorus was actually just the Olé chant over and over, but it was tweaked to a “real chorus” when Avicii cut the track. Can you tell?!)
Also From Caitlin: This might be TMI (read: it’s definitely TMI) but post-pandemic, I typically wear a sports bra every day – I hate wires, am constantly dealing with spillage at the top (why are my boobs shaped so weird?!), and a lot of the straps on the 36F offerings make me feel like I’m 90, not 33. So when one of my trusty sports bras bit the dust last month, I figured I’d try out this $34 bralette alternative. GUYS, IT’S MIRACULOUS. It looks toddler-sized – I literally laughed when I picked it up – but it somehow holds my girls in AND up. (I mean, it’s not a push-up bra, but there’s a definite difference. I got it in the XL!) I wouldn’t recommend any of Skims’ other bras -I have tried almost all of them, none work for me personally – but I find myself turning to this baby-sized bralette every day. It’s been through multiple laundromat washer/dryer cycles with no issues, and it’s infinitely more wearable than my sports bra alternatives. If this recommendation can help one other wire-hating, comfy bra-loving gal, I will be thrilled!!!
From Jess: While at my dad’s this past weekend, he was very excited to show me his new wax fire pit. It’s an eco-friendly alternative that doesn’t make any mess and is cute! You don’t need any wood because it’s powered by 100% biodegradable vegetable wax. He loves it because it’s perfect for his small patio, gets 8 hours worth of burn time, and again, he doesn’t have to clean up after it. It can also act as a stool when you’re not using it. A perfect way to stay outside as long as possible:) Here’s a link to the refills where there’s a citronella option too. See ya bugs!
From Mallory: My favorite sports bra is easily this one from Lululemon (been wearing it on repeat for over a year now), and I could not love it more. I have it in white, and then I also snagged it in a mauve and (got the matching shorts) and they’re SO cute – wear it all the time!! I typically size up in Lulu sports bras (I got a 6) fyi:)
From Arlyn: Once my knees started sounding like a bag of popcorn in the microwave, I looked into introducing some collagen into my life. I tried Vital Proteins and liked it enough but to be honest, I’m not even sure what “liking” a collagen powder is supposed to look like. But I’ve been using Bubs Collagen Peptides for six months since I found it through a Facebook ad and it’s great! Yes, my knees still crackle like Rice Krispies in milk, but they don’t really hurt anymore so that’s a plus, yeah? Mostly, I’m glad to squeeze in 18 grams of extra protein in my morning coffee (it’s heat tolerant), which is a huge win for me in general!
From Marlee: This is one of my fave heavyweight sweatshirts ever – I’ve had the same one for 5 years at this point and I’m still loving it. It’s super plush and the perfect oversized – I’d say it’s pretty true to size and has a super big hood that is so nice for lounging around in (I hate when sweatshirt hoods are small/tight, but if you don’t like it oversized, this might not be for you). It’s definitely worth the price IMO, considering I’ve worn mine nearly every week for the past 5 years. Cost per wear has got to be pennies at this point! This one is more of a slouchy, straight down the torso fit, but if you want it a little more fitted/tapered at the waist, this one is also a great choice:) I just have black, but they both come in super cute colors.
From Gretchen: I picked up this super cute, tiered swing dress from Old Navy the other day, and I really like it! It’s not anything too groundbreaking. It’s a lightweight fabric and very breezy, and the reddish brown plaid just feels like me. The sleeves hang nicely, and I like that you can wear them on or off the shoulder. But mostly, I just appreciate that it’s as easy to throw on as a t-shirt–stretchy, no zippers, plenty of flowy fabric. I wore it the other day with a cropped hoodie over top and was surprised at just how cute it looked together, but I’ve also enjoyed wearing it with no layers and just a cute pair of sandals. Affordable, adorable, and easy!
This last week, we saw the devastating news that photographer Bethany (Nauert) Mendez’s husband unexpectedly passed away. She’s a photographer EHD has worked with and loved. We have no doubt everyone reading this has seen her incredible work. As I am sure many of you know, costs add up so fast after a loss so if you are able to donate to Bethany, here is a GoFundMe that was set up to help her.
Thanks for taking some time to hang with us and see ya tomorrow for the post we’ve been WAITING to show you:)
One of the best sales of the year is coming to an end: The Nordstrom Anniversary Sale. Emily wrote about her picks here when it started! I, on the other hand, tend to be a bit disorganized about sale shopping, so if you also fall into that category, this post is for you. I went through and found 16 truly great pieces that can be worn through the rest of the year (and beyond, of course:)) If you’re in need of either a few more summer pieces or new clothing for the fall, I highly recommend you check out this sale before it’s gone. Ready to “last-minute” shop this Nordstrom Anniversary sale picks with me?
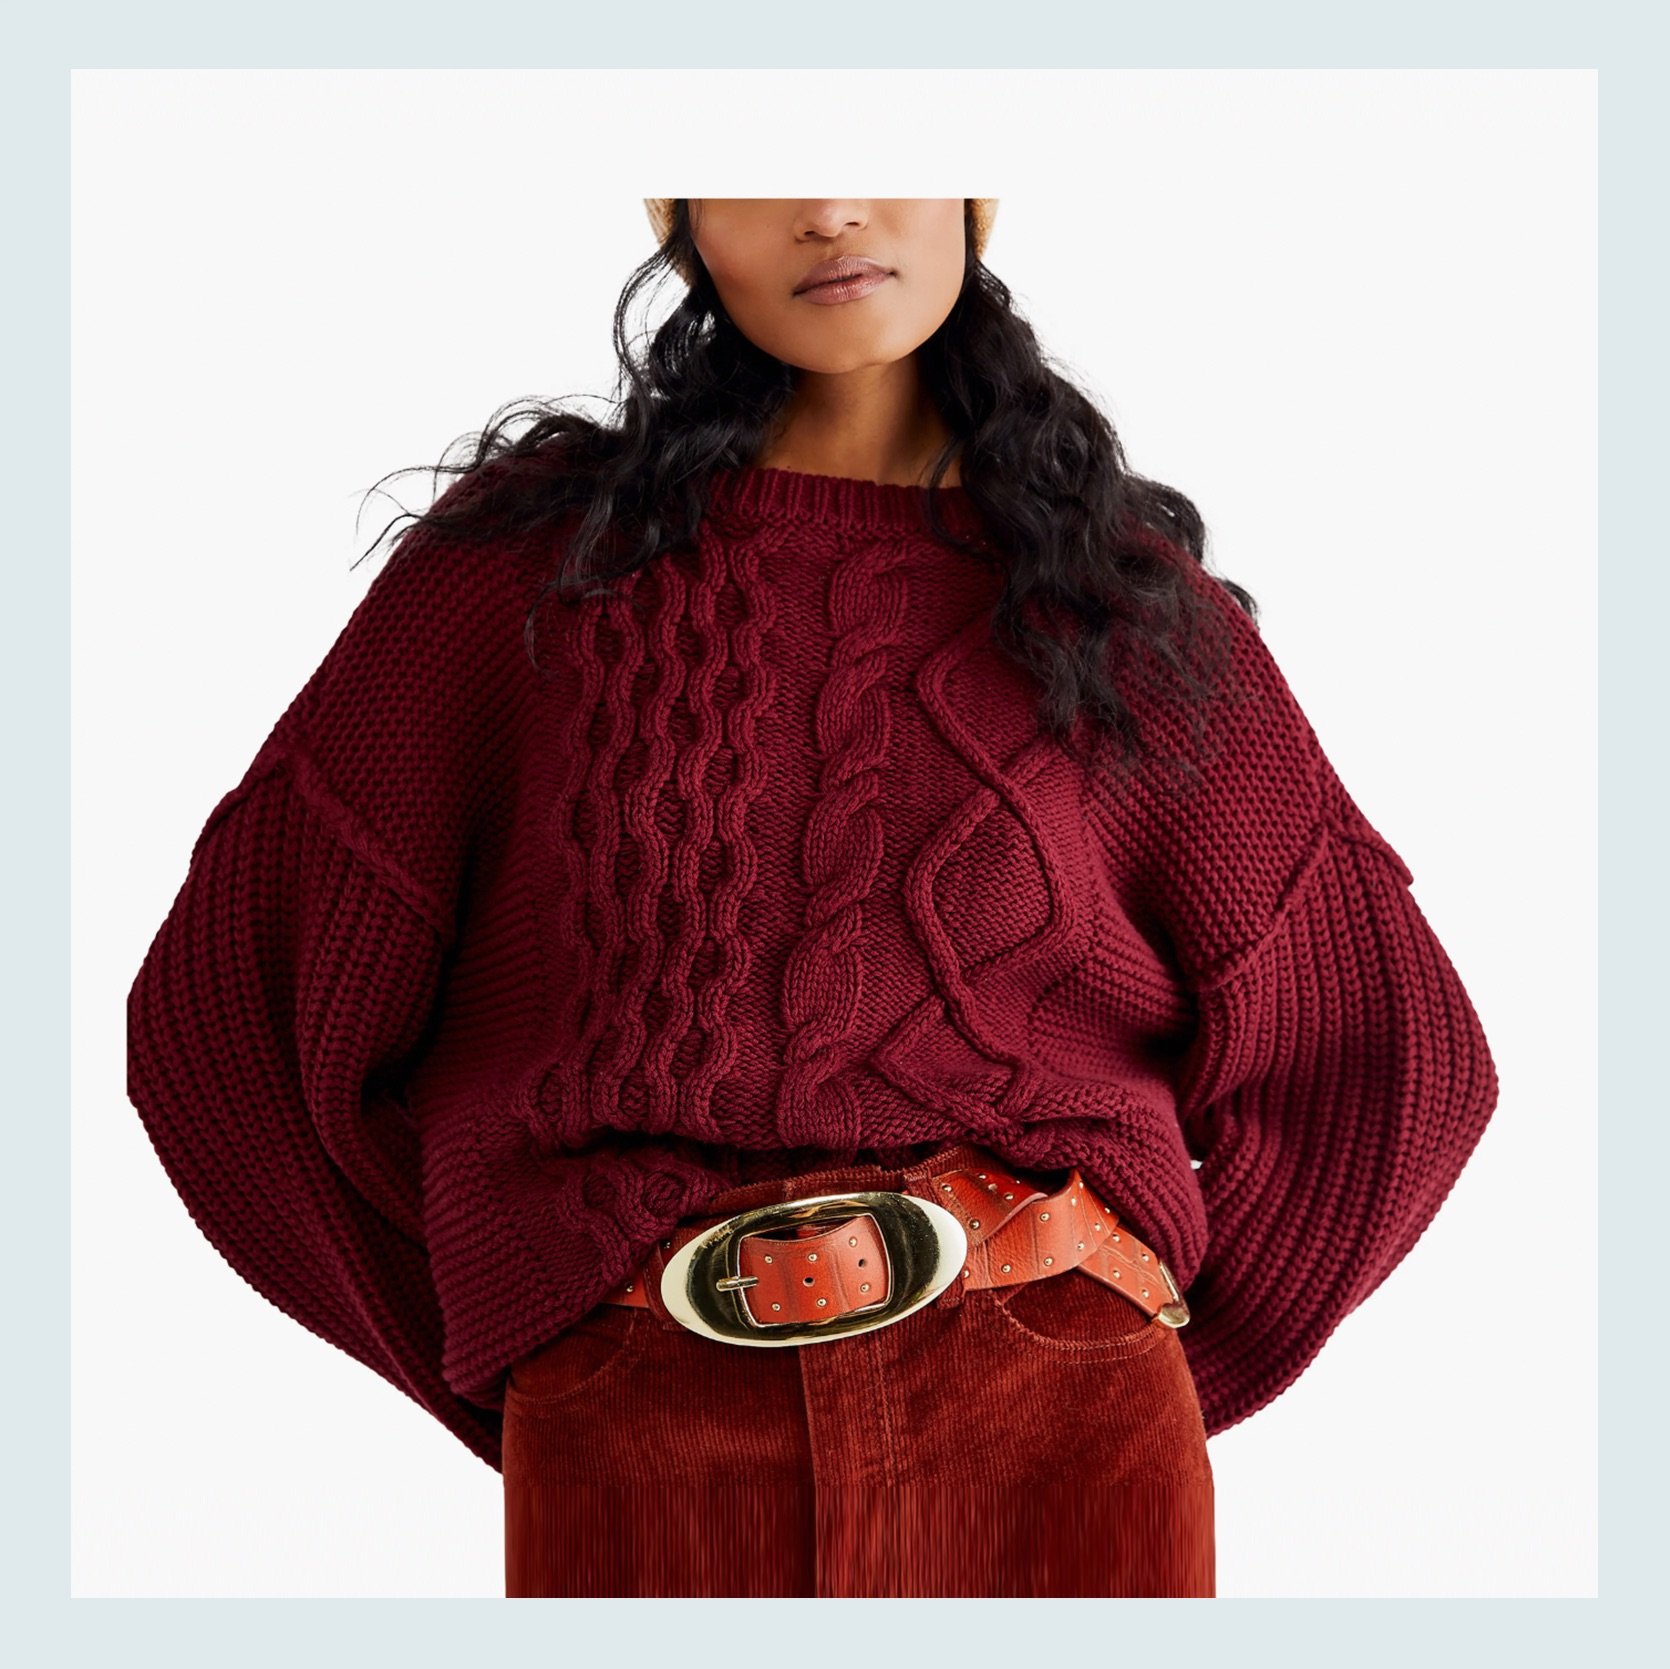
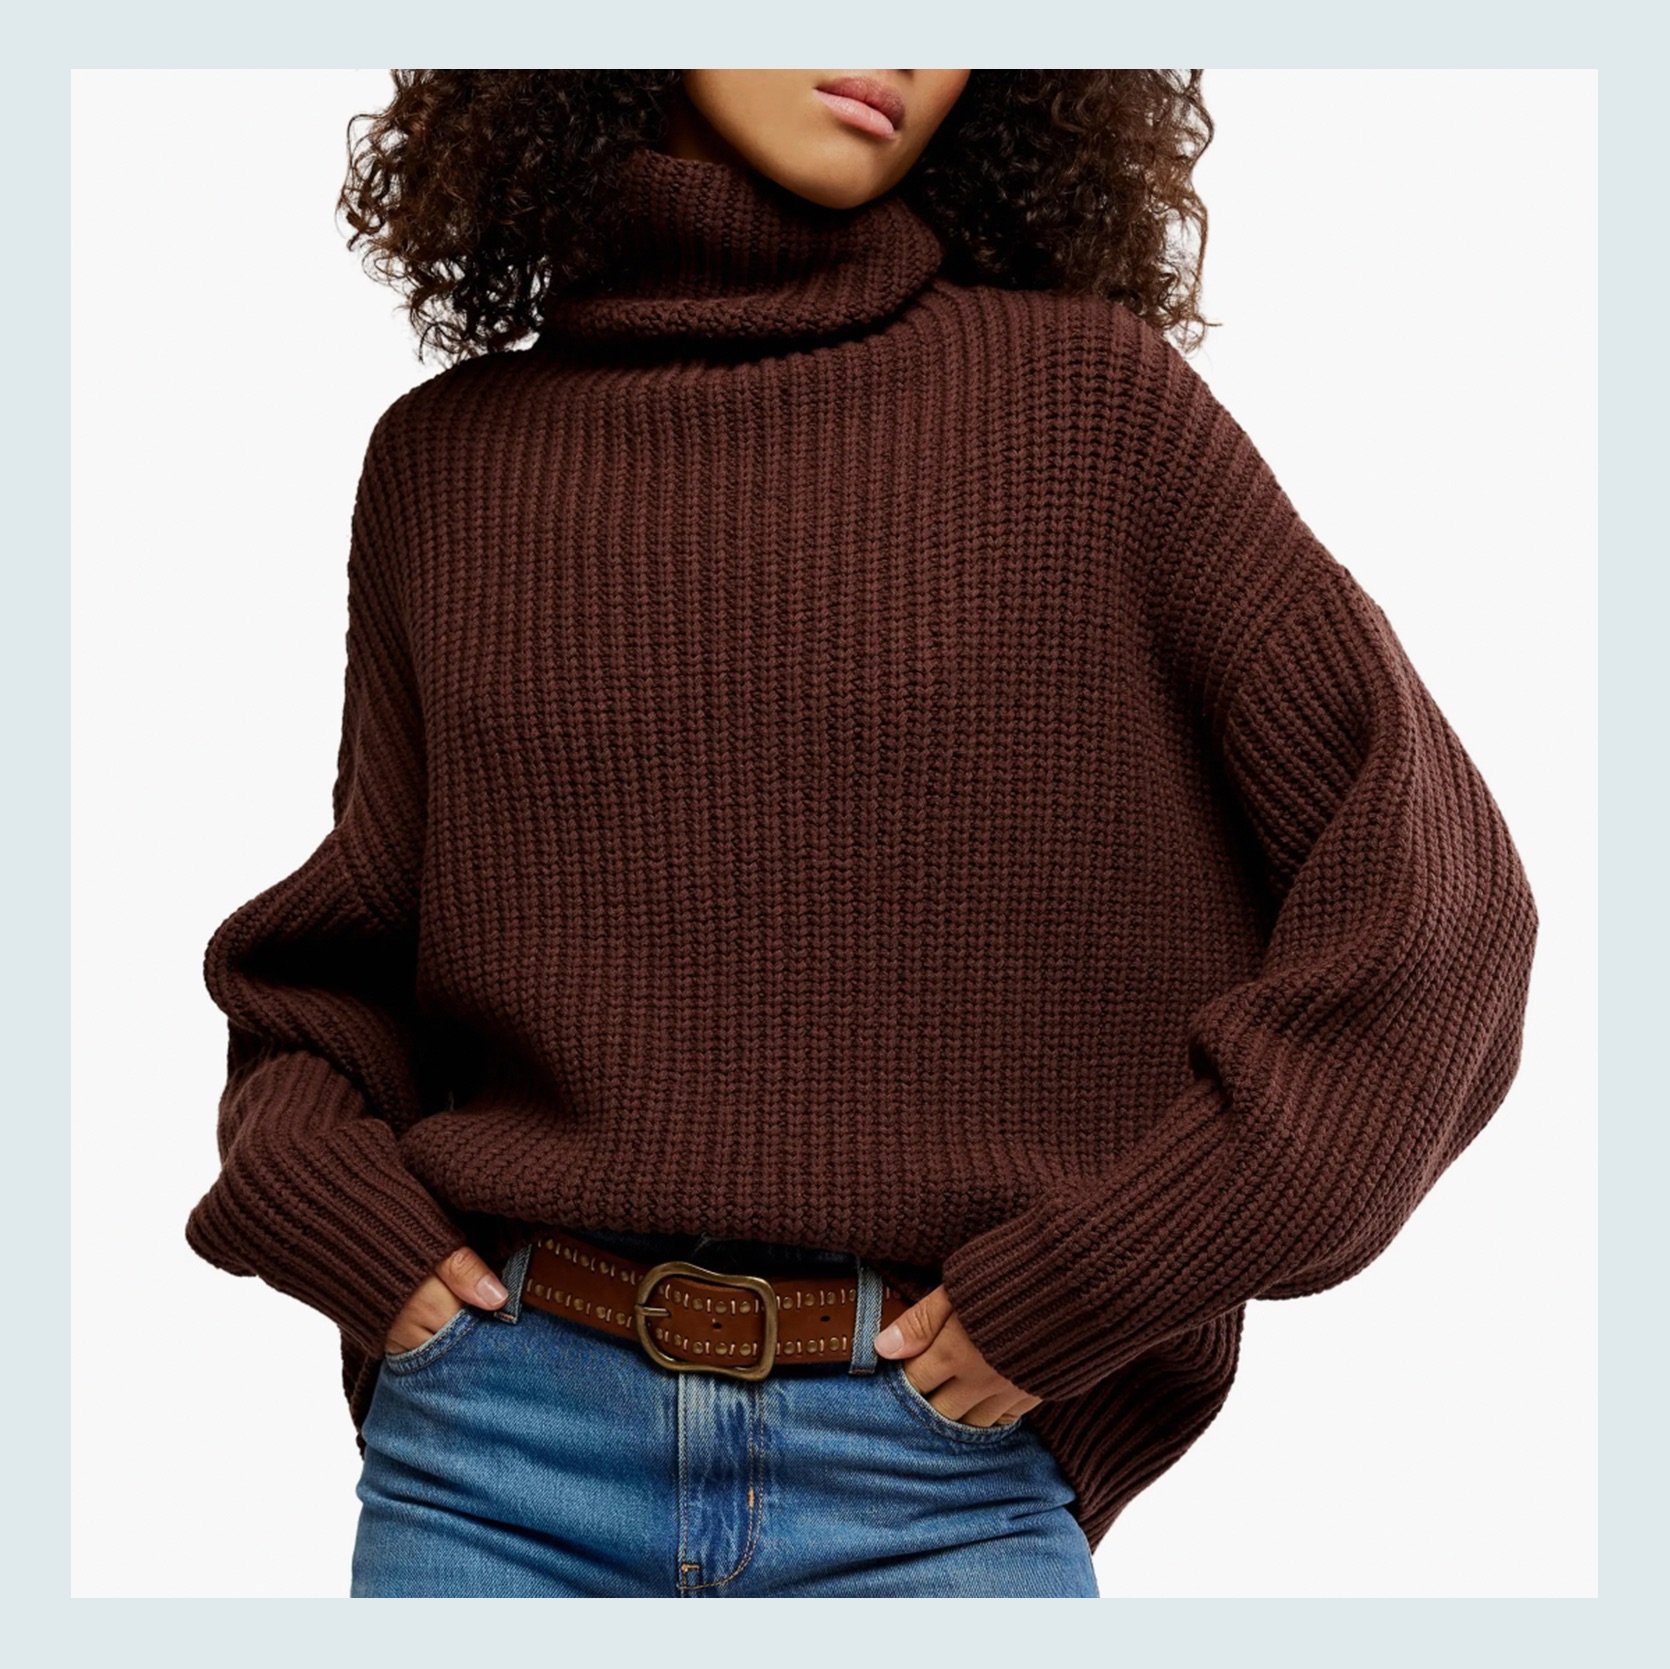
In the clothing category, few things are dreamier than a slightly oversized sweater. Both of these are from Free People, which makes sense because all of my favorite knit sweaters are from them. They just have “the slouch” down perfectly. And both of these are well under $100 and come in more colors. Also, should we do a belt roundup? The are EXTREMELY back.
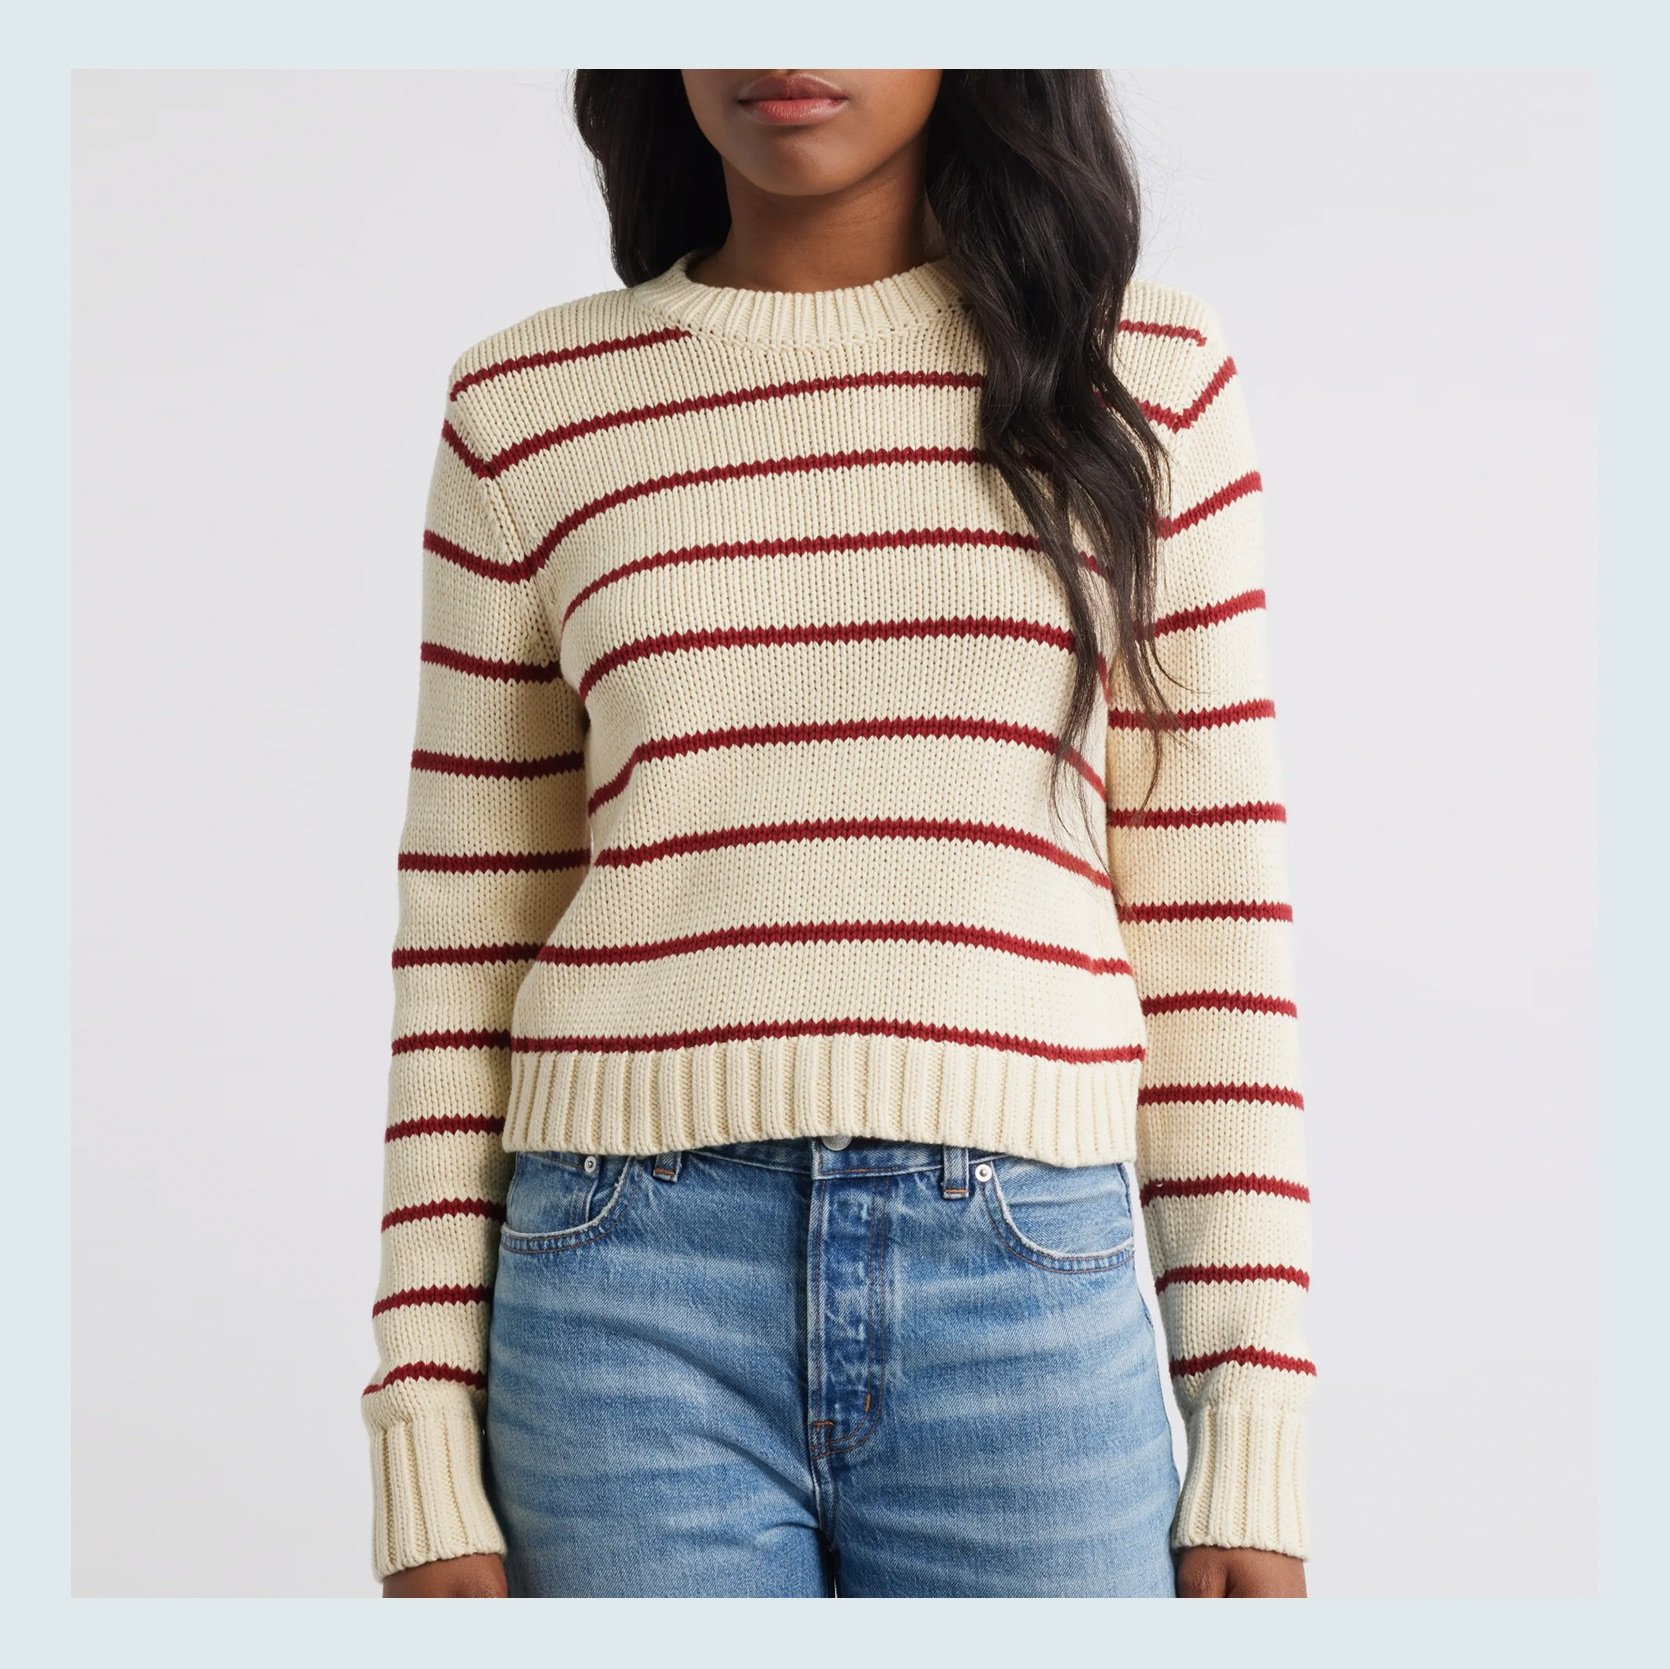
If you prefer a more tailored (but still cozy) look, this Madewell sweater is perfect. It’s great to throw on for a cool summer evening or be the perfect pop of pattern under your fall/winter coat. It also comes in blue with white stripes.
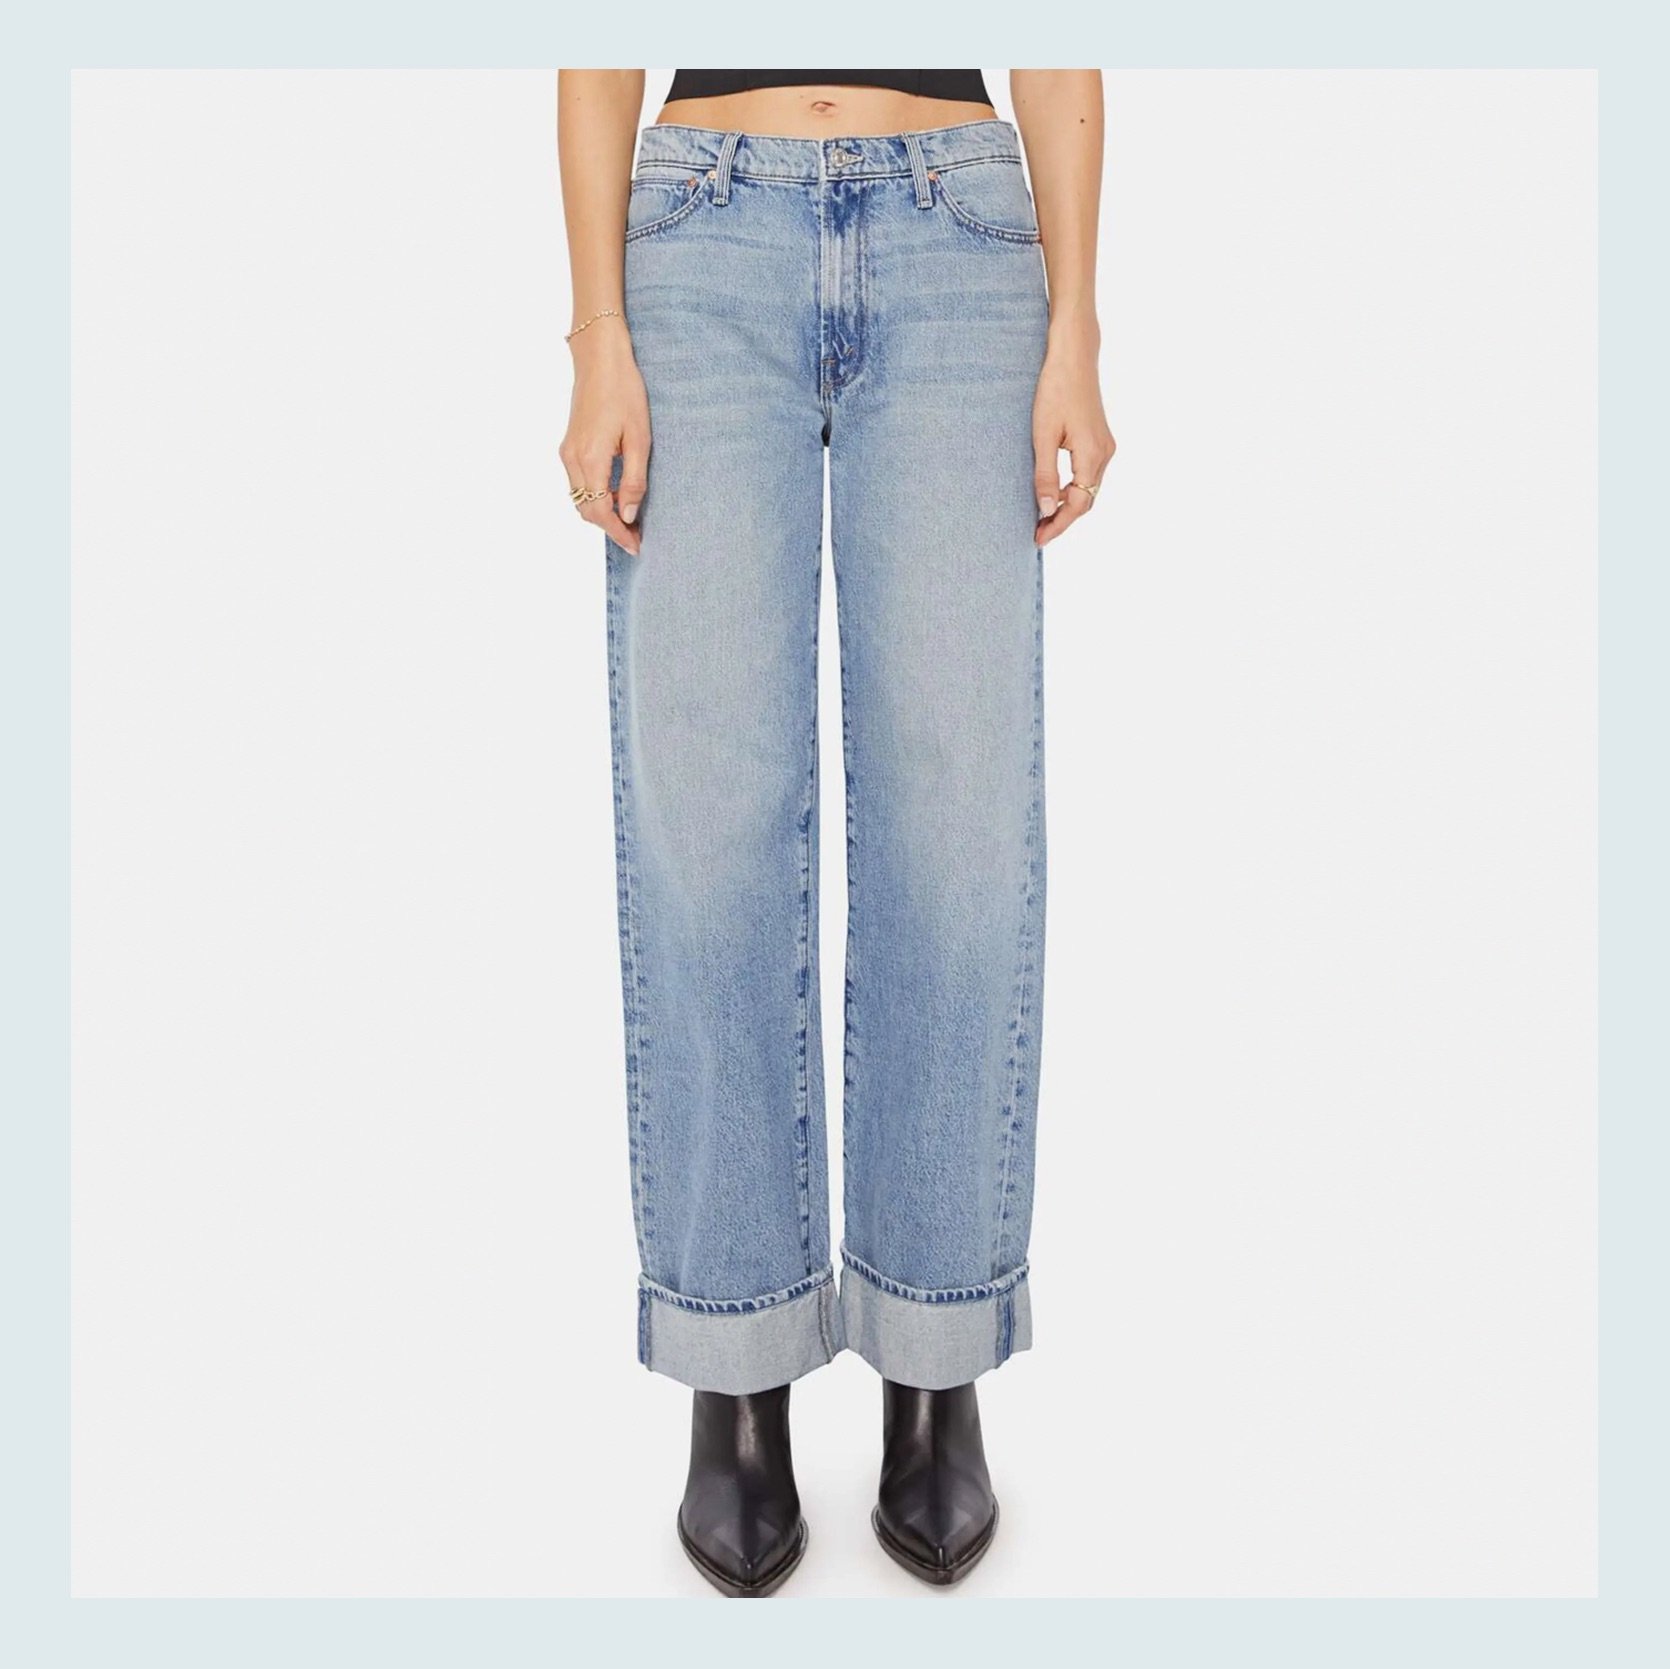
If you are someone who maybe wants to try a pair of expensive jeans, a sale like this is such a great way to do that without paying full price. Both of these jeans are by MOTHER, a beloved but not inexpensive brand. I love each of these styles for different reasons. Who doesn’t love a little flare? They just know how to show off those curves. The other wide-leg jeans are simply cool. It gives you that chic, effortless vibe I know I’m always trying to go for:)
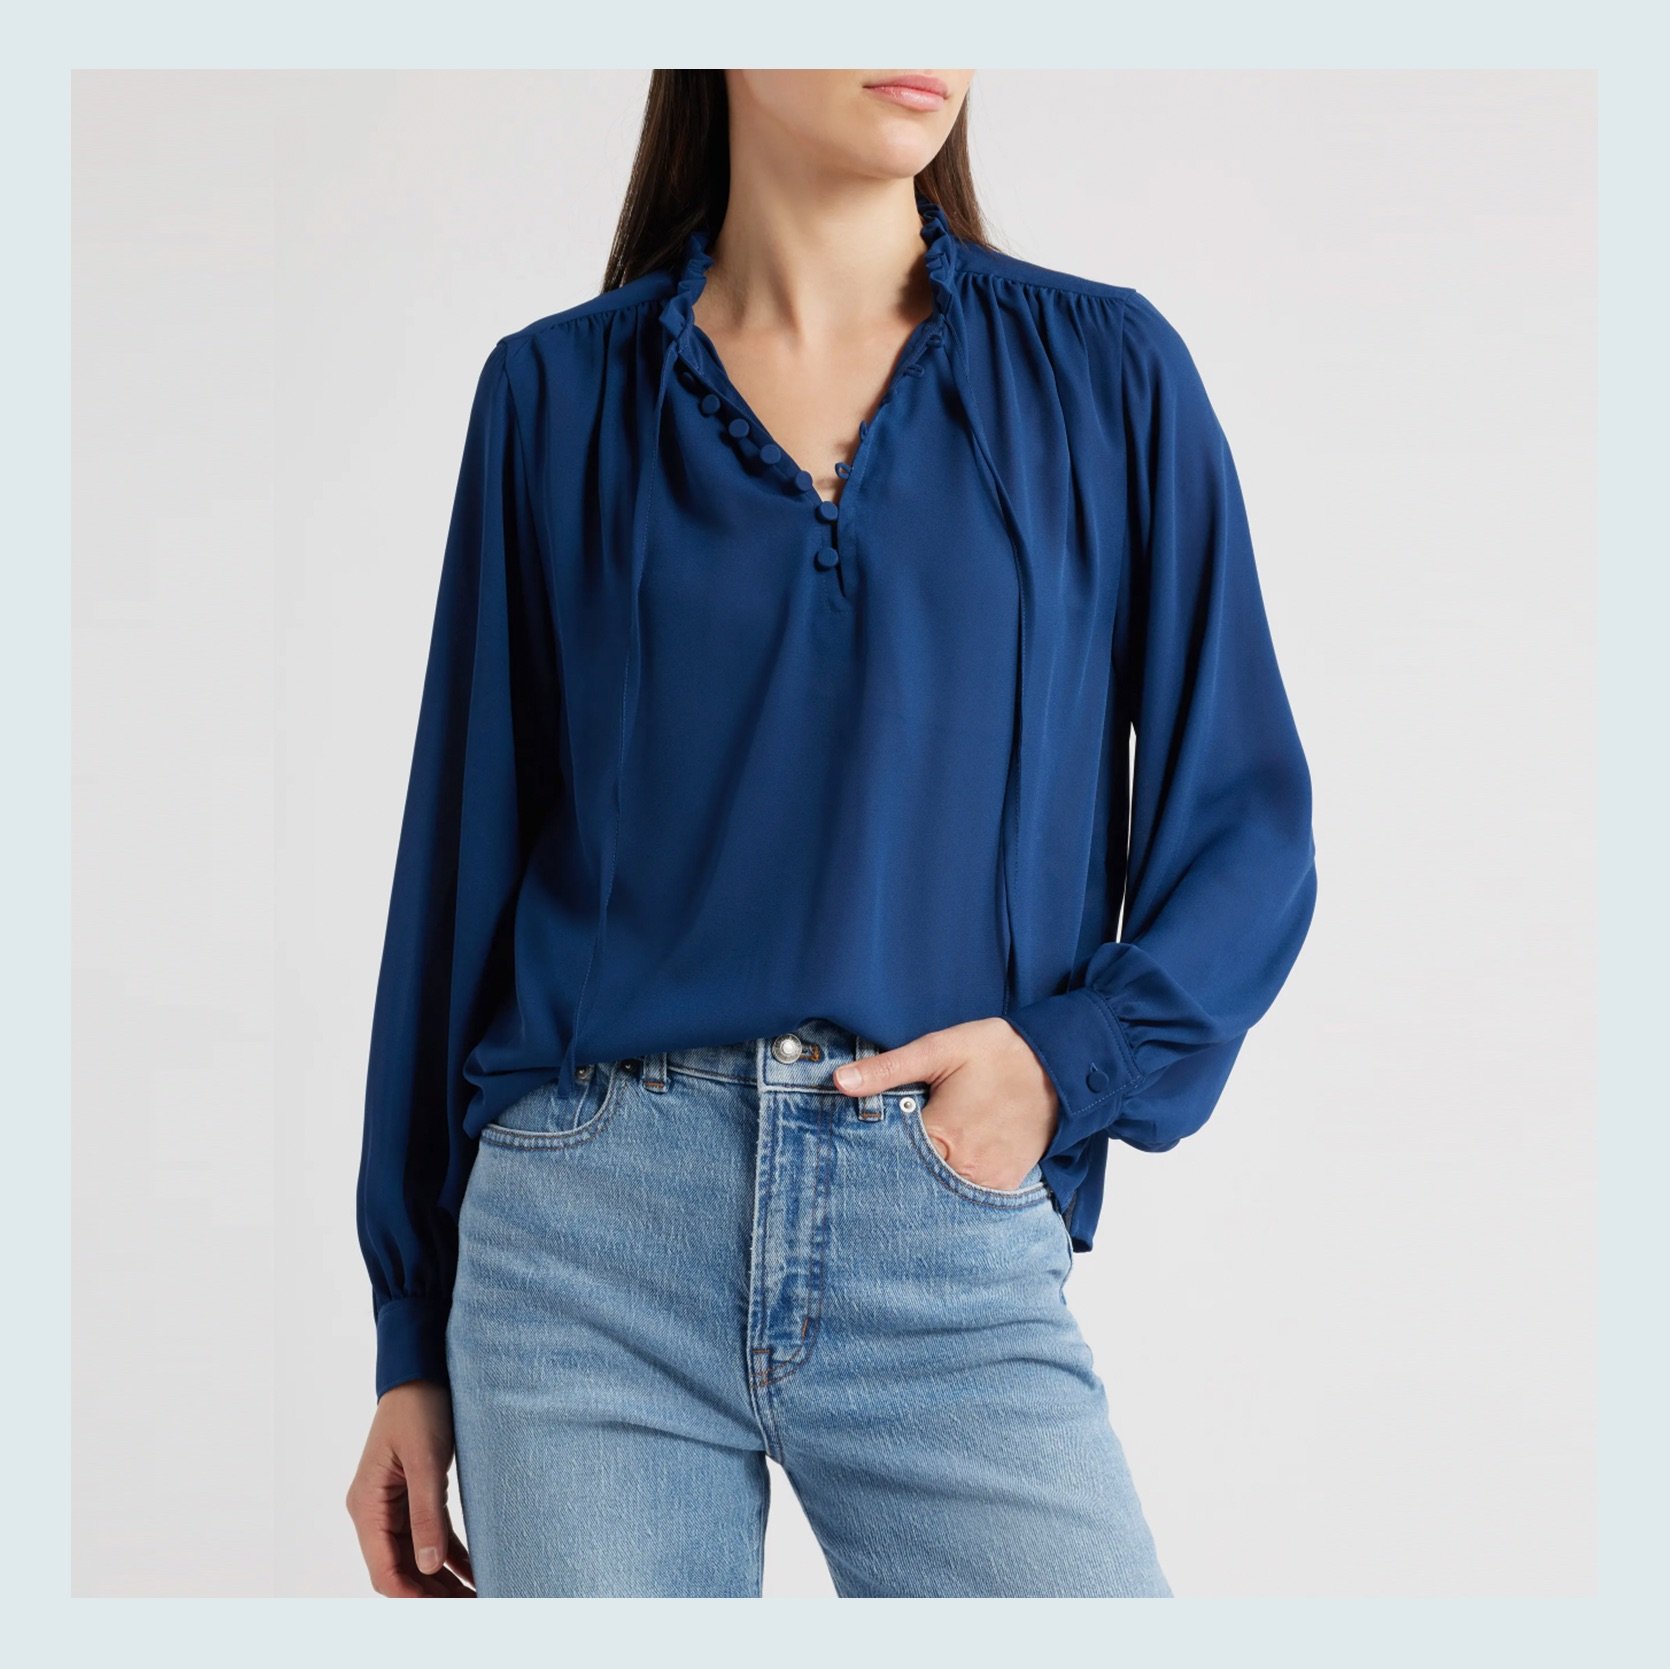
Naturally, I had to find some pretty blouses since we are VERY pro flow-y blouse at EHD. If you like some pattern, then look no further than Farm Rio (where the blouse on the left is from). This top, in particular, is the perfect colorway and pattern for all seasons. It’s vibrant without being too over the top. We are big fans. Then that solid blue top is simple, but the detailing in the cuffs and neckline are so pretty. Versatile but special!
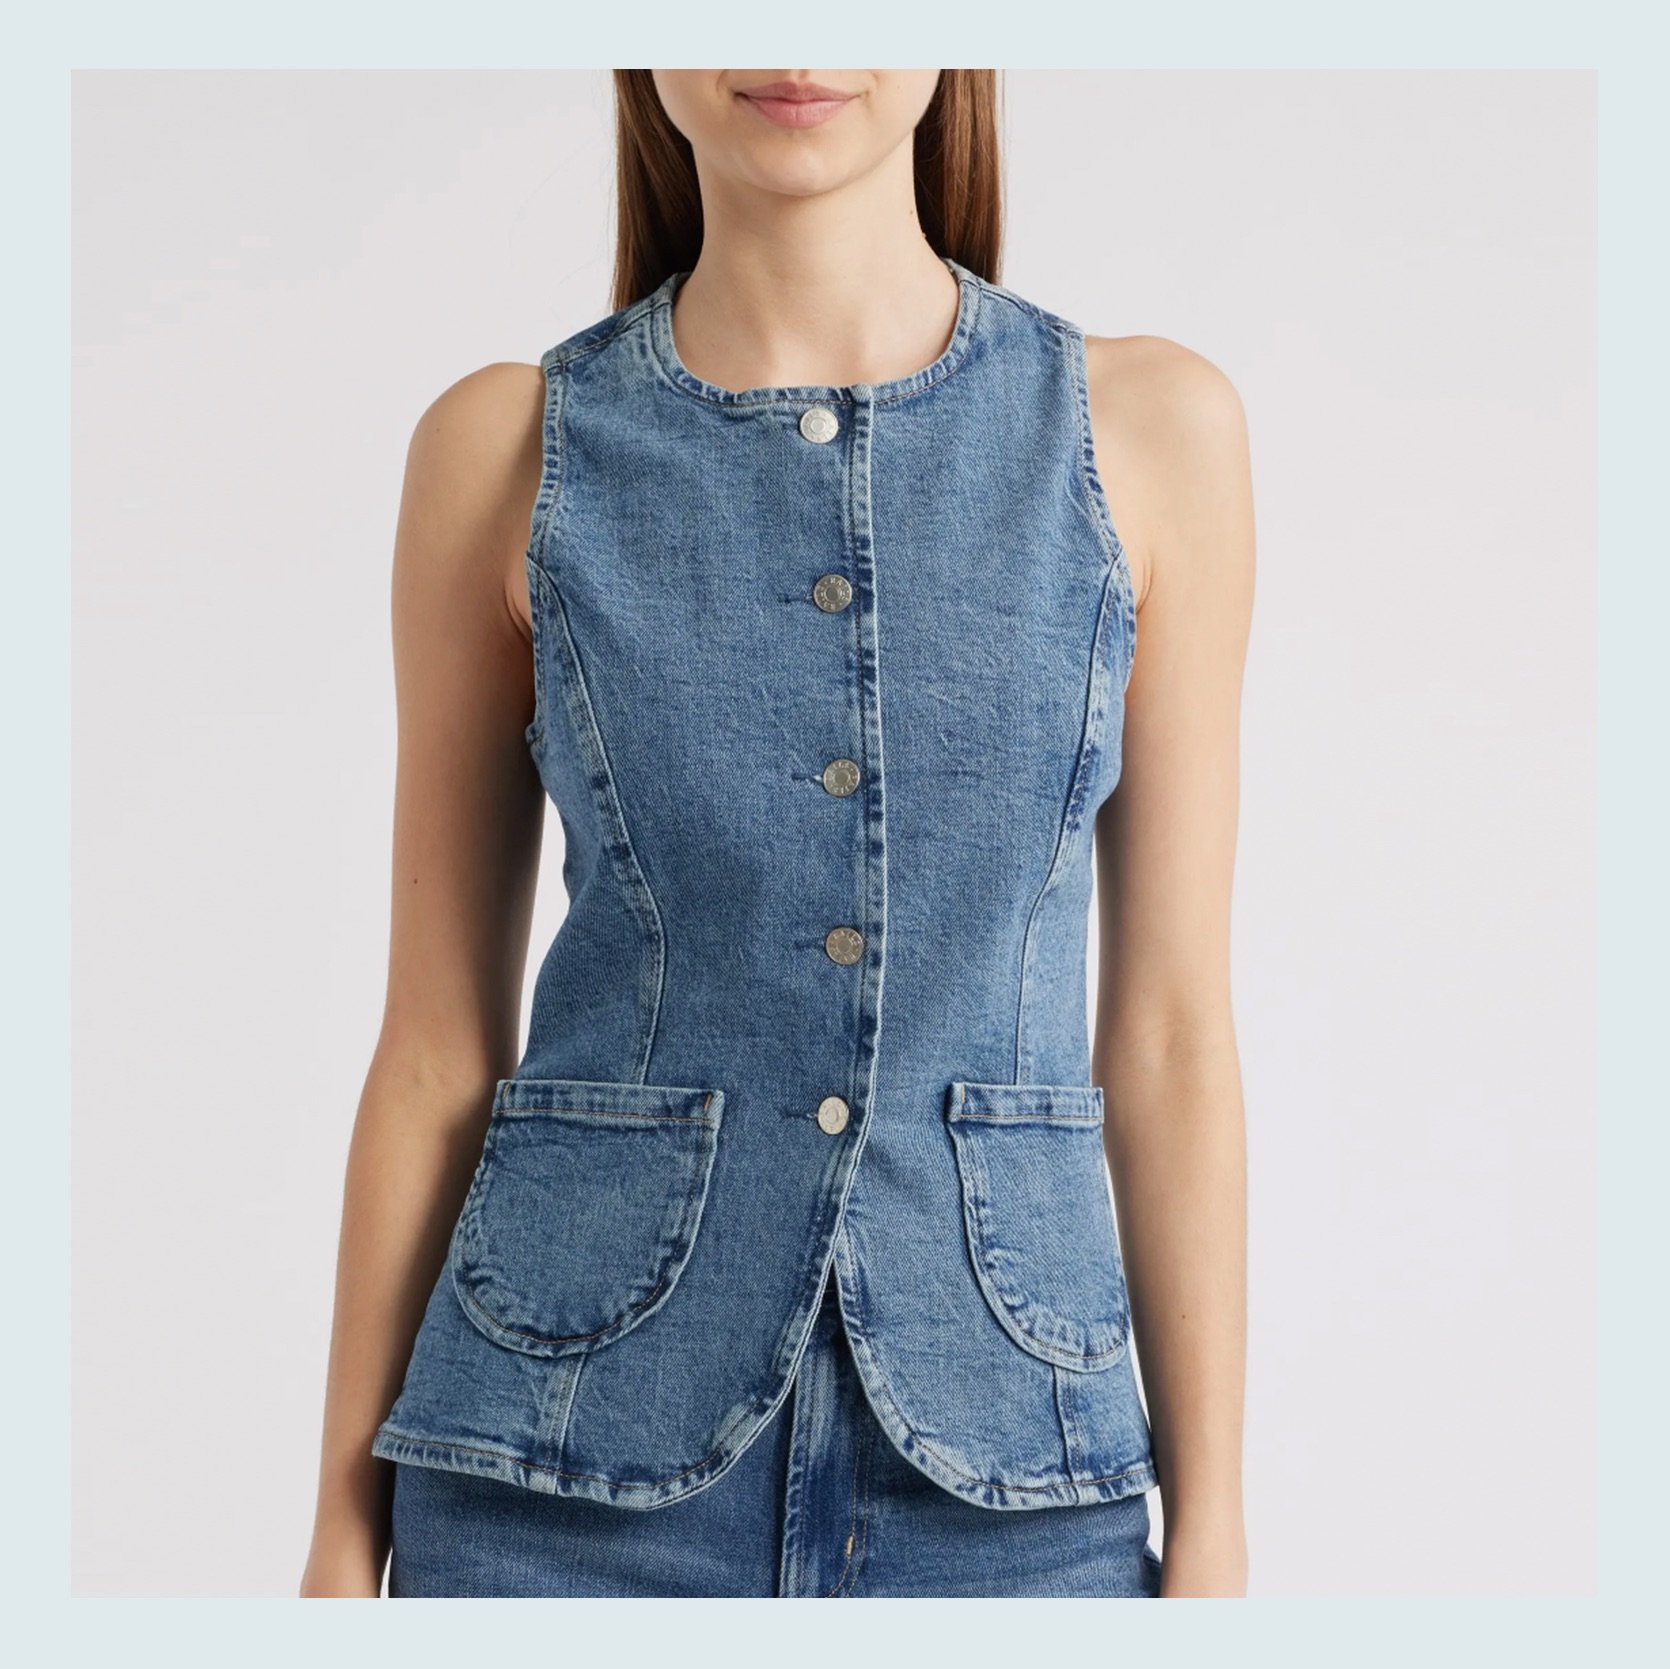
But if you want a top that is a little more structured, that can also easily transition to a cooler season (just throw on a thin little long sleeved top under), this vest is ideal for that. It’s from Rails, which Em is a big fan of, and I love that it’s a little longer. A great find…if I do say so myself:)
Time to get a little more casual. I’ve recently been leaning more into fun tees. I still love a simple, plain white t-shirt, but sometimes you just want something a little more, amirite? Both of these have that ideal amount of “fun” without being too loud. That’s my ideal mix.
Continuing our cool and casual journey, I’m in love with these track pants. How cute is the paper bag waist, or the curved detail on the bottom, or those cool stripes? A great pant for you to run around town and feel put together and comfortable.
Today is an exclusive sneak peek for you readers before it’s blasted to the world. You see Sean Lowe, yes, the most likable former bachelor, and I have something to tell you. We’ve partnered up to launch my first line of sofas next week, called Room Service…with Wayfair, all made in America. First time in Emily history (sorry it took me a minute:))
A backstory feels necessary here – how did we get here exactly? Sean and his business partner, Clay Silver, started a furniture company 10 years ago. You see, right after he finished The Bachelor (how cute are he and Catherine on social?), he asked Clay, his long-time best friend, for his dream pit-style sectional as a wedding gift. Clay’s family has decades of furniture manufacturing and selling experience, and they have been very successful in this really challenging space. The sectional went viral, so with that success, they built a really robust line and company of their own (I had no idea, TBH). They were ready to expand so they approached me with a very clear pitch – I would design the furniture (with help from my talented team), with full creative control, while he and Clay would handle all the factory contracts, operations, logistics, fabric procurement, manufacturing, inventory, and customer service – all the stuff that is outside my expertise/experience or desire, frankly. My interest was piqued enough to jump on a call with them, which went really well. They seemed honest, nice, smart, experienced, and again, willing to give us full creative design control while taking away our stress. It just felt natural and easy. I still was unsure I had the bandwidth to do it, but my team cheerleaded around me and convinced me it was the right time and that they were the right operations partner (they were right!). A year and a half later, we have a line of sofas that we are so proud of. I love each of them so much. I’ll go more into what is so great about them all next week and why we designed the exactly the way we did, I promise (but know that my team and I – led by Jess) really obsessed over the comfort, quality and being the right level of stylish (not too trendy, but not basic!). A true EHD collaboration on all fronts – I’m continuously so grateful for my team.
And get this…We partnered with Wayfair on this line because they are a trusted company that has mastered the science of logistics and delivery – they can get our pieces into your home within a couple of weeks at minimal delivery costs. It’s a real love triangle. A furniture industry throuple (using real restraint here, not to use more “final rose” puns). Our collective goal is to help you have stylish and comfortable furniture, quickly, so you can enjoy your home more, now. The whole thing has been so fun and fulfilling.
A First Sneak Peek…
So here they are – and there are more sizes and colors available. Everything is live on Wayfair’s site and purchasable as of today. The reason I wanted to give you, my loyal blog readers (THANK YOU), a heads up is that we fear some will sell out (they can’t stock 100 of each SKU). Wayfair has a massive catalogue feature and big marketing and advertising campaign going up soon. So if you are in the market for a sofa, you have over the weekend before it gets blasted on social and I start telling the world about it. But the good news if any should sell out, they can be made and shipped quickly (no 10-12 week lead times) because we are made in America and have a fantastic factory in Texas (of which I’ve visited twice to sit on my babies and make sure they are good enough for my own family/home – they are). We tweaked the design a lot (ask Sean), and I specifically obsessed about the comfort and family-friendliness of them all (the perfect foam/padding combination for each sitting experience). More to come on Monday, I’m so excited. But if you are in the market for a sofa or just want to see what me and my team have been up to, feel free to check out Room Service here. It’s been a real journey:)
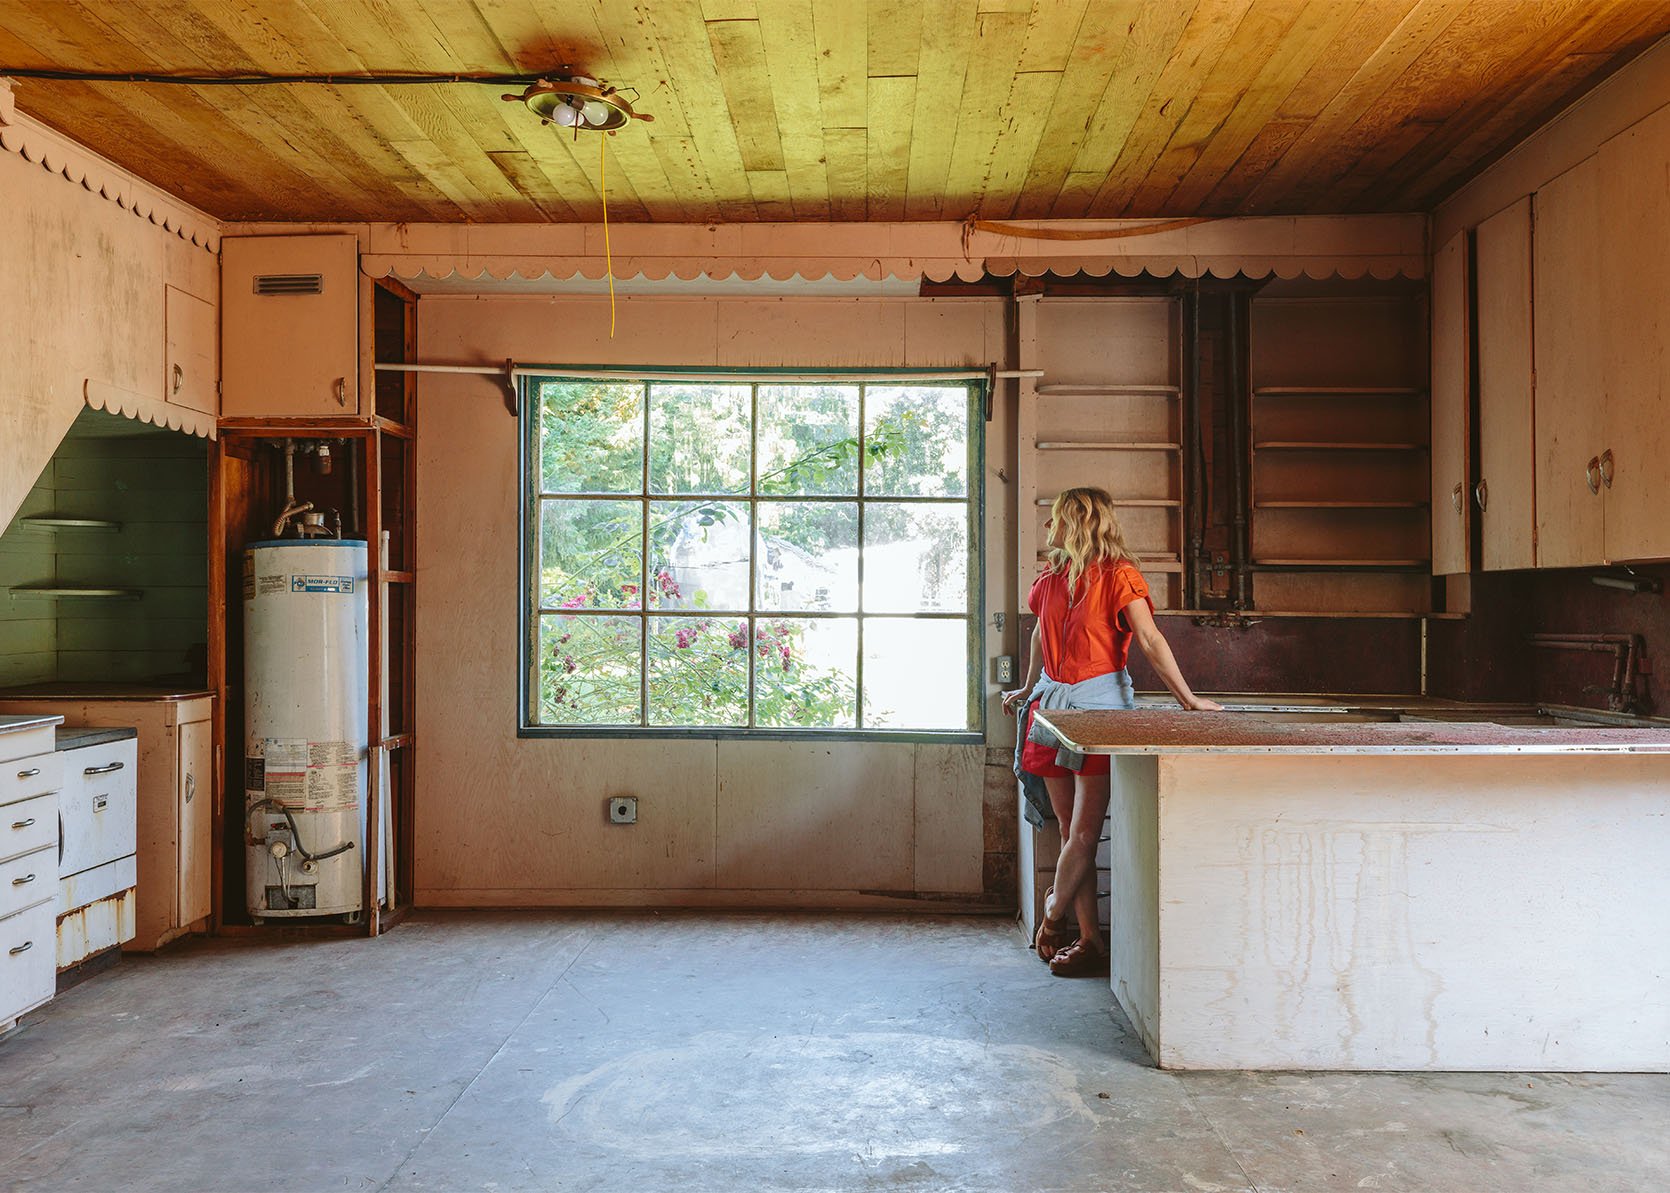
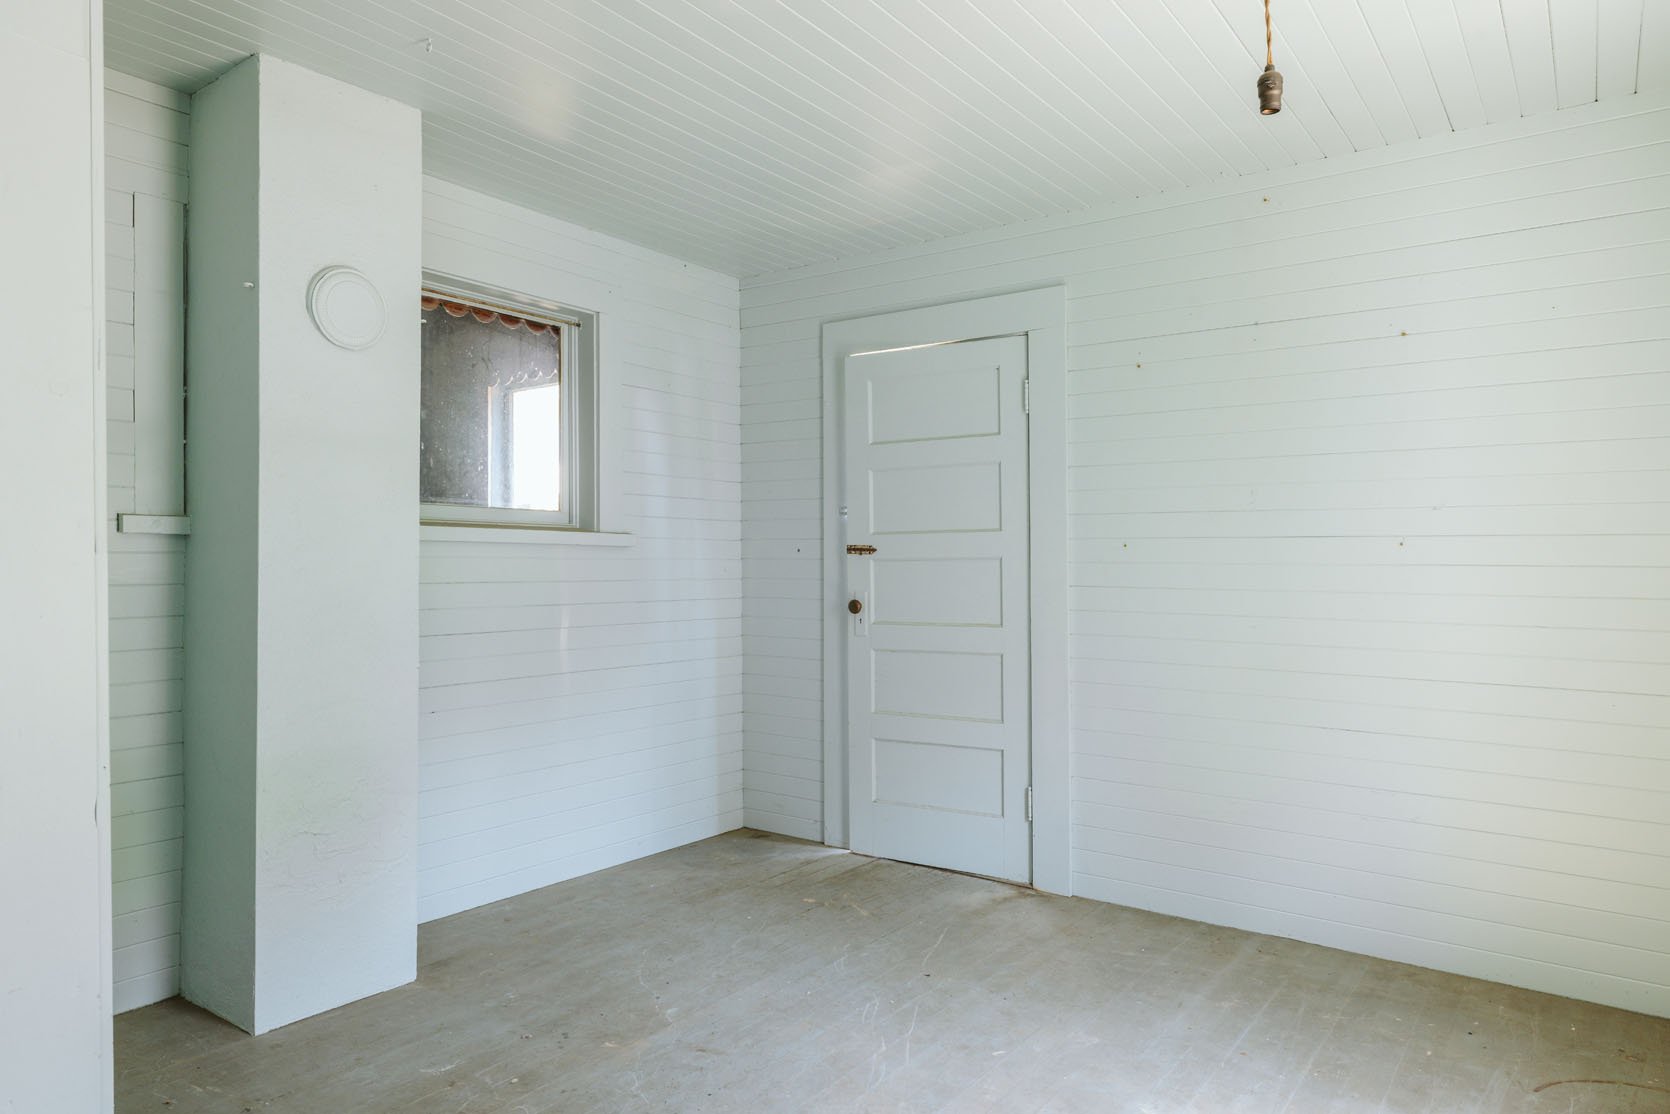
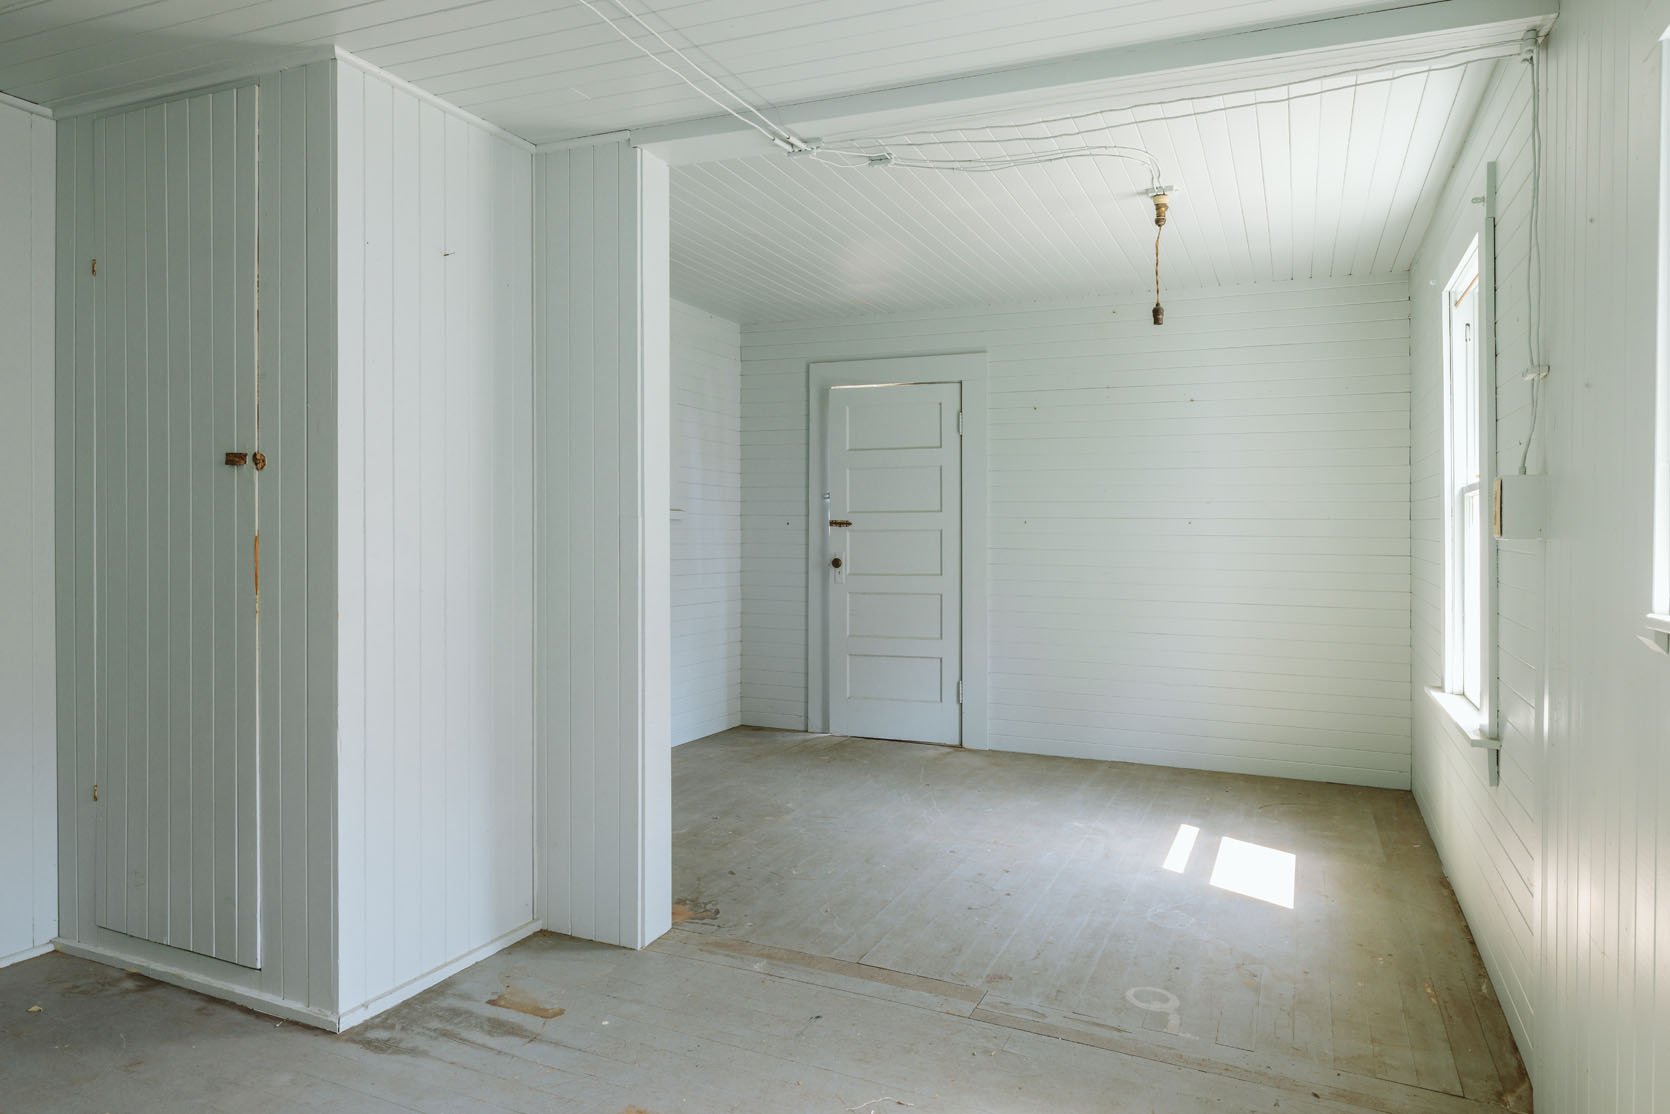
When we first found our farm property in 2019, I knew that our main house (that we now live in) had a ton of potential to be beautiful and the perfect place to raise our family, but this house, this is the one that my heart screamed for from day one. Today you’ll see why, folks. We are finally embarking on the restoration of this house this year, and I will absolutely be learning about its history and sharing it with you. And while I could blab about it for 5 paragraphs (and will), I know you want to just skip to the photos and see the sweetness for yourself, so here you go… (she says with a giddy excitement never felt before)!!!! Oh, and if you like to play the “Every time she says the word ‘charming’” drinking game, I might suggest using water or something ABV. IT’S A LOT.
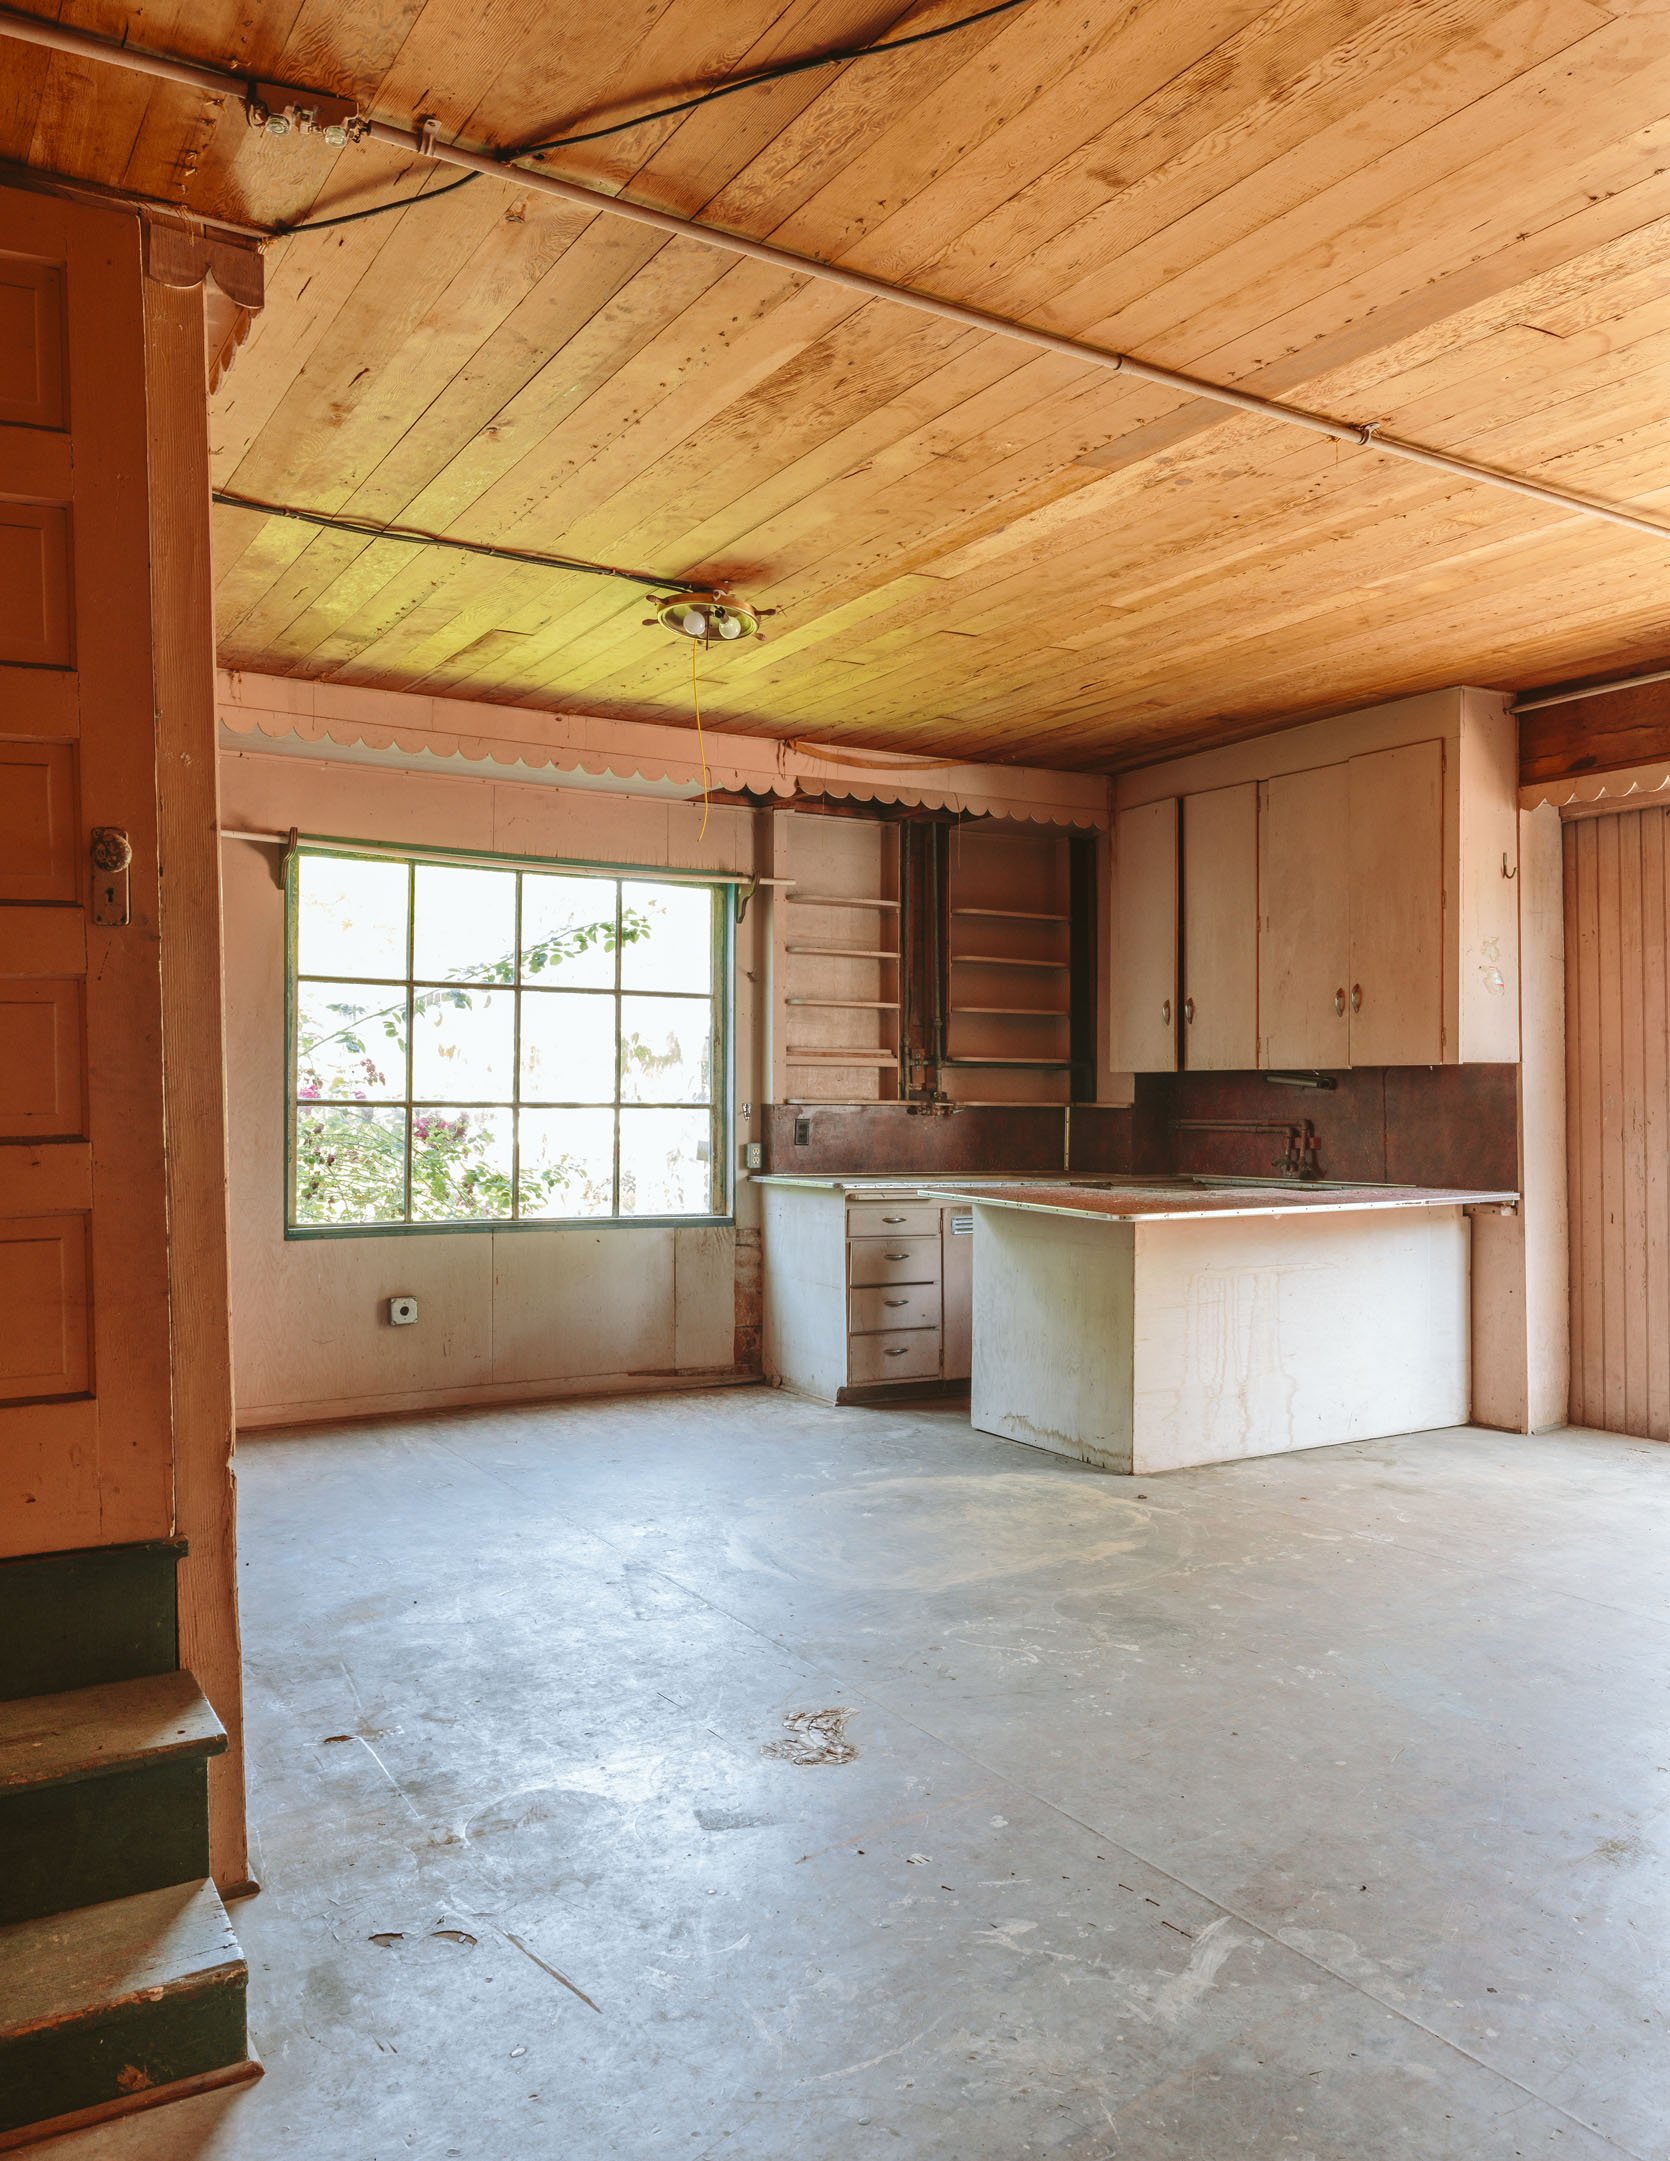
The Main Floor – The Original “Family Room”
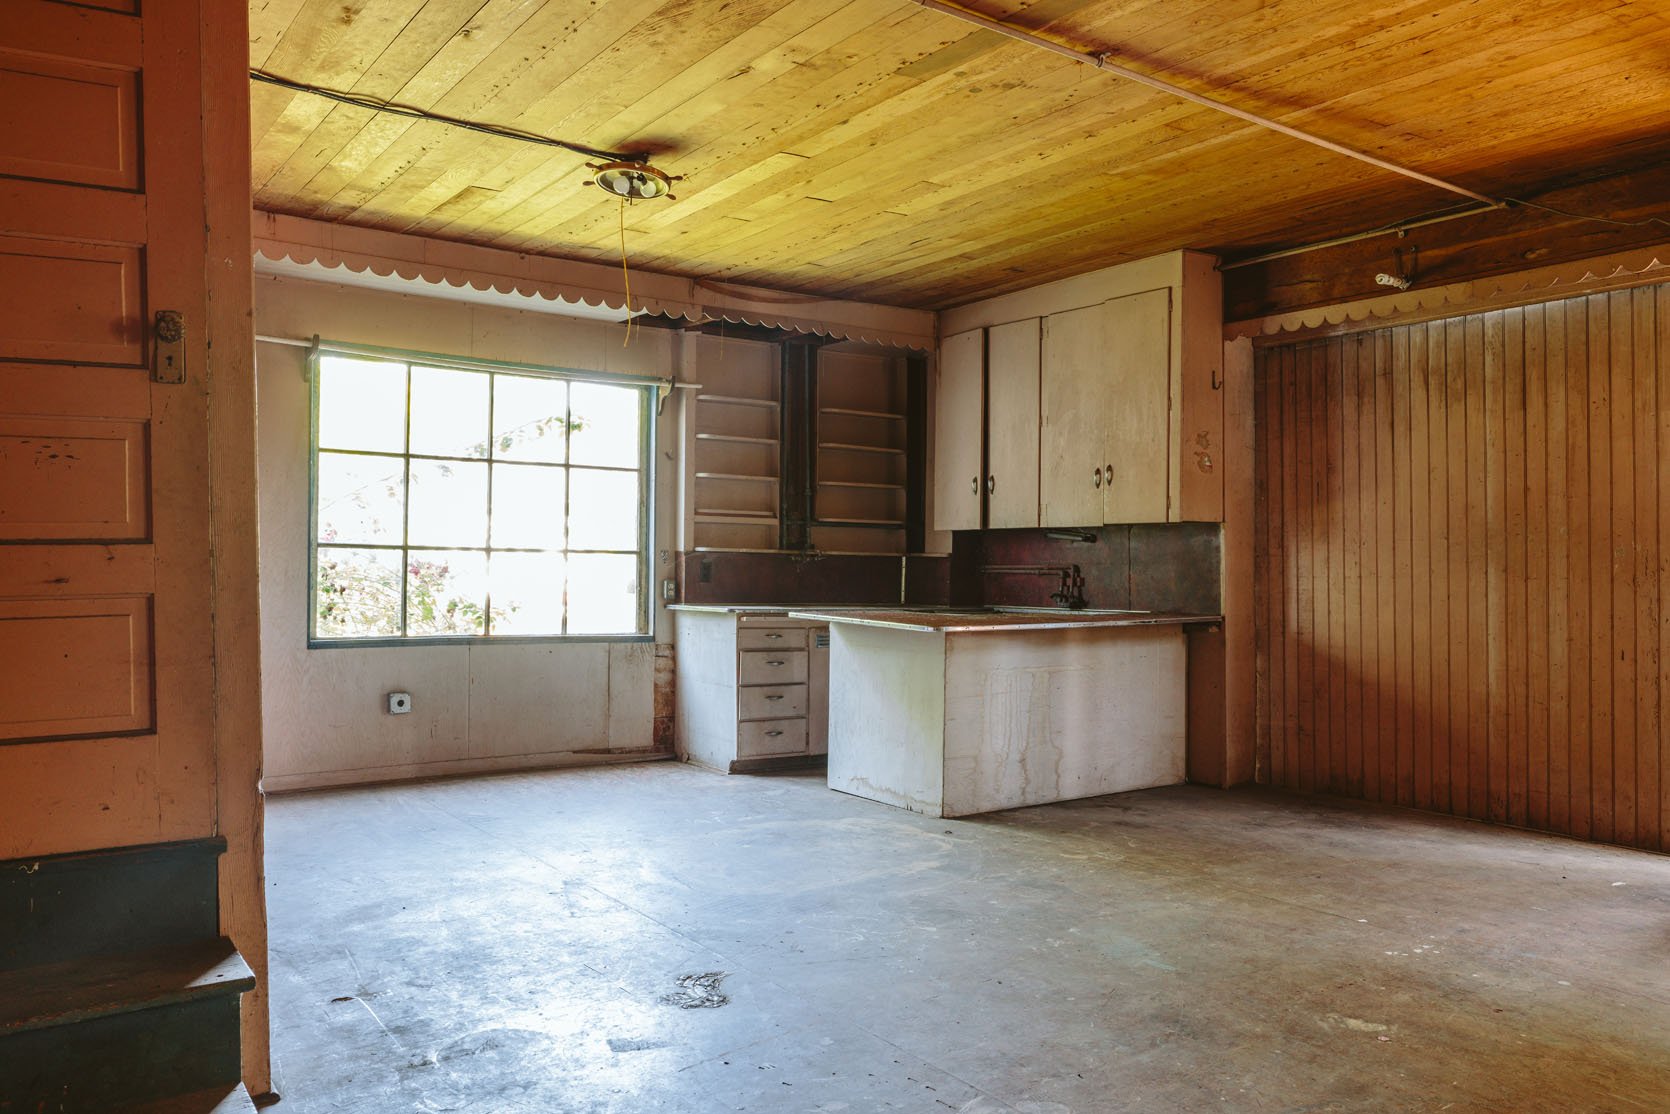
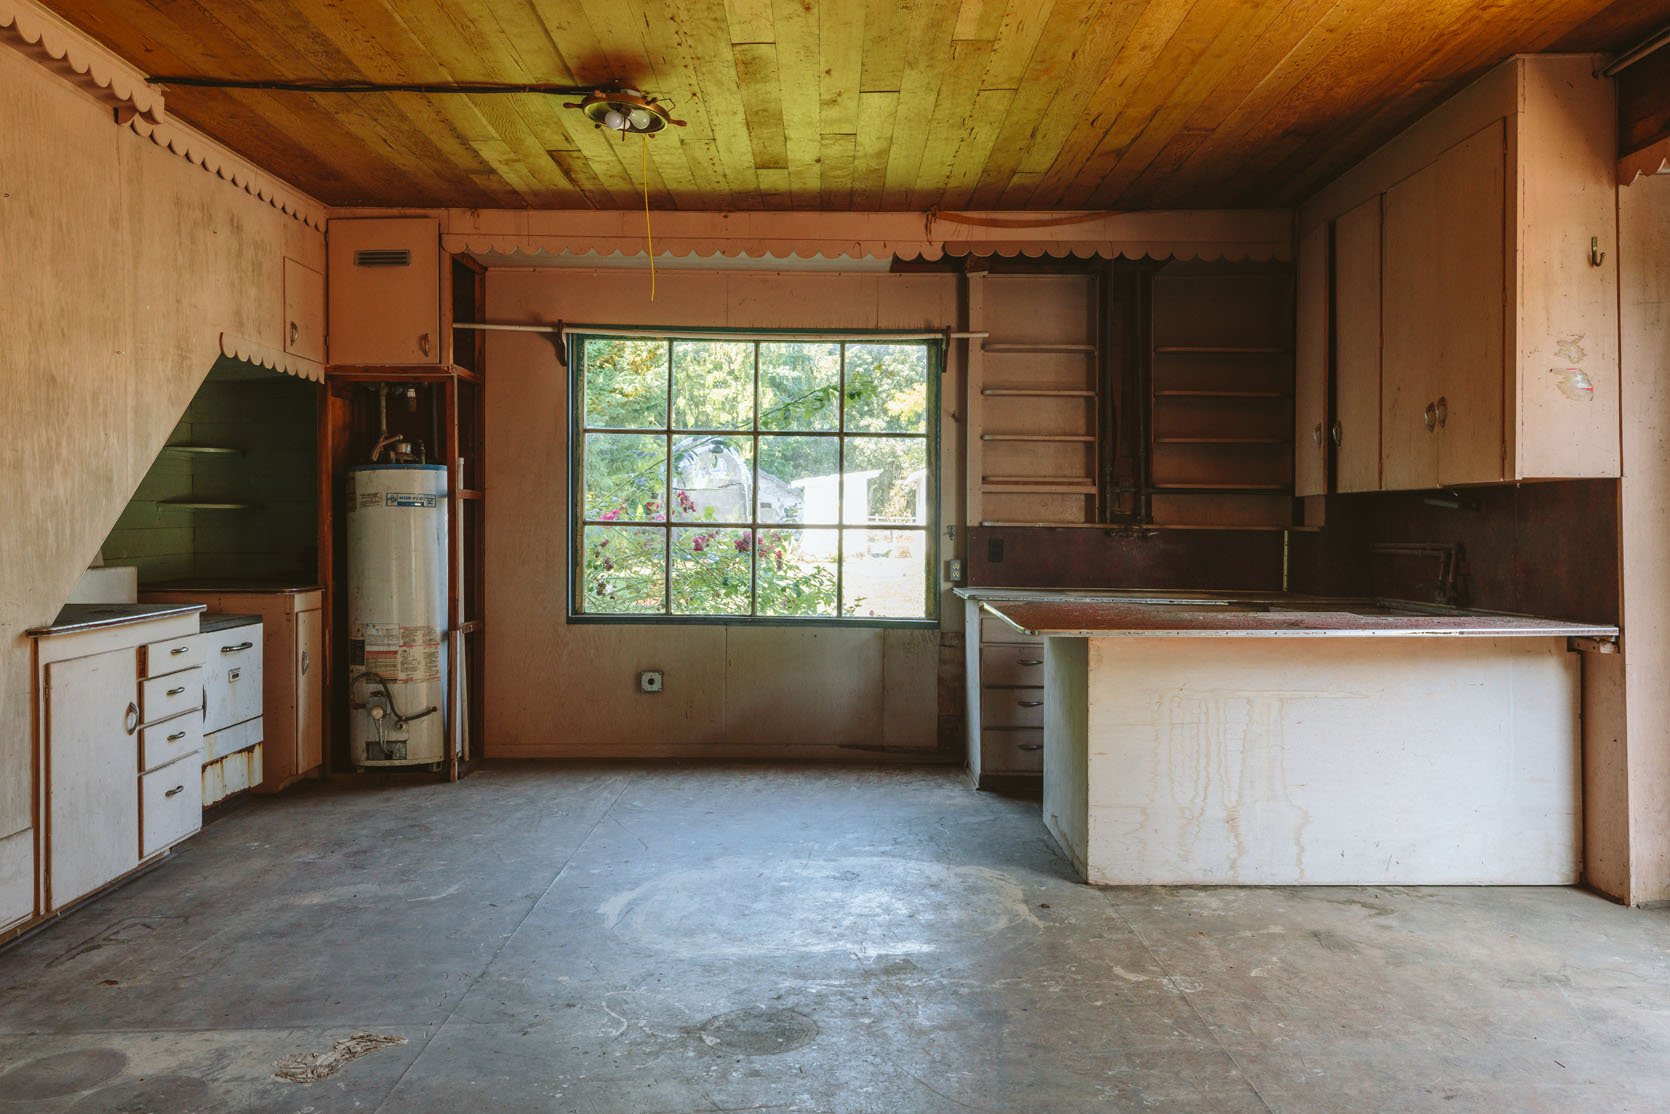
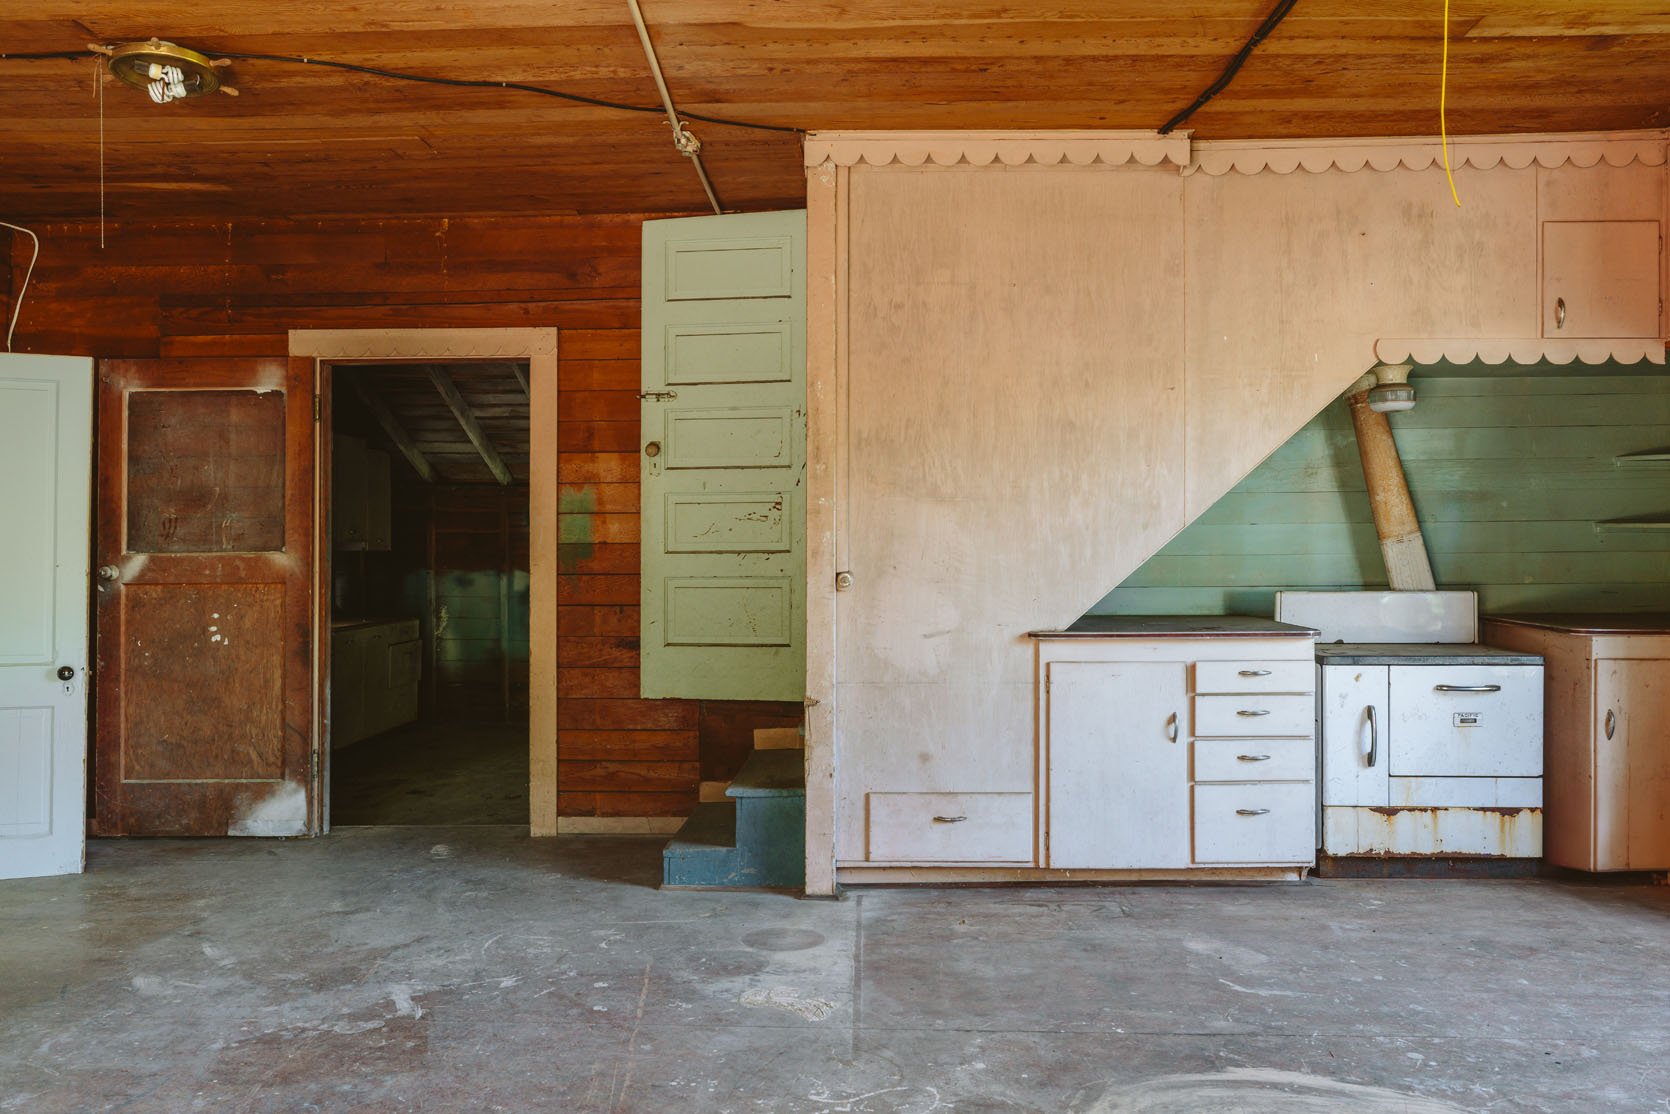
While we are still learning about the history of this house, we believe this room specifically to have been built first in 1850 by whoever ran the homestead, which we know very little about (more to come soon!). It’s oddly cute/charming with a ton of wood paneling (this is before drywall, and we were told that the Pacific Northwest didn’t plaster walls back then, so paneling was just what was done).
The original kitchen was to the left (where the wood-burning stove is), and then the “kitchen” to the right was likely added after the turn of the century (1930s -1950s). Can we talk about the colors and the scallops trim everywhere???? I mean, it’s painfully charming.
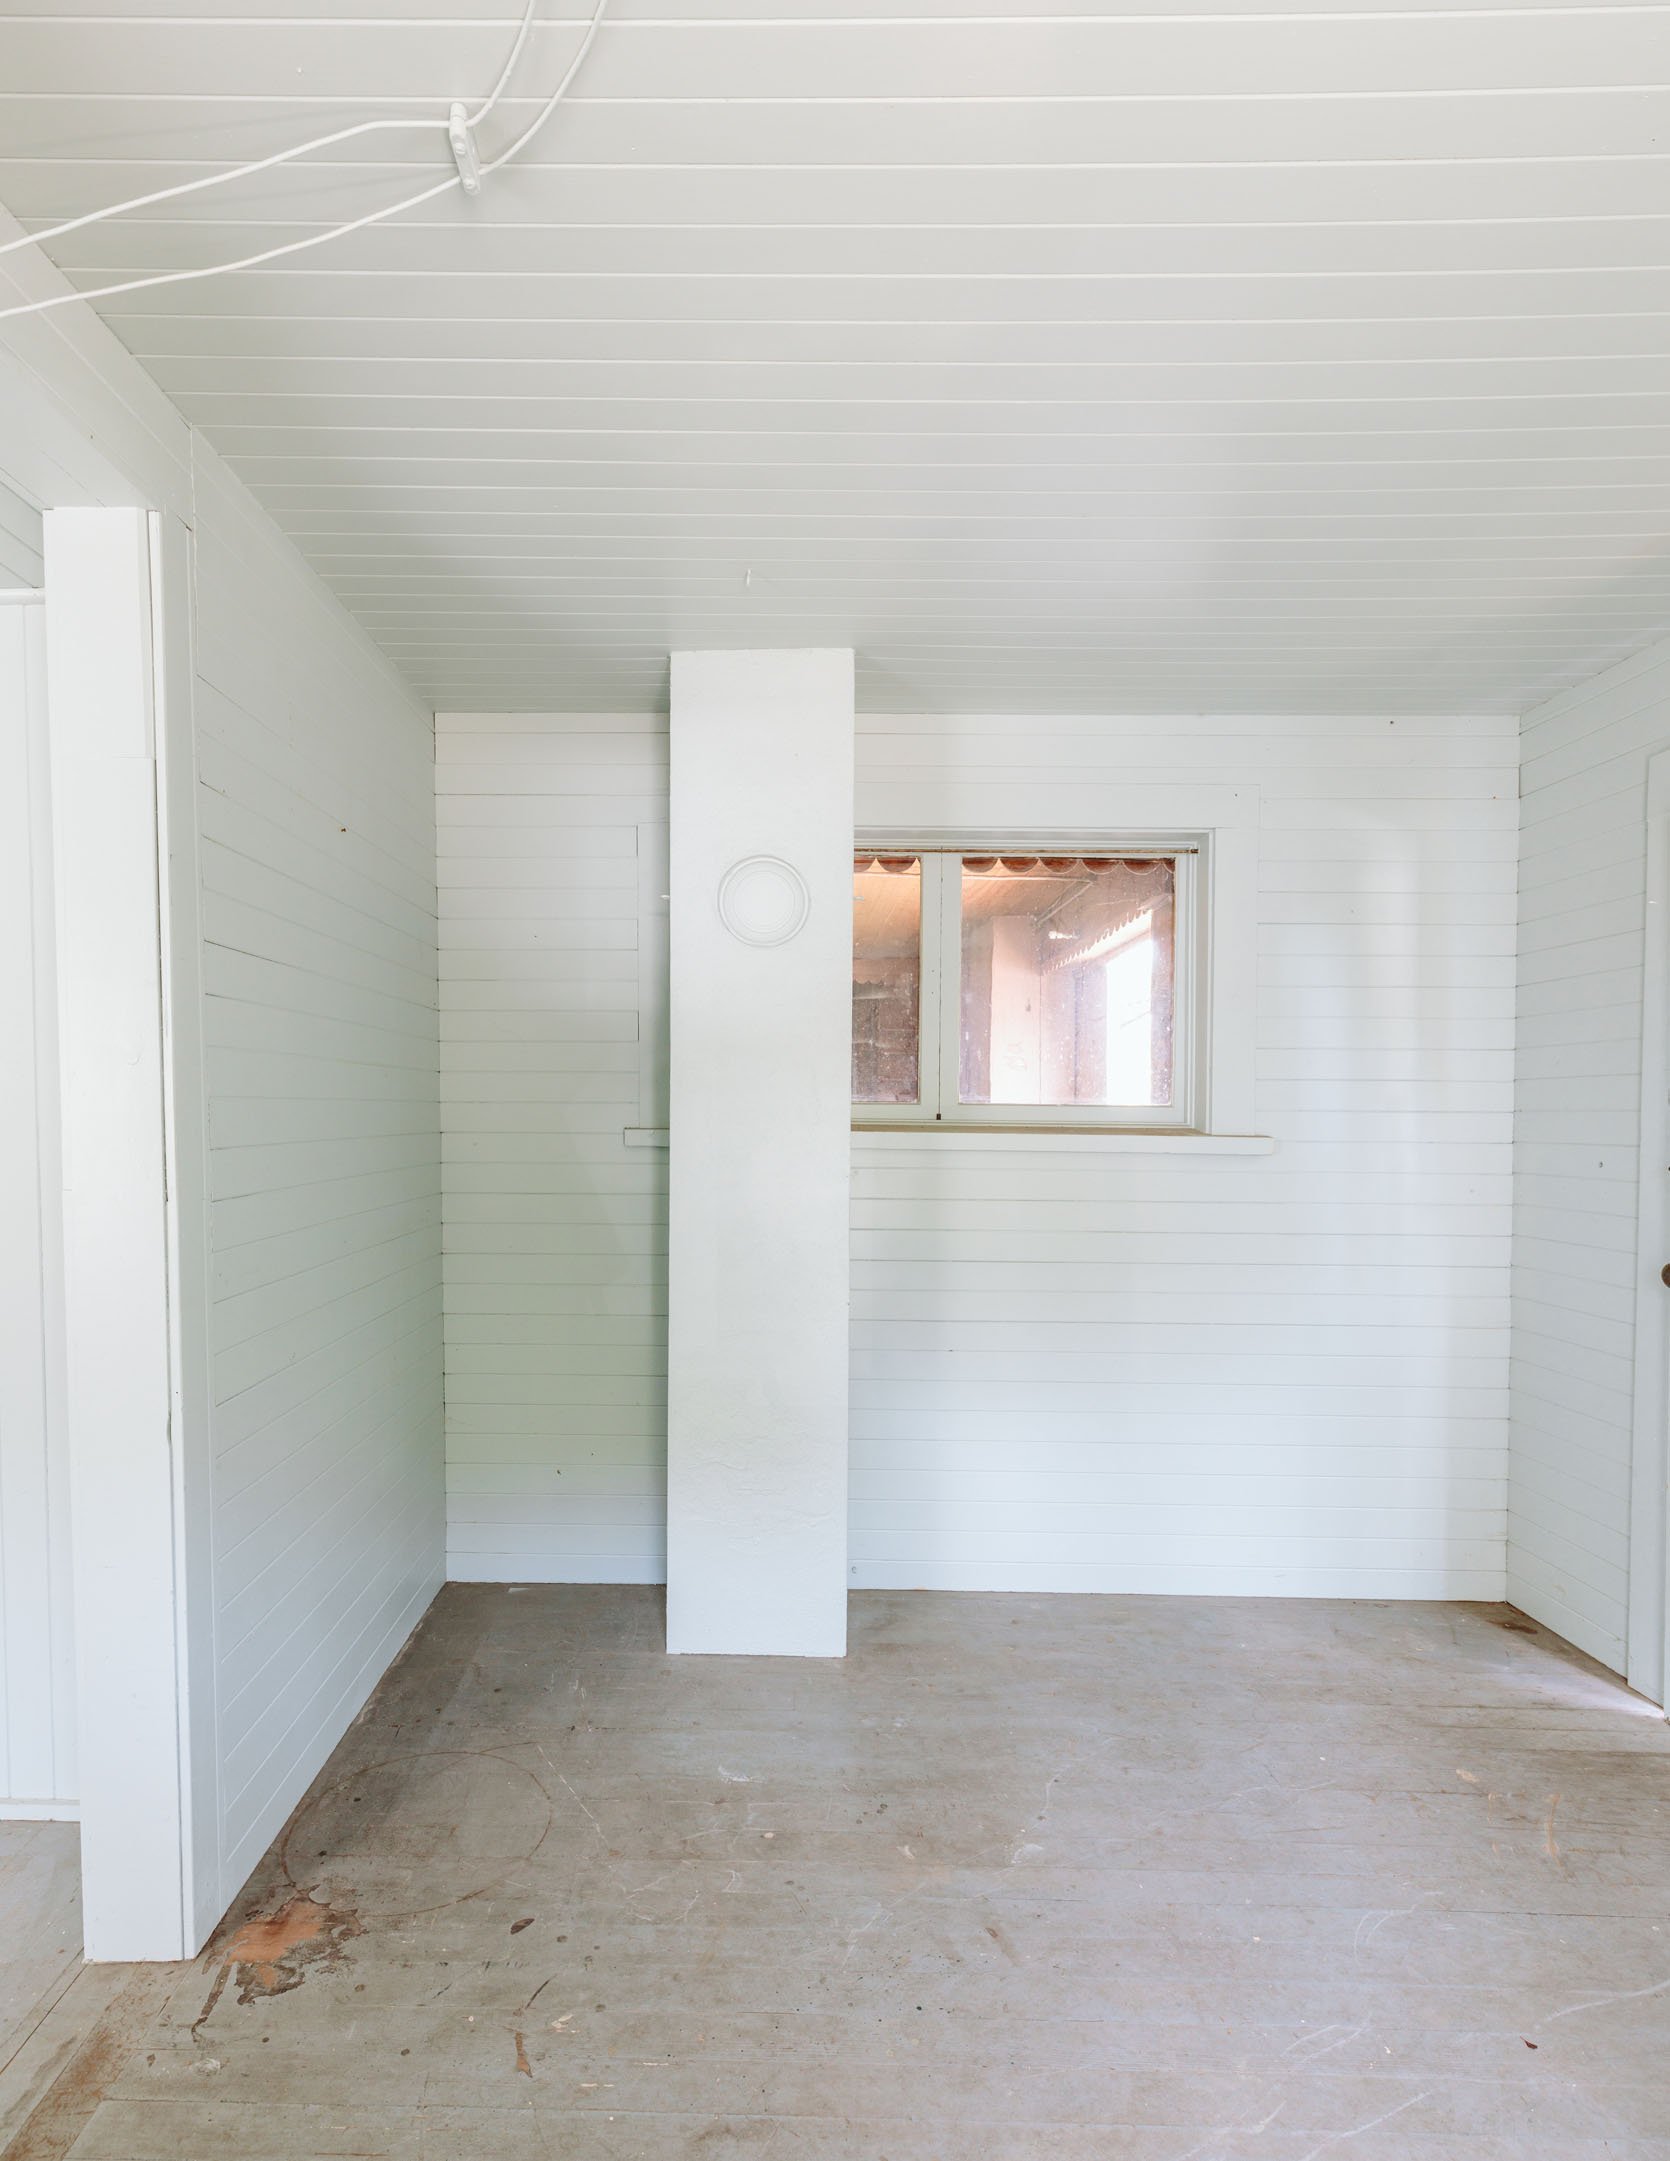
Walking into this room, everyone is in awe of how stinking cute it is – the wood ceiling (in fantastic shape), the scallops (not in great shape, but replicable), and the paint tones. See below…
The green paint inside the old “kitchen” is so beautiful, the blue stairs, the light blue door – I mean, they nailed these tones (and yes, the paint is full of lead paint – more on that later.) This room has one huge window and the big sliding door (light when open, dark when closed). The vibe is 10/10 (says me, I think my kids and Brian have very different opinions on the creepy factor of this house).
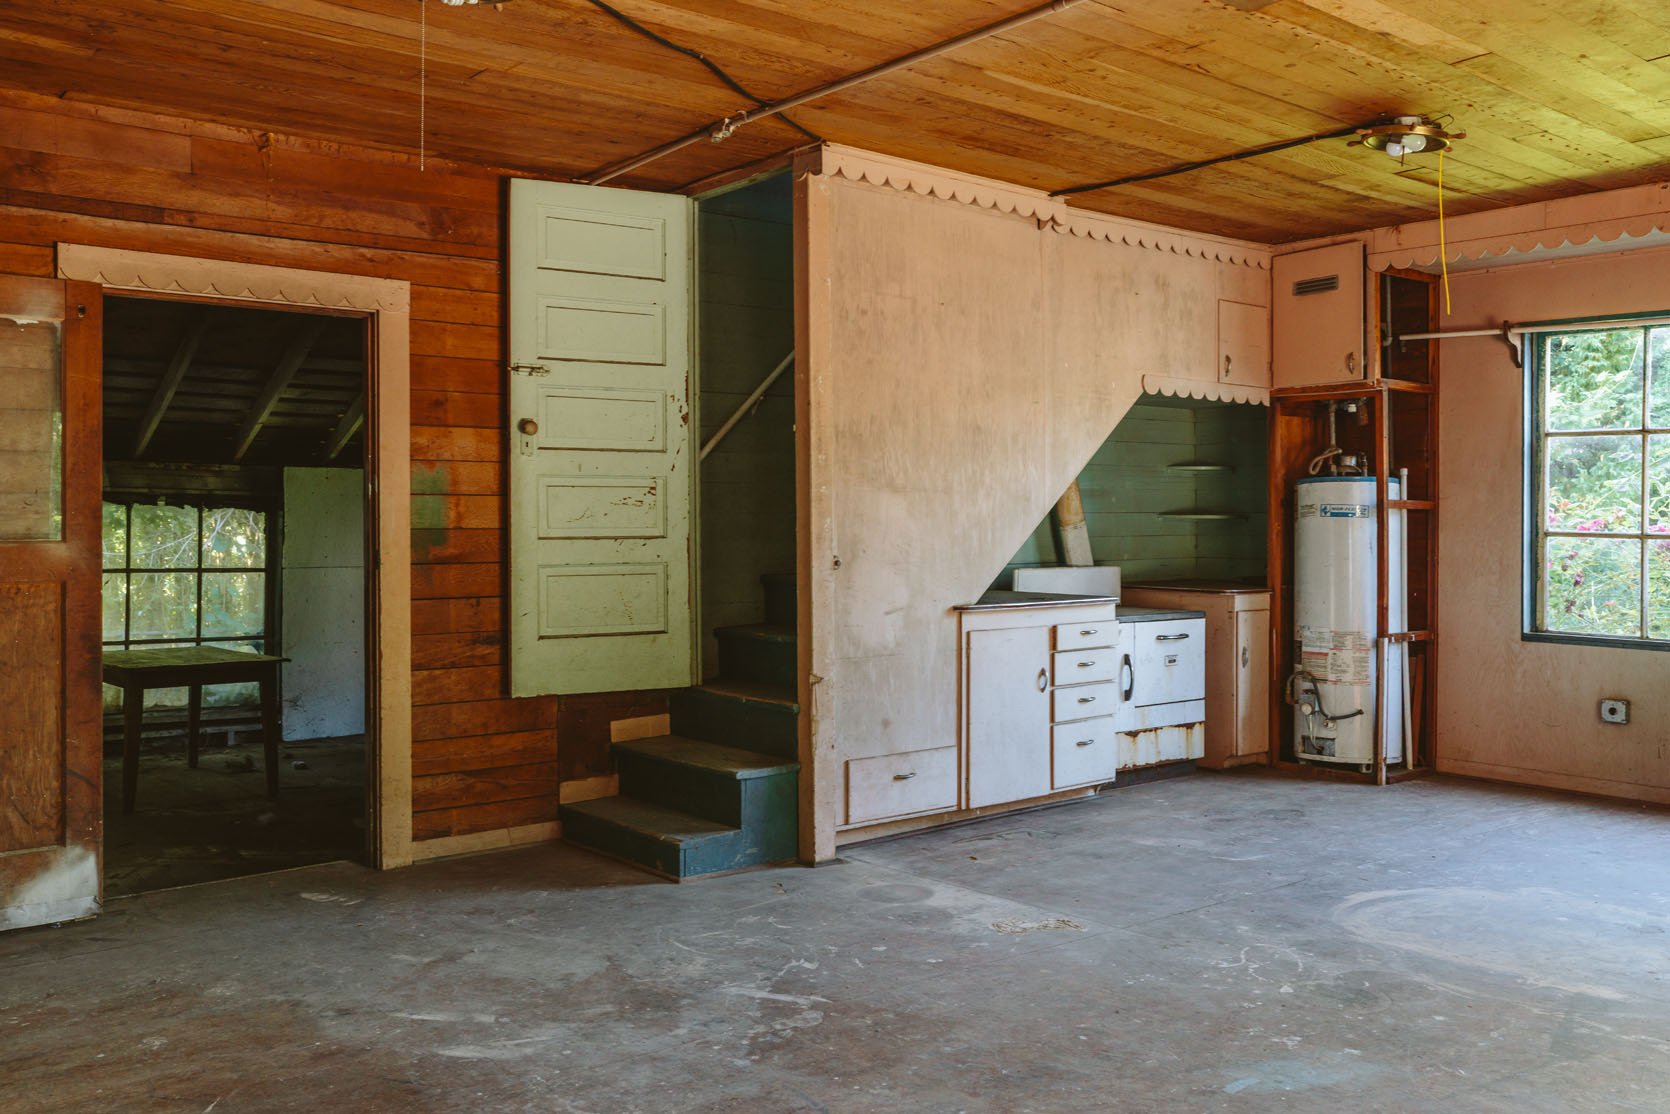
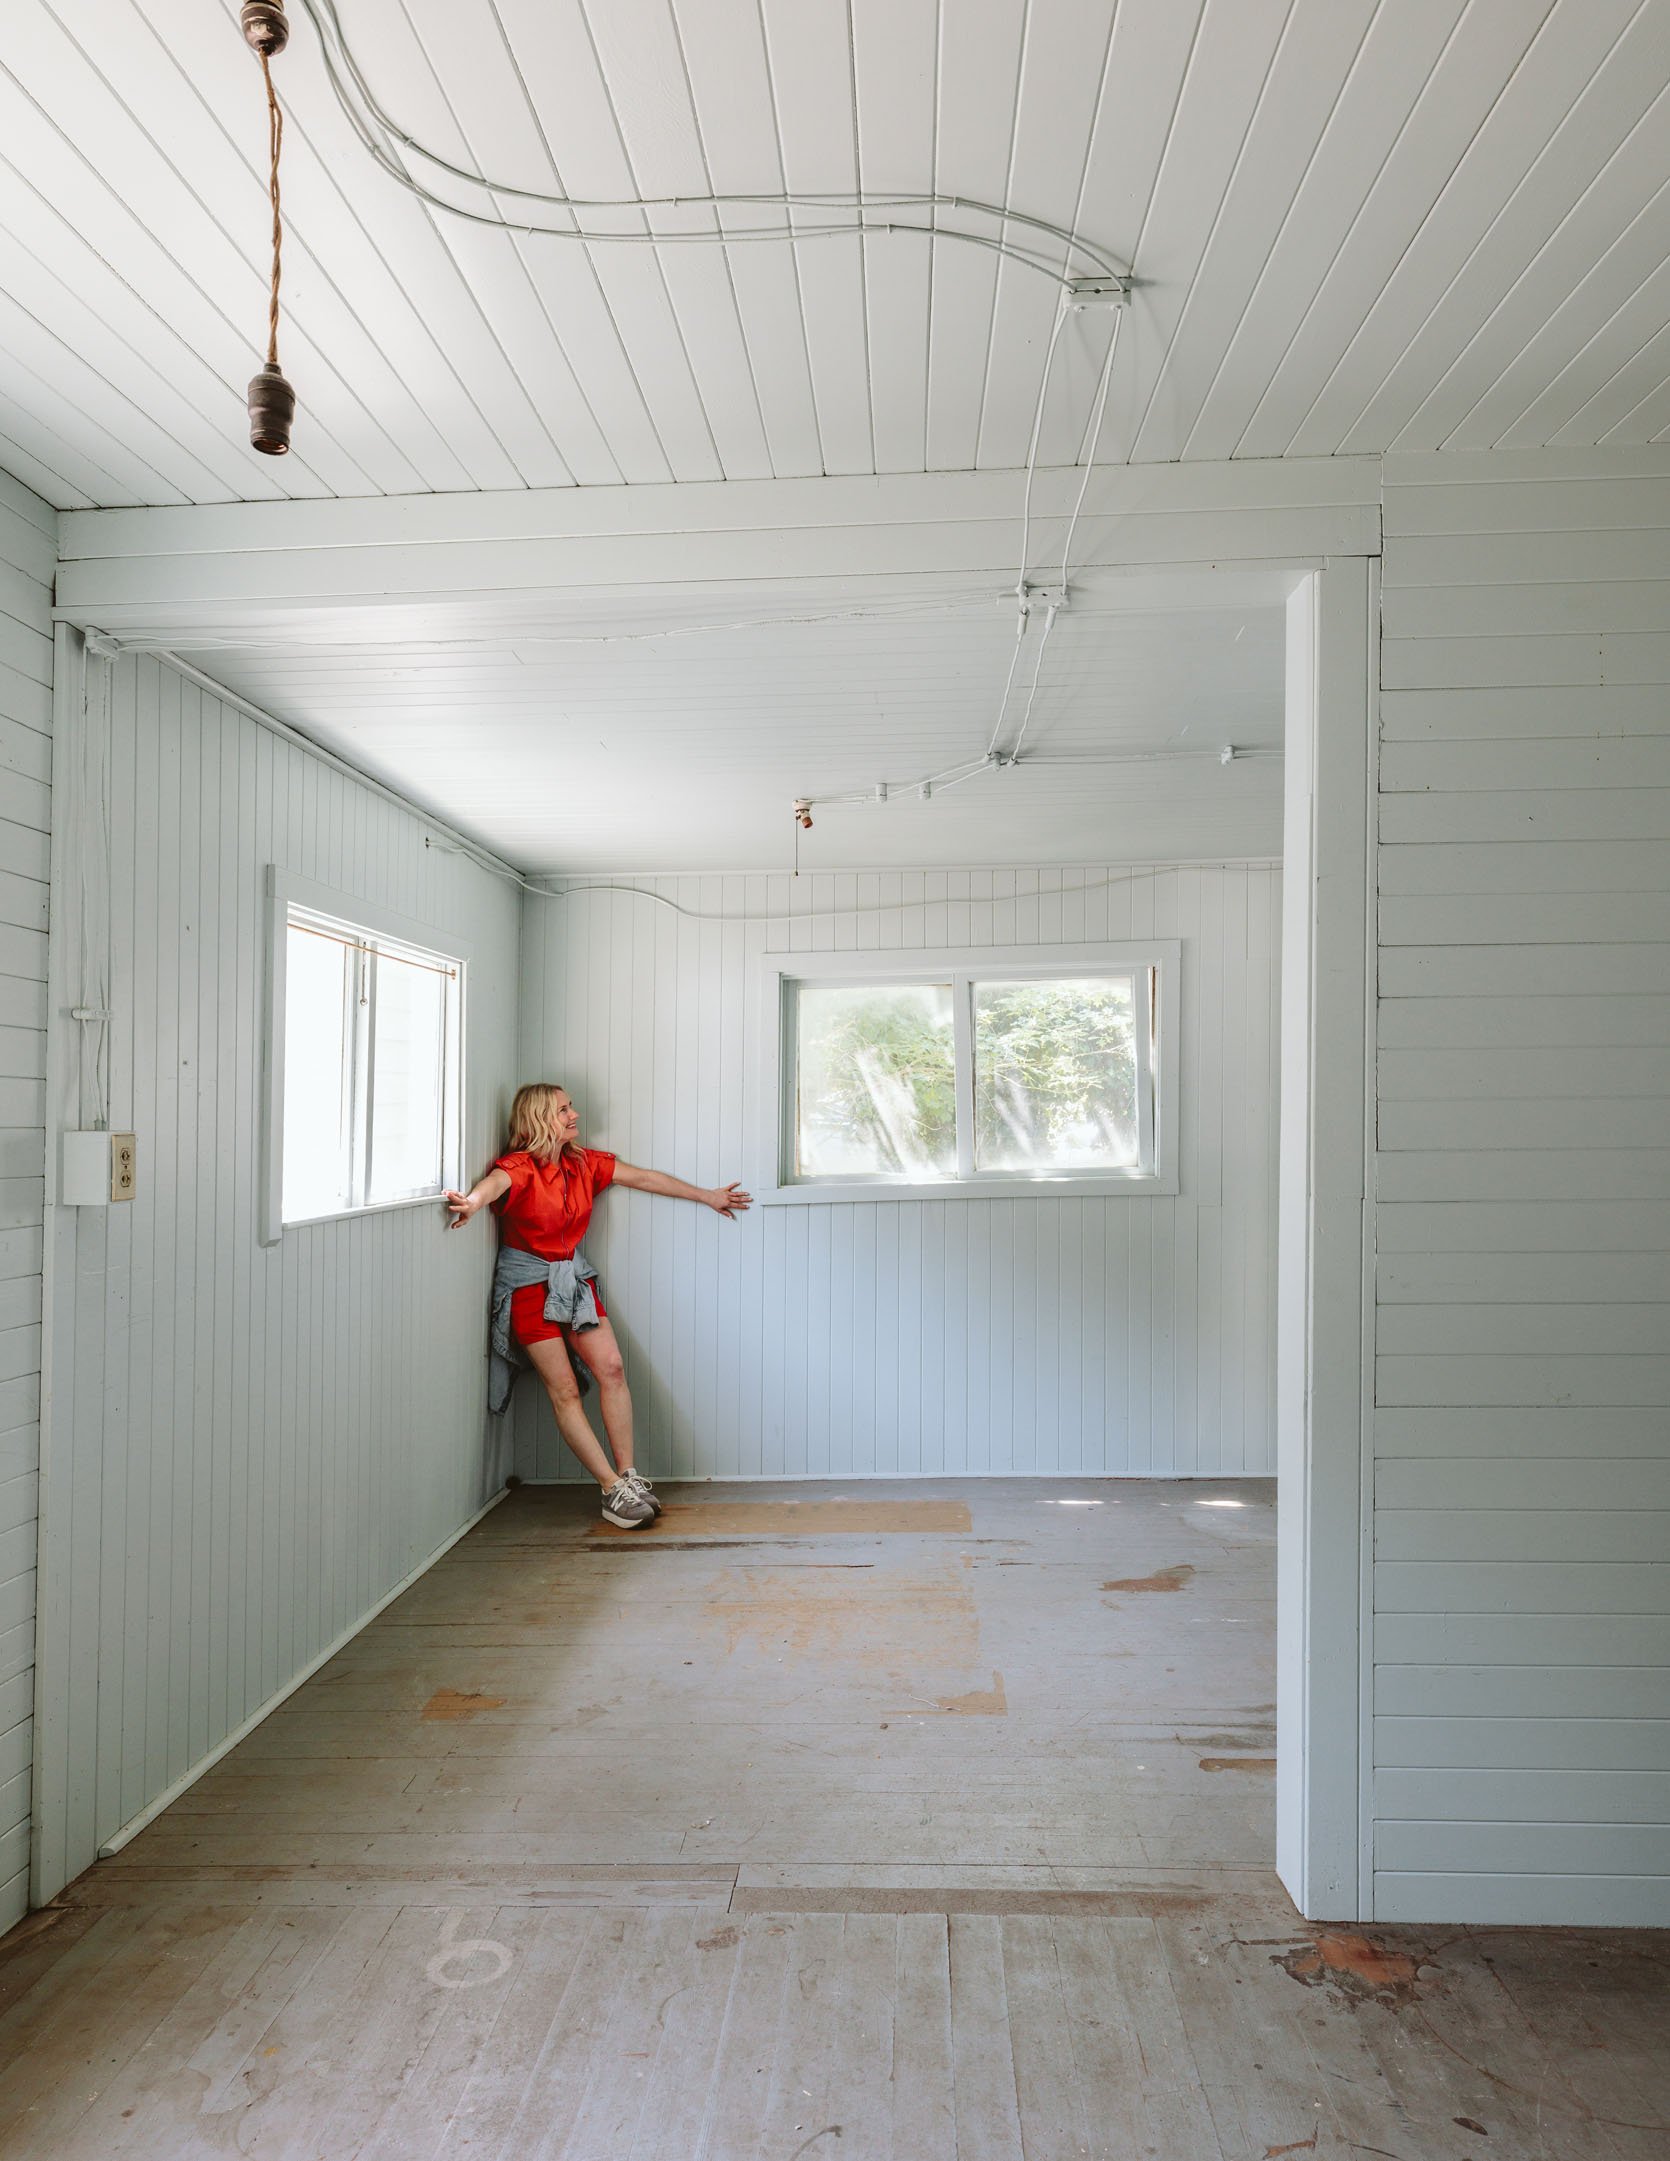
So as you walk in, the turn of the century kitchen is to the right, the old wood burning stove is straight ahead, the stairs to the bedroom floor are in front, the “canning room” is through that dark doorway straight back, and our old prop room (light blue) is to the left. It just occurred to me that I want to do a floorplan for you or maybe even one of those real estate videos where you use an arrow to move you through a house – ooh, that would be so fun!!
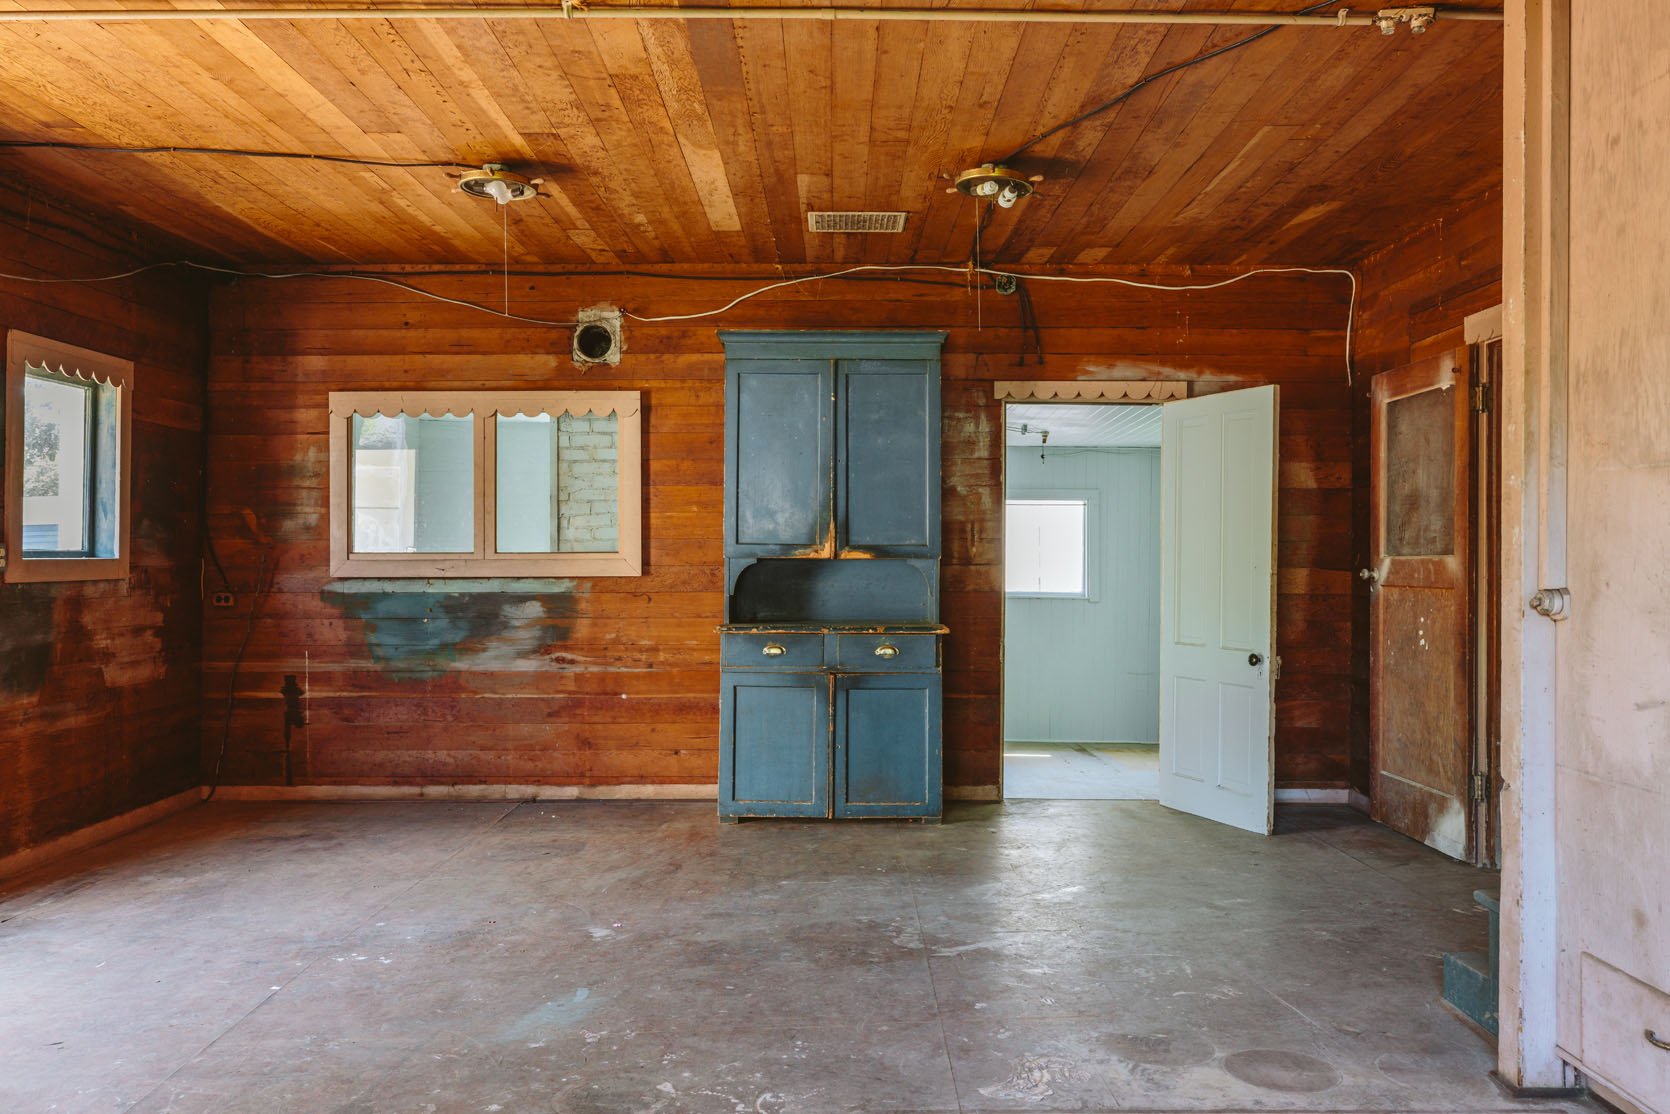
The main room is big enough for a little kitchen, dining table, and sitting area, but we are going to wait til the next post to tell you what are plans are (also because maybe we don’t have them yet, lol). That blue hutch was bought online from Sweden – don’t get too excited, it sadly didn’t come with the house, just too heavy to move for the shots, and clearly looks good in here, so we left it. That interior window was likely an exterior window once, but they added the second room (that light blue room), so they just added on without taking it out. Remember, this was before general contractors did residential homes – everyone just built their own, at least that’s what we were told in this region.
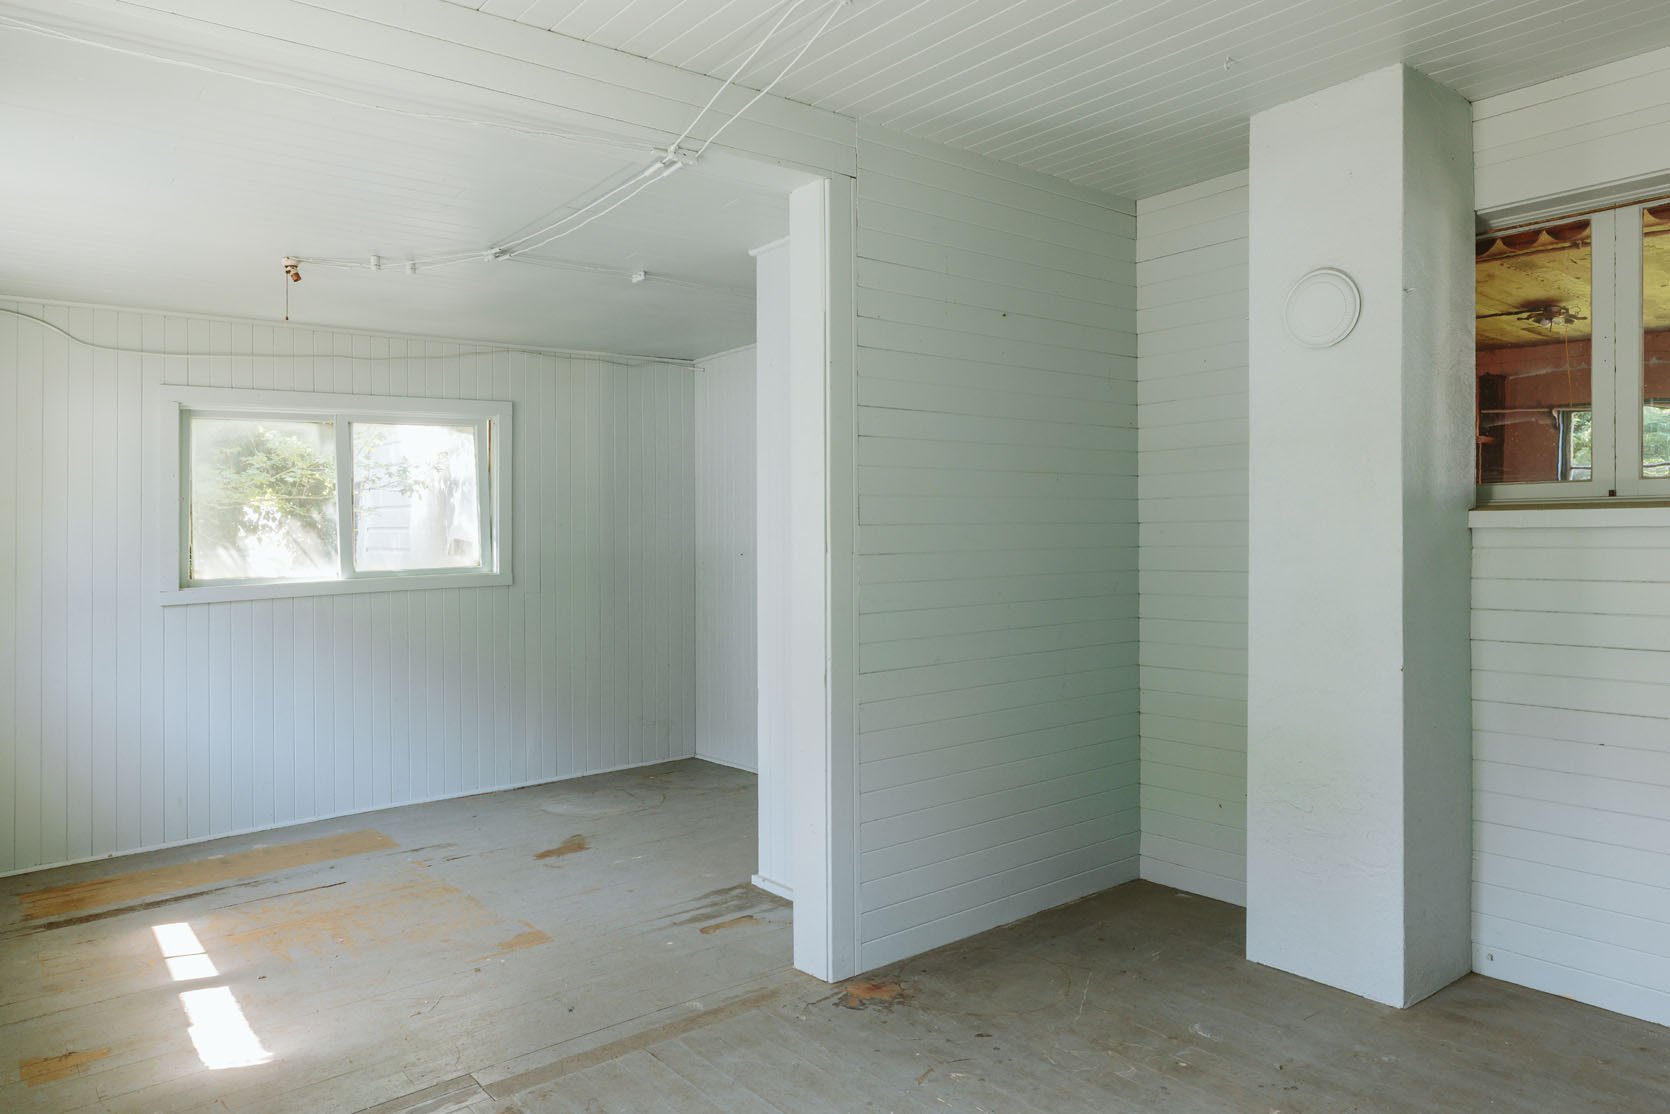
The Old Prop Room
This is the room that we painted a fresh coat of paint before I made it my old prop room (I tried to match the original color, actually, called Rainwashed by Sherwin-Williams, and it’s very serene). It’s awesome – please note the beadboard from floor to ceiling going a million different ways and the original knob and tube electrical (more on that later).
There is a chimney (for the upstairs fireplace) that is right in front of that window. They just added and added, before codes or regulations or any real knowledge of how to do things – all just passed down or taught by learning.
It’s hard to properly express the slope of these rooms (we were told it’s 7″ slope from one side to the other – it’s sinking badly!!). I almost worry that Kaitlin tried to “straighten” these photos too much, so it’s hard to get the full extreme diagonal line. Trust me – these rooms are WONKY as heck. Not a 90-degree angle in sight. It’s like my own personal carnival funhouse!!! Which way is up??
But so sweet. Such potential. Such fantasies.
The “Canning Room”
We think this room, “The Canning Room,” was added in the 1940s or 1950s (which is now 75 years ago) for them to can the fruits and vegetables grown in the orchard and in the garden. You know, before processed food, when most people had to grow their own (I know we can’t go back in time, nor do we want to for a million reasons, and I don’t want to get all Ballerina Farm on us, but what and idea, to just eat what you can grow, can for the winter and not have our lives/bodies inundated with ultra processed foods that our kids are so easily addicted to that become a daily battle). We canned a lot growing up (Mormon), and while I don’t do it, I sure do plan on it every single year.
I doubt this “canning room” was for a business, just a necessity to feed your family. One of the cabinets served as a fridge with dry ice. I guess I just find the history of it all enriching, interestin
The Internet at large is full of ideas for how to “hack” IKEA furniture. Some are unbelievable in a good way. Some, in a bad way. Others make you go “well…as long as you love it.” But anything that requires power tools or even a sewing machine might prove too much for some of you out there—I get it…DIY can often feel more like WDIDT, “why did I do this?!?”. Sure, you can turn a sidewise bookcase or kitchen cabinet box into an upholstered bench, or create a custom design using wooden dowels on the door fronts of an IKEA armoire, but there’s a much easier way to make an enormous impact on your Swedish imports thanks to the plethora of companies out there offering their third-party “after market” products.
I especially like this option for those buying second-hand IKEA or trying to breathe some new life into what they already have on hand (a kitchen being the exception!), as there is a part of me that winces just a bit at buying something new and full-price just to go and spend even more money to make it “better.” In some instances, the math totally works out, but in others, not so much. IKEA pieces are a dime a dozen on peer-to-peer marketplaces, so be sure to check those out if you have something specific in mind and know that there are things you can buy to refresh them if needed.
So, from cabinet doors for kitchens, bathrooms, and closets to “I can’t believe this is IKEA!” slipcovers and even very cute and cool legs, I did some work for anyone who has ever wanted to put their stamp on their big-box purchases without the hassle of true do-it-yourself. Here’s what I found:
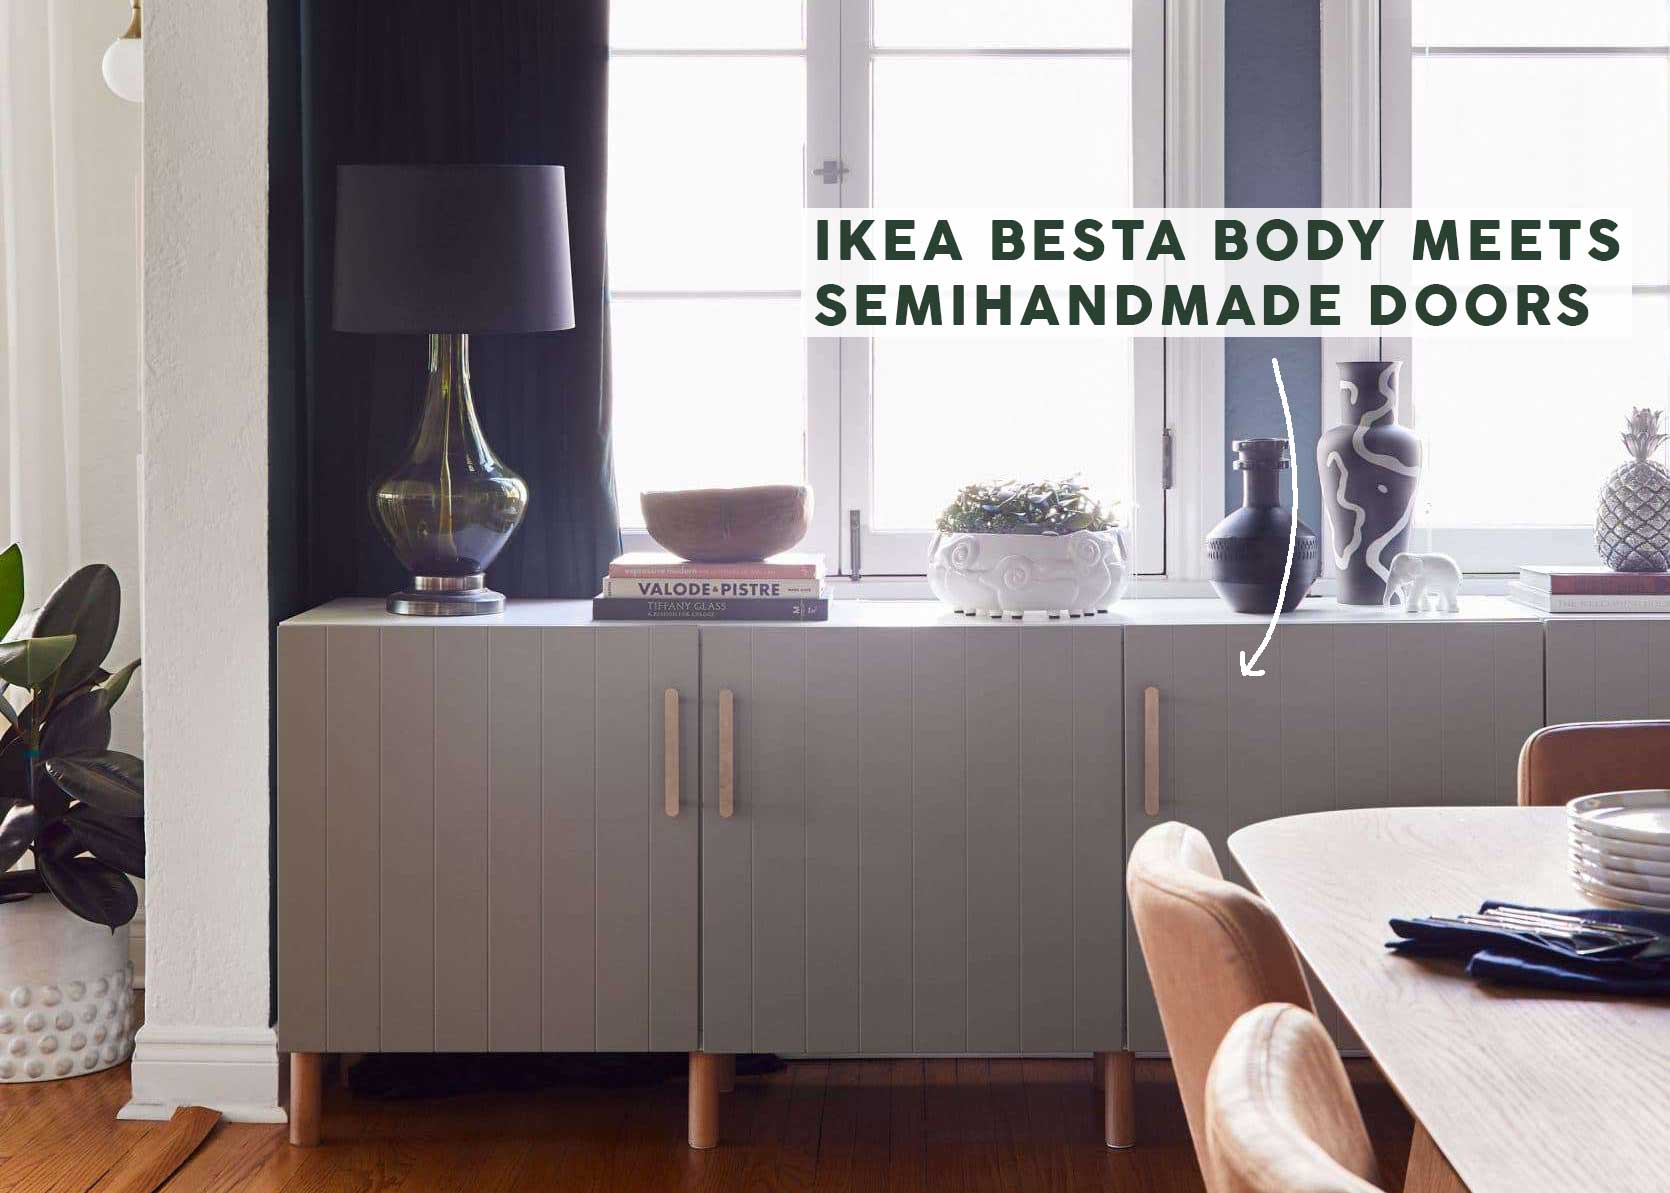
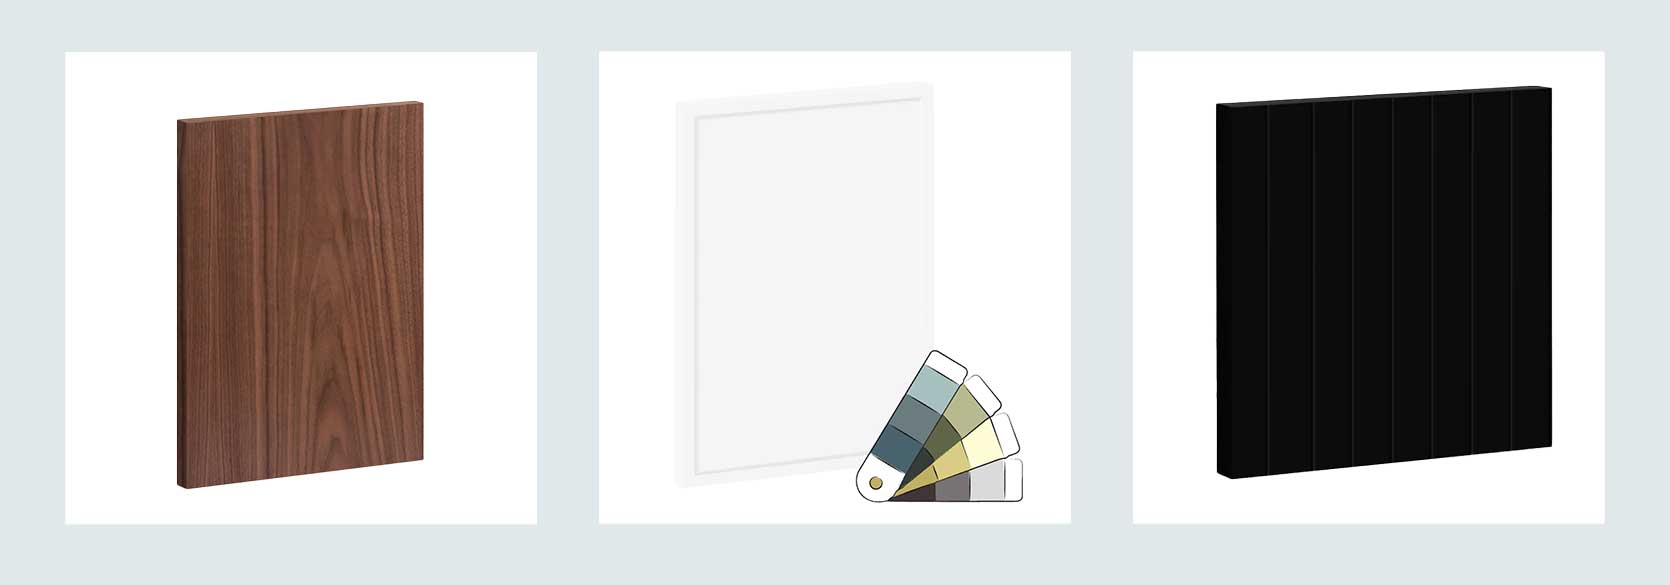
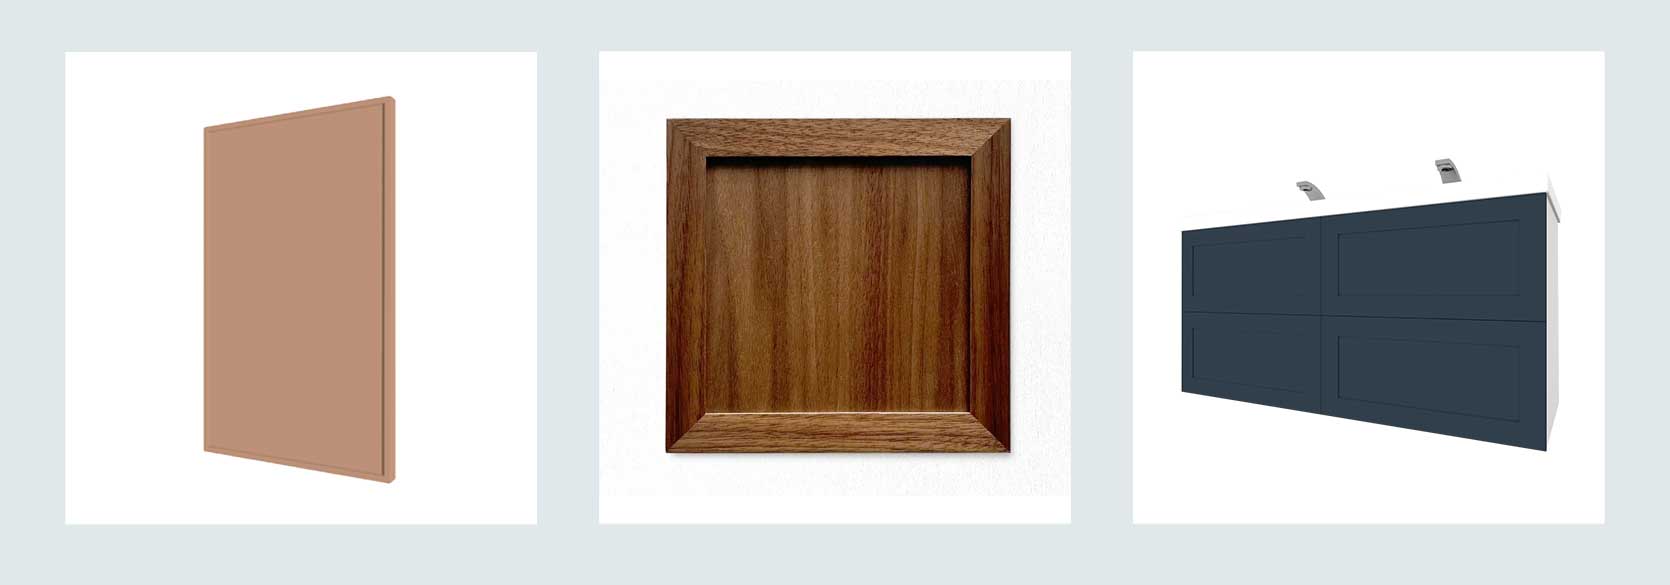
We’re starting with the grande dame of IKEA after-market products: Doors for their cabinetry systems and storage units (typically the Besta, which I have four of and love). Cost-conscious but make it custom-looking—that’s what many of these companies that sell doors and drawer fronts sized to fit Sektion boxes (etc.) offer with their product. I find that most of these places sell very similar looking product with the exception of some specialty things like Plykea (see below), so find the one that matches your budget and time window best, has a design system that you find easiest to use and gives you the option for custom colors or DIY paint if you are after a specific hue or finish.
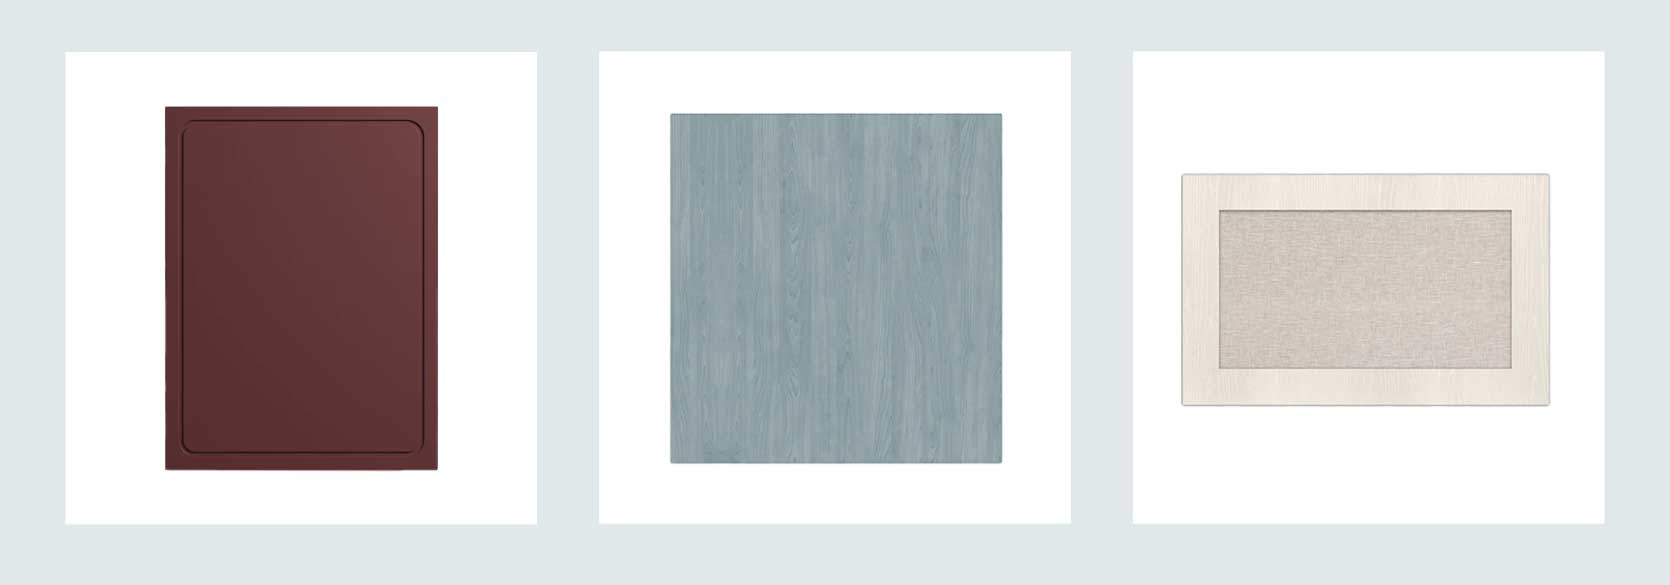
Semihandmade
What They Sell: Doors for Sektion & Akurum kitchen cabinet systems and Besta storage systems, drawer faces for Godmorgon bathroom vanity; one-stop-shop offerings of Caesarstone countertops, floating shelving, and hardware, as well.
Why We Like It:Semihandmade has possibly the most visibility when it comes to IKEA after-market door fronts likely because they tend to work with a lot of designers and content creators. We’re fans of all things Sarah Sherman Samuel, and her line with them is beautiful. They also recently released their painted collection where you can opt for a custom paint job instead of one of their signature brand colors, as long as it’s a swatch from Benjamin Moore, Sherwin-Williams or Farrow & Ball.
What They Sell: Doors, drawers, sides for Sektion kitchen systems, Pax wardrobes, and Besta storage systems
Why We Like It:Fronteriors is woman-founded and run with some super chic design options we don’t see elsewhere. We also love that they have door fronts for the Pax wardrobe. I personally Pinned many of their products for years before they started selling in the US, at which point I went through a deep exploration of their Besta doors to upgrade my living room media cabinet.
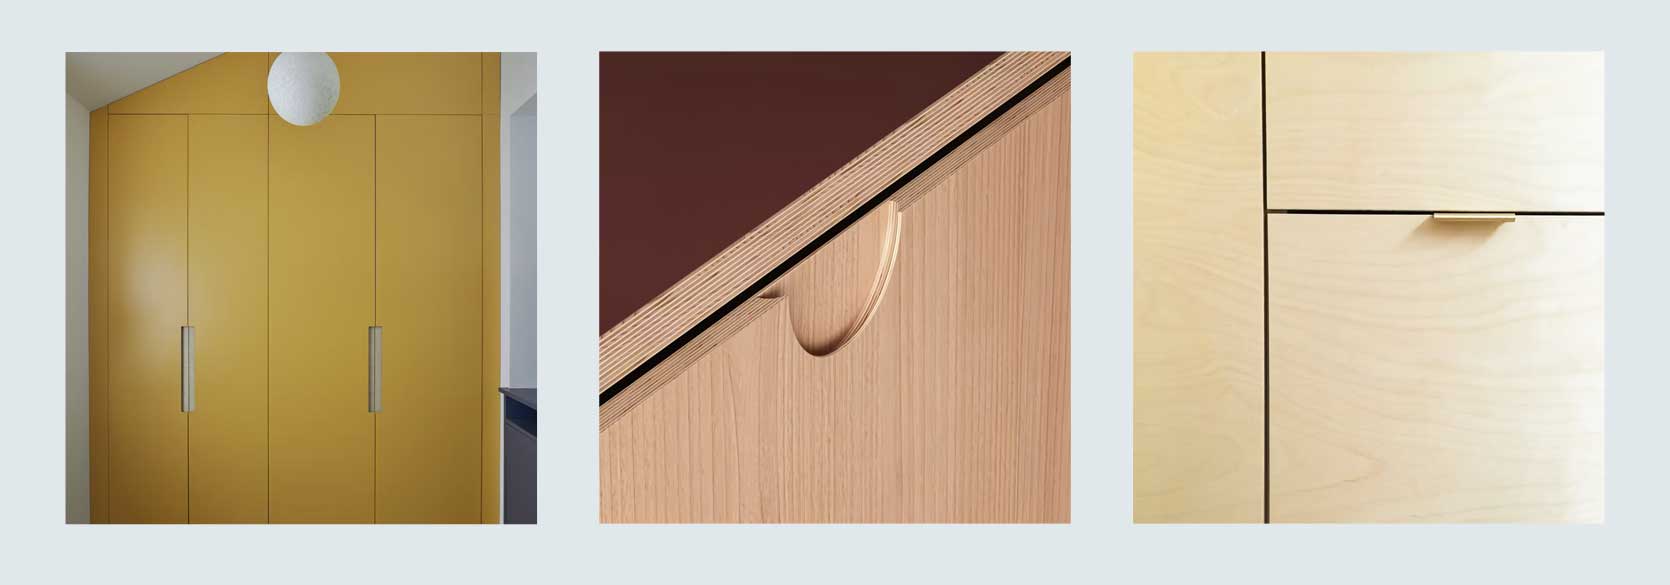
What They Sell: Bespoke plywood door and drawer fronts (even plywood countertops) for Sektion kitchens and Pax wardrobes.
Why We Like It:Plykea definitely has a modern look (very Domino or Clever AD), but a great avenue for anyone wanting something different that is still warm and friendly feeling. You can’t really get a sense of individual products on their website, though, as you have to work with them for quotes to buy a full bespoke kitchen package.
What They Sell: Door and drawer faces for Sektion (including for panel-ready appliances), Pax and Godmorgon
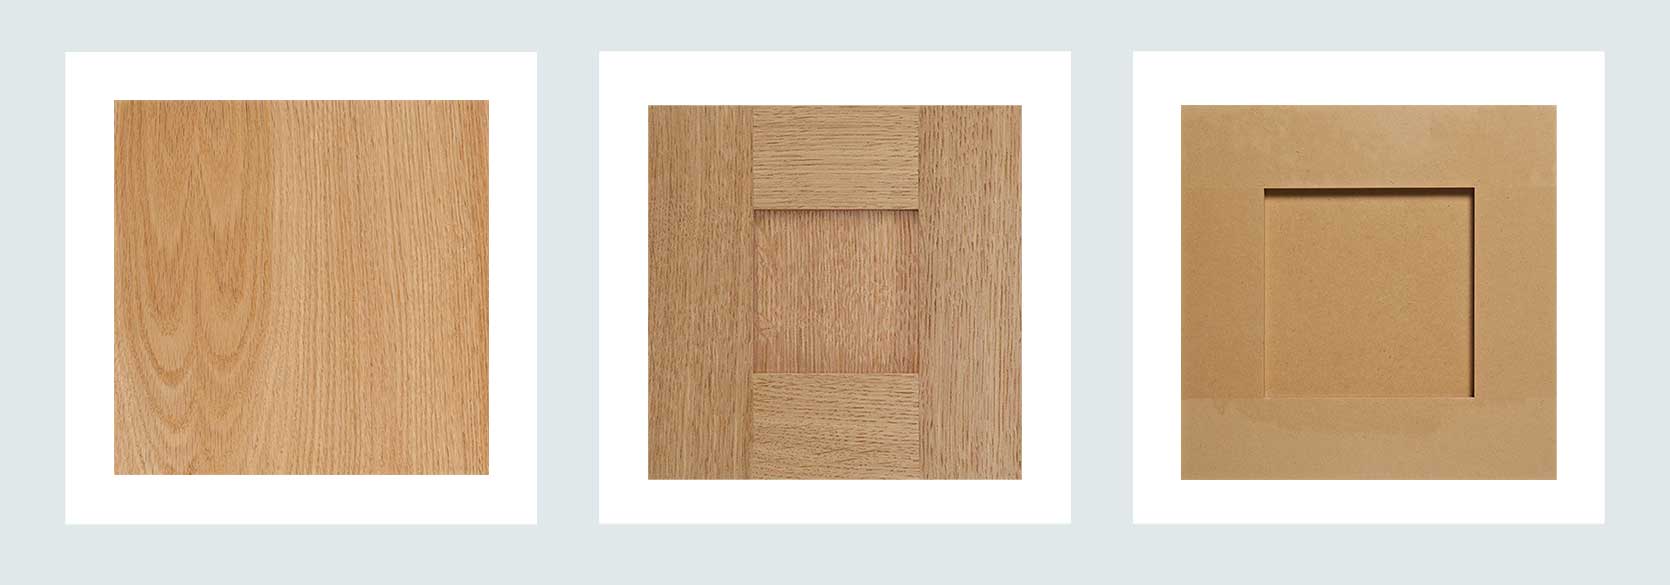
Why We Like It: Much of what you’ll find in kitchen door markets is MDF, but The Cabinet Face also offers solid wood (and wood slab veneer). As I highlight below, the red oak and the quarter sawn oak are beautiful! But yes, you can also opt for their DIY paint grade MDF for your own finishing. For anyone daring enough, they also have high-gloss, metallic gloss or matte finish acrylic slab and Shaker if you prefer that look.
What They Sell: Sektion and Akurum kitchen system doors, Pax wardrobe doors and Besta storage unit doors
Why We Like It:Nieu sells a good variety of Shaker profiles (I like the stepped or skinny Shaker, below) that you don’t see elsewhere—a flat Shaker, skinny Shaker or slab are the most common across the board. Plus, their lead times are great, with raw MDF taking only 3-4 weeks (note that their painted orders could take 6-7 weeks, however). Another great selling point for anyone looking to get their doors painted themselves: You can order primed doors, as well, to save you a step in the process.
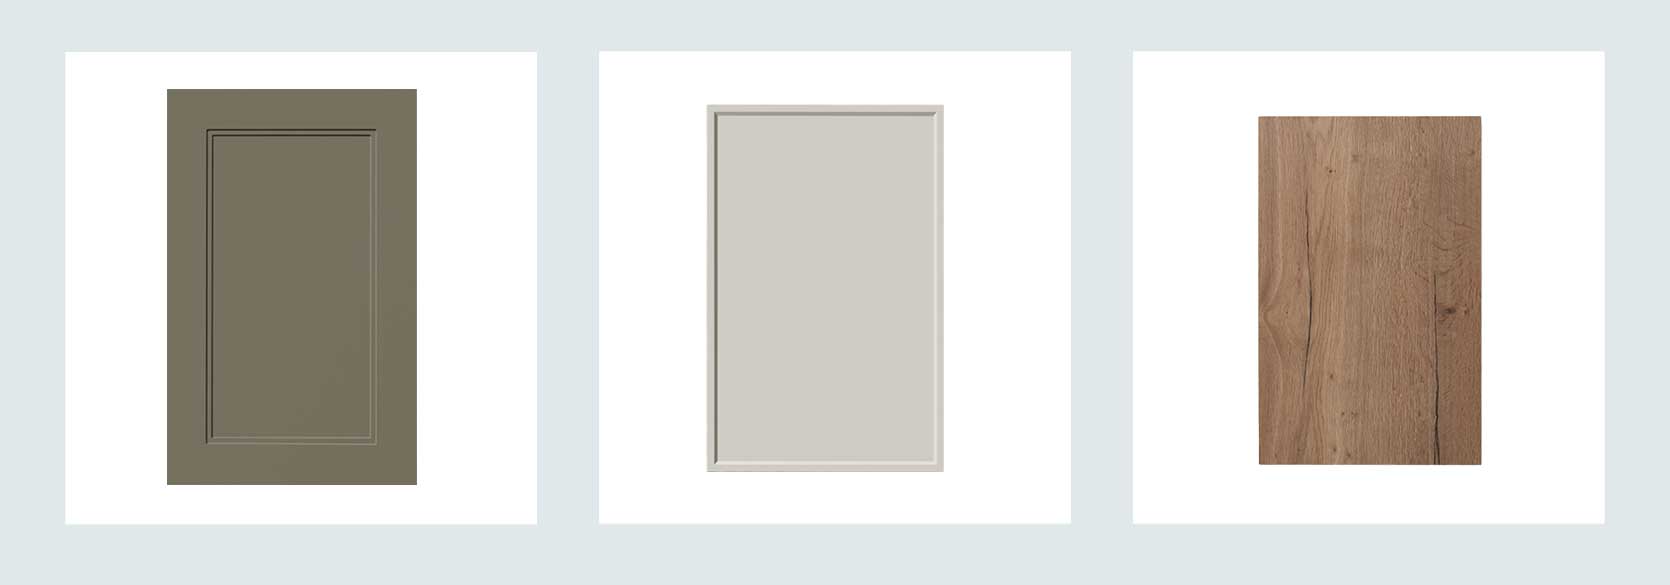
What They Sell: Doors for Ikea Sektion, Godmorgon, Besta, and Pax
Why We Like It:Modern Twig’s wood offerings are fantastic. You can pick between beautiful wood veneer slab doors, solid wood Shaker varieties and faux wood laminate if that’s your thing. But don’t worry, they also hate matte painted in a handful of popular modern colors and two unfinished designs.
Honestly, after virtually shopping around for slipcovers for this post, IKEA sofas have gotten a lot more alluring to me. I have never owned one, so I cannot speak to the quality of the cushions or frames, but if your old Kivik or Ektorp has seen better days, one of the below companies definitely has something to make it look fresh again without having to throw in the towel and get a whole new sofa.
Bemz
What They Sell: Slipcovers for IKEA sofas, sectionals, dining chairs, armchairs, footstools and beyond.
Why We Like It: There are plenty of companies doing the IKEA slipcover game well, but Bemz takes it to the next level with some very cool designs. Some of them can get pretty pricey, so keep that in mind if budget is top of mind for your new couch cover. Everything is made to order so there is no overproduction, and they’re also B Corp certified!


